Download UBCD(Ultimate Boot CD)

Ultimate Boot CD allows you to run floppy-based diagnostic tools from CDROM drives and consolidate as many diagnostic tools as possible into one bootable CD. An experimental feature also allows you to run UBCD from your USB memory stick on newer machines that supports booting from USB devices.
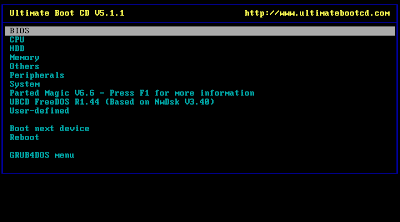

Download UBCD(Ultimate Boot CD)

Current release: V5.1.1
Download formatSizeChecksums
ISO image
360MB[MD5    ] 3d35afcc9150d99fb67cc3c9fe4e6b75
[SHA1   ] 5bc63a1264d124ba96333bb6ed05f725de01e0ef
[SHA-256] 4b09eac9f2bd28d5a3787550d2bee549e20a9f0c688b586f21881baaa0791174
The primary method by which I share the UBCD ISO image is via P2P, because that's the fastest and most economical way a small project with limited budget can share a large file without incurring astronomical bandwidth cost. You can also download through normal HTTP via a network of mirror sites (found below) maintained by volunteers. If you find a particular mirror site to be down temporarily, please be patient and try another one.
After you have download the ISO image file, verify the integrity of the image by comparing the MD5/SHA1 checksum of the image with the values above. For more information about how to generate the image checksum, check out the wiki page on this topic.
Now you need to burn the ISO image to CD. This is another topic that frequently trips up newbies who are not familiar with their CD recording software, such as Nero or Easy CD Creator. Some of you end up burning the ISO file itself to the CD, or some other weird results.
The easiest way to burn the ISO file to CD is to use a small specialized freeware such as BurnCDCC or Active@ ISO Burner. For further assistance, refer to the tutorials section for help with burning the ISO image to CD with various popular CD recording software. Where possible, experiment with CDRW discs instead of CDR discs so that you can start over if something goes wrong, instead of churning out coasters.
After you have burnt the ISO image to CD, you should see the following structure on the CD if you have done it correctly:
c:\ubcd-extracted\
  antivir\
  boot\
  pmagic\
  ubcd\
  autorun.inf
  license.txt
To run UBCD, leave the CD in the CDROM drive and reboot your computer. If you have problems booting the CD, you may need to adjust your BIOS settings to boot from the CDROM drive ahead of your hard disk. Some BIOS have the option of choosing the boot device on startup by pressing a function key. Refer to the FAQ for some suggestions.
If you wish to run UBCD from a USB memory stick, please refer to Making UBCD memory stick.

P2P

DetailsVersion
ISO 
This is a torrent file to be plugged into BitTorrent-enabled browsers such as Opera or BitTorrent download managers such as uTorrent.
Alternatively, you can use this magnet link:
  magnet:?xt=urn:btih:6FNPDSLMRI52JIWESYJK3U26B5XOUZU6
without downloading the torrent file. If you are using uTorrent, select File, Add Torrent from URL... and enter the magnet link.

Mirror Sites

SponsorVersionStatus
ISO 
5.1.1
ISO  
Computer Center/University of Crete
5.1.1
ISO 
5.1.1
ISO 
5.1.1
ISO  
5.1.1
ISO 
5.1.1
ISO 
5.1.1
ISO  
5.1.1
ISO 
5.1.1
ISO 
5.1.1
ISO 
5.1.1
ISO  
5.1.1
ISO 
5.1.1
ISO 
5.1.1
ISO 
Dennis Hecken
5.1.1
ISO 
5.1.1
ISO 
Bergen University College / Norway
5.1.1


10 Windows 7 Registry hacks and tweaks

Windows 7 Registry hacks and tweaks
Windows 7 
Windows 7 needs far less of the sleeves-up shuffling about that its predecessors demanded for smooth operation.
It works, and it works well. But that doesn't mean you can't use the Registry to add nifty features or change the settings to your liking.
Here are ten things you can do with the Windows 7 Registry. Just type regedit in the usual search box and hit [Enter], then follow our tips.

1. Personalise IE8
Bought your PC from an overzealous manufacturer that's gratuitously branded Internet Explorer with its own name? Just want to add your own custom touch in place of the default 'Windows Internet Explorer'? It's easy.
In the registry editor, navigate to 'HKEY_CURRENT_ USER\Software\Microsoft\ Internet Explorer\Main' and create a new string value. Name it 'Window Title', with the space. Then just double-click it and enter your desired window title in the field.
2. Stop Snap
Aero Snap is arguably a very useful feature – we say arguably because, as we're sure you've noticed, it often decides to kick in and glue your windows to screen edges when you don't want it to.
If you're not finding the Snap feature useful, then you might as well turn it off . First, navigate to 'HKEY_CURRENT_ USER\Control Panel\Desktop'. There are a number of settings you could customise here, but the one that you're looking for in this case is called 'WindowArrangementActive'. The value should be 1 – change it to 0 to make this feature inactive.
Alternatively, just make sure you never venture too close to the edge.
3. Change stacking behaviour
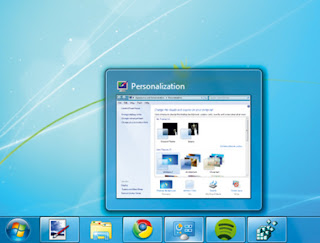
This particular tweak is perhaps of questionable usefulness, but we thought you'd like the option to try it anyway. If you don't like the thumbnail display when clicking on taskbar buttons, then you can change the action and force Windows to open the last opened window of the stack instead.
To do this, open 'HKEY_ CURRENT_USER\Software\ Microsoft\Windows\Current Version\Explorer\Advanced' and create a new DWORD value. Rename it LastActiveClick and set its value to 1 to switch this mode on.
Should you change your mind, you can always go back and delete the key or set it to 0 to revert back later on.
4. Quicker taskbar previews
Are you bored of waiting the couple of seconds it takes for the graphical previews to pop up when you hover over icons on the taskbar? Or would you rather they took longer to appear?

Windows 7 Registry hacks and tweaks
The choice is yours. Go to 'HKEY_CURRENT_USER\ Software\Microsoft\Windows\ CurrentVersion\Explorer\Advanced' and create a DWORD named 'ExtendedUIHoverTime'. Now double-click to open it, click the 'Decimal' radio button, and then change its value to the number of milliseconds you'd like the process to take. The default is 400ms.
5. Change other delays
Stay in the same key (Explorer\Advanced) and you can tweak a couple of other timings.
Add a 32-bit DWORD into the mix named 'DesktopLivePreviewHoverTime'. Switch this to decimal in the same manner as before, then change the value data field to alter the number of milliseconds it takes for the Aero Peek function (minimise all windows) to kick in when you hover over the icon on the right of the taskbar.
Alternatively, do the same with a DWORD called 'ThumbnailLivePreview HoverTime' to alter how long it takes for the windows that are associated with taskbar thumbnails to come to the front.
6. Speed up menus
Make menu items automatically drop down a lot faster with this tweak. Go to 'HKEY_CURRENT_USER\ Control Panel\Desktop', right-click 'MenuShowDelay' and click 'Modify'.
Now change the current string value to something like 100 – hey presto, near-instant menu appearance.
7. Stop space checking
Free up a tiny shred of system resources. Go to 'HKEY_ CURRENT_USER\Software\ Microsoft\Windows\Current Version\Policies\Explorer', create a new DWORD called 'NoLowDisk SpaceChecks' and set its value to 1 to switch off disk space checking.
8. Move the kernel
If the Windows Kernel is in memory, it will run slightly faster than it would if it were on your hard drive. Hunt out 'DisablePagingExecutive' within 'HKEY_LOCAL_MACHINE\SYSTEM\ CurrentControlSet\Control\Session Manager\Memory Management'. Change its value to 1.
9. Change the name
Bought a second-hand machine? Then you might want to alter the name of the registered owner. Go to 'HKEY_LOCAL_MACHINE\ Software\Microsoft\Windows NT\ CurrentVersion\', double-click on the 'RegisteredOwner' key and then change it.
10. Boost speed
There's one tweak that will make every hover action much faster, from tooltips to the Start menu. Navigate to 'HKEY_CURRENT_USER\ Control Panel\Mouse' and tweak the 'MouseHoverTime' value. A word of warning, though: never choose 0 – it's completely unworkable.

Click here for more Registry tweaks...

comments pls...


Add a Floating facebook Like page in blog

Try this new way to Add a Floating facebok Like page in blog.


Adding Jquery Plugin
1. Sign in to Blogger
2. Go to your Dashboard>Design>Edit HTML
3. Add this code above the closing </head> tag in your HTML file:


<script src="https://ajax.googleapis.com/ajax/libs/jquery/1.6.1/jquery.min.js" type="text/javascript">
</script>


Adding Widget Code
1. Go to Design>Add a Gadget>HTML/JavaScript
2. Add This code to HTML/JavaScript Widget


<script type="text/javascript">
//<!--
$(document).ready(function() {$(".ssslikebox").hover(function() {$(this).stop().animate({right: "0"}, "medium");}, function() {$(this).stop().animate({right: "-250"}, "medium");}, 500);});
//-->
</script>
<style type="text/css">
.ssslikebox{background: url("https://blogger.googleusercontent.com/img/b/R29vZ2xl/AVvXsEhOv-pmFoX-4N_HZ3Dko872-NR_FxFnbFOStDs-dL7Z1ZMS_vETIK-5AFi8qV4TB7gmiaPmaORzDvp1Y4ypT2XB_lMaaKkpq3crPKvsFnVF7oPQIW-9_f_Jq7sMVIXL_VNHhsGJDVjIjQgu/s150/w2b_facebookbadge.pn") no-repeat scroll left center transparent !important;display: block;float: right;height: 270px;padding: 0 5px 0 46px;width: 245px;z-index: 99999;position:fixed;right:-250px;top:20%;}
.ssslikebox div{border:none;position:relative;display:block;}
.ssslikebox span{bottom: 12px;font: 8px "lucida grande",tahoma,verdana,arial,sans-serif;position: absolute;right: 6px;text-align: right;z-index: 99999;}
.ssslikebox span a{color: #808080;text-decoration:none;}
.ssslikebox span a:hover{text-decoration:underline;}
</style><div class="ssslikebox" style=""><div><iframe src="http://www.facebook.com/plugins/likebox.php?href=http%3A%2F%2Ffacebook.com%2FAdminsClub&amp;width=245&amp;colorscheme=light&amp;show_faces=true&amp;connections=9&amp;stream=false&amp;header=false&amp;height=270" scrolling="no" frameborder="0" scrolling="no" style="border: medium none; overflow: hidden; height: 270px; width: 245px;background:#fff;"></iframe><span>By <a href="http://www.strikingsoon.com/">Strikingsoon</a> / <a href="http://blogger.strikingsoon.com/2011/08/sliding-facebook-likebox-widget-for.html">+Get This!</a></span></div></div>

Replace http%3A%2F%2Ffacebook.com%2FAdminsClub, with your Facebook fan page URL.

Remember!
Before replacing URL, replace these symbols:
: with %3A
/ with %2F


Interview Questions For Freshers

1 .Tell me about yourself


Good morning sir/madam.

Thank you for giving me this opportunity.

I am Mohana sundari. K koundar and I have born and brought up in Olappalayam.

I have currently pursuing my BE in M. Kumarasamy College of Engineering with aggregate of 89%.

I am from a secular family.

My achievements are won first prize in athlete and first prize in relay during my school days. And I have participated in drawing competition at National level.

My short time goal is to be placed in a good company and my long time goal is to gain knowledge and improve my skills along with the company growth.

My strength is my hard work and my smile.

My hobbies are drawing and gardening.

Thank you.


2. Why should I hire you?
Strengths:

Reacting to the situation properly.
Take the things in a positive way.
Motivate the people to do good in their works.

Weakness:

I expect more from my work and I want to complete all the things.


3 .Why do you want to work at our company?


Sir/madam,

Your concern is good at all business oriented deals in the world market. If I given an opportunity it is easy for me to develop my personality and i'll get more knowledge and I dedicate my ideas and passion for the development of your concern.


4 . How do you feel about working nights and weekends?
I complete my work within the time limit if the organisation demand to work at night or weekends I definitely do, because I help other in critical situation.
5.Can you work under pressure?
Working under pressure also teach lesson in our life, we are under pressure only from the date of joining school till now we have been suppressed by pressure many times, because at that time only our inner talent come out of the shell. It is easier to ride the cycle in the direction of wind, difficult against the wind but when we want to go in that direction surely we will.
6.Are you willing to relocate or travel?
Relocation or travel based upon the situation only we will decide, at that situation what we feel comfortable do that thing only, without comfort we can't work properly. So anything should be in frank, honest and fair manner.
7.How long would you expect to work for us if hired?
I expect to work till I and the company are satisfied in my work for the company. If company is satisfied and there is no bond and everything seems comfortable to me. I will work as long as my service needed by the company.


8.How much salary do you expect?
As a fresher salary is not my first priority, I only needed to improve my skill and learn new things. So whatever company offers is OK for me.
9.Do you have any questions for me?
Thank you all, hmm, I have only one question. This is because you have been very thorough and covered most of the important areas that I wanted to ask about. Thank you for your professionalism. When should I expect feedback?

how to enable DISQUS COMMENT BOX in blogger

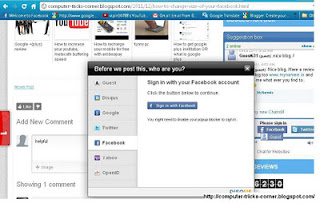
DISQUS is the best COMMENTING PLATFORM which gives total freedom to all of your visitors no matter where they came from ( facebook ,twitter, online search or from where ever). they can give there views with having a identity. DISQUS COMMENT BOX also gives your blog a great look and improve your blogs interface .Disqus lets your visitor to comment as by using any of following ids.
how to enable DISQUS COMMENT BOX in blogger

So all the visitors will have lots of option to choose from and will have there unique identity. 
they can also use OPENID or GUEST id to submit there views if they want to..!

NOW HOW TO ENABLE DISQUS COMMENT BOX IN YOUR BLOG:-
It will only gonna take 4-5mins to setup DISQUS COMMENT BOX in your blog
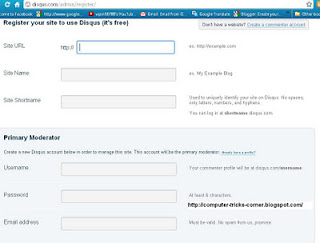
First of all goto disqus and register your blog click here to register your blog.

                                                  THIS WINDOW WILL OPEN
                               Fill all the required  fields and click on ' CONTINUE '
HOW TO ENABLE DISQUS COMMENT BOX IN YOUR BLOG

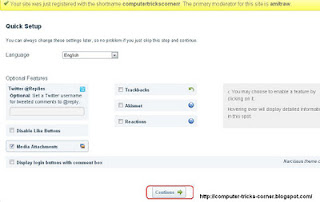
  • After clicking " CONTINUE " the following window will open . in this window simply click on " continue "(at bottom of the window). no need to fill any field. just click on "CONTINUE"
IN THIS WIDOW NO NEED TO FILL ANYTHING SIMPLY CLICK ON " CONTINUE
HOW TO ENABLE DISQUS COMMENT BOX IN YOUR BLOG
  • After clicking on " Continue " following window will show up, in this window click on "BLOGGER ".


CLICK ON " BLOGGER "
  • After clicking on " Blogger " following window will show up, in this window simply click on the tab under 3rd option which says " Add site " your_site_name" to blogger.
click on the tab under 3rd option which says " Add site " your_site_name" to blogger.
Now  select a blog in which you want to add DISQUS COMMENT BOX . fill the title and click on " add widget ". 

IN THIS WINDOW CLICK ON " Add Widget "


  • Now you can see DISQUS COMMENT BOX  in your layout and as well as in your blog..!

  • To check it you have to click on a particular post. in you blog...! !! :-)


HOW TO ENABLE DISQUS COMMENT BOX IN BLOGGER

Picture Resizer 6.0


If you need to run a simple resize of a whole batch of JPG files then Picture Resizer is probably the easiest way to do it. Just rename the program's 389KB executable to indicate the size you need on the longest axis - PhotoResize640.exe if you're resizing from 800x600 to 640x480, say - then drag and drop the images onto the program and it'll resize them for you, storing the new versions in the same folder (Picture.jpg would become Picture-640.jpg).
You want to resize by a percentage, or without preserving the aspect ratio? Picture Resizer can do that, and more - the author's site explains all. 
[http://www.rw-designer.com/picture-resize]