Reuse an old router to bridge devices to your wireless network


Reuse an old router to bridge devices to your wireless network(Credit: Ed Rhee/CNET )
Many smart or connected devices come with wired-only connections (Ethernet), like your TV,game console, DVD player, TiVo, or other streaming-media device. Unless your Internet modem or wireless router happens to be at the same location as those devices, connecting them to your wireless network can be a challenge.
Possible solutions include, power-line adapters, dedicated wireless adapters for each device, or installing Ethernet jacks. Unfortunately, those options can get expensive and each has its unique drawbacks. Another option is using a wireless bridge. A wireless bridge connects two wired networks together over Wi-Fi. The wireless bridge acts as a client, logging in to the primary router and getting an Internet connection, which it passes on to the devices connected to its LAN Jacks. You can buy a dedicated wireless bridge, but if you have an old router lying around, you might be able to convert it into a wireless bridge using DD-WRT.

Client Bridge mode
A wireless bridge connects two wired networks together over Wi-Fi.


DD-WRT is free Linux-based firmware for routers that replaces the router's factory firmware. It can breathe new life into an old router, giving it enhanced performance and new features. One of the features of DD-WRT is the ability to switch the router's function to a wireless bridge.
This tutorial, based on the DD-WRT Wiki, will go over how to configure DD-WRT for use as a wireless bridge (client bridge mode), using a Linksys WRT54G router as an example. The process is fairly straightforward but will require some time and patience to complete. In the steps below, primary router refers to the main router that you'll connect to, while bridge routerrefers to the router you're configuring as a client bridge.
Step 1: Check the DD-WRT router database to see if your router is supported. If your router isn't supported, keep an eye out at The Cheapskate blog for router deals. Rick Broida recently found a refurbished router with DD-WRT support for just $9.99.
Step 2: If your router is supported, you'll see it listed in the database and it'll include links to the firmware. It may also include device-specific directions on how to install DD-WRT, but you'll want to read over the general installation notes as well. In some cases, you'll need to install a firmware prep, prior to installing the actual DD-WRT firmware. It's possible to brick your router during installation if not performed correctly, so read the directions carefully and follow each step as noted.
Step 3: Once you've successfully installed DD-WRT, perform a hard reset on the router. This usually involves holding a reset button/pin for 30 seconds or until you see the router's lights flashing. Refer to your router's user manual to figure out the exact method for a hard reset.
Step 4: Connect an Ethernet cable from your computer to one of the LAN jacks on the bridge router, then set a static IP address on your computer. Use something like 192.168.1.10, so you'll be on the same subnet as the bridge router, which will have an IP address of 192.168.1.1.
Step 5: Open a Web browser and enter 192.168.1.1 in the address bar. The DD-WRT Web interface will appear and you'll be prompted to change your username and password. Choose a username and password, then click the Change Password button.
Step 6: Go to Wireless > Wireless Security, then set the same Security ModeAlgorithm, andShared Key as your primary router. Click Save.

Step 7: Go to Wireless > Basic Settings, then change the Wireless Mode to Client Bridge. Set the same Network Mode and SSID as your primary router. If your bridge router is an N router, you may also need to set the same wireless channel width as your primary router. Click Save, then Apply Settings.
Step 8: Go to Setup > Basic Setup, then fill in the router IP info. For the local IP address of the router, choose an address in the same subnet as your primary router. If your primary router is on the 192.168.1.x subnet, choose something like 192.168.1.15. Leave the Subnet Mask as 255.255.255.0 and enter the IP address of your primary router as the Gateway. Leave Local DNS blank and select your time zone. Optionally, you can check the box to Assign WAN Port to Switch. This converts the WAN port to a LAN port, providing you with an extra port on your bridge router. Click Apply Settings.


Step 9: Log back in to your bridge router using the new address you set (192.168.1.15).
Step 10: Go to Security > Firewall, then under Block WAN Requests, make sure that only "Filter Multicast" is checked. Click Save.


Step 11: Under Firewall Protection, make sure "SPI Firewall" is disabled, then click Apply Settings.
Step 12: Go to Setup > Advanced Routing, then set the Operating Mode to "Router." Click Save.

Step 13: Remove the static IP address from your computer and re-enable automatic IP addressing. At this point, the bridge router should pass along an IP address from the primary router to your computer, giving you access to the Internet.
Step 14: Once you've verified that your computer can access the Internet while physically connected to the bridge router, you can disconnect your computer. You're now ready to connect your wired devices to the bridge router from anywhere in your home (within range of your primary router).
Notes:
  • If you're using MAC filtering on your primary router, you'll want to add the bridge router's wireless MAC address, not the LAN MAC address that's usually printed physically on the router. To find the wireless MAC address, go to Status > Sys-Info.
  • If your primary router is a Wireless-N router, but your bridge router is a Wireless-G router, you may need to set the wireless mode to a setting that supports b/g networks.
That's it. Now you can connect all your wired devices to your wireless network, even if they're not next to your primary router. It's worth mentioning that a wireless bridge is also useful when the scenario is reversed. If you have your Internet modem and primary router next to your TV, but need connectivity to your computer in another location, you can use the wireless bridge to provide a connection to your computer, printer, NAS, etc.

Courtsy : www.cnet.com

Best Boot CD Creator

Best Boot CD Creator

Some malware can best be removed if the infected system, including the malware itself, is not active during the cleaning. To use another system, one needs either a second full installation, or a operating system bootable from CD. Boot CD Creator create a bootable CD with a minimum of interaction by the user required. Boot CD Creator automates the difficult parts and tries to be as simple as possible using these steps nearly every user should be capable of.

Download Boot CD Creater

Click here for other Boot CDs...

Lock and unlock computer with a USB drive


Lock and unlock computer with a USB drive

If you prevent access to your computer with just a password, you are missing out on an alternate (and more secure) way to lock down your computer.
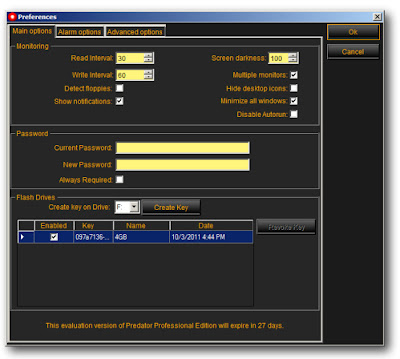
Predator, a free Windows program, turns your USB drive into a key that locks your computer when it's removed. To unlock your computer, you'll have to plug the USB drive back in. 
Anyone who attempts to access your computer without the USB flash drive will be hit with an epic "Access Denied" message. To get started, follow this guide:
Step 1: Download and install Predator.
Step 2: Once Predator launches, plug in your USB flash drive. None of the contents of the drive will be deleted or altered in any way, so feel free to use your primary thumbdrive.
When you insert the drive, a dialog box will appear asking you to create a password. Click OK to continue.
Step 3: In the Preferences window, take note of a few key settings. First, enter a secure, unique password in the "New password" field. If you lose your USB drive, you'll use it to unlock your computer.
If you'd like, you can check the Always Required box and you'll be asked to enter the password each time you use your thumbdrive to unlock your PC.
Lock and unlock computer with a USB drive
Finally, in the section under Flash Drives, ensure that the correct USB flash drive is selected. When you're done, click "Create key" and then OK.

Step 4: Predator will exit. When it does, click the Predator icon in the taskbar to restart the program. A few seconds later, the icon will turn green, alerting you that Predator is running.
Every 30 seconds, Predator will check to see that your USB drive is plugged in. If it isn't, your computer will dim and lock down.
Here are some extra tips:
  • To pause Predator at any time select "Pause monitoring" from the taskbar menu.
  • If someone tried to access your PC while it was locked down, you'll see the activity log when you log back in. You can see the log at any time by clicking "View log" from the taskbar menu.
  • Predator's Web site has several cool how-tos, including one that shows you how to program your computer to take a snapshot each time someone tries and fails to log in to your computer. Check it out.


Linux Class Room: Introduction


Hi ,


Today I am going to start a new Session in this bog , focused on the people who are coming newly to Linux field.

Like every new guys in this field I also had a lot of doubts while changing to Linux field.At first it will not digest to new guys especially those who are changing from the windows background.Me to faced the same problem.
But , believe me ,when i changed to Linux background i felt that this is one of the simplest  OS for everyone.one thing i noticed was its power to change any files in its file system by the root user , as widows wil not allow this feature.In this way we can change our Linux to any form as per our wish, as widows wil not allow that.


ok...i am not going to give all my experience here ,though it will take a lot of time, i don't have that much tooo.


In this page i am going to give you classes from the basics of Linux( i will start with redhat , though it is more popular one).including the screenshots and video tutorials.


so Guys let start our new class room from my next posts......welcome to all with your feedbacks and comments

Click here to view all session ithis class room...

Best Linux OS in 2012


1. Ubuntu 12.04 LTS

Best Linux OS in 2012

Ubuntu is the #1 and the most popular distro out there. Even though Linux Mint appeals more to new users Ubuntu has a rigorous release cycle and tends to have more features implemented in each release. Ubuntu does not come with a load of software and codecs pre installed like Linux Mint. So new users may have trouble playing certain media formats and may require a few command line installations but due to the excellent community support they can be sorted out within minutes.
2. Linux Mint 13
Best Linux OS in 2012

Linux Mint is known as the second most popular linux distribution simply because of its user friendliness. It comes with loads of software carefully picked by the team, media codecs and drivers. The distro works so well out of the box you will not be spending any time trouble shooting. The Distro focuses on what is best for its users and provides what the mainstream linux users demand (most of the time). Linux Mint 13 comes in 2 editions. The Cinnamon edition includes a modern Gnome 3 desktop with a familiar and traditional layout. The MATE edition comes with a Gnome 2 desktop. Compared to the cinnamon edition, the MATE edition is more stable but is quite boring. Cinnamon is a fairly new desktop that is being developed by the mint team.
Linux mint is based on Canonical's Ubuntu.

3. Pinguy OS 12.04 LTS

Best Linux OS in 2012

Pinguy OS is an Ubuntu based distribution that comes with A LOT of software preinstalled. It is great for users who want to explore the extensive software that Linux has to offer. It is also very convenient because it includes almost all the software that a user may require. Pinguy OS is a fairly new distro but it is gaining popularity quickly. Pinguy OS includes two Docks by default and the overall look of the desktop leans toward OS X. Pinguy OS 12.04 includes a customized gnome-shell.
4. Zorin OS
Best Linux OS in 2012

Zorin OS is optimized for users who are transitioning From windows. It looks quite similar to Windows 7 and comes with "zorin look changer" that can make your desktop look similar to older Windows versions and Mac OS X. Zorin OS also offers four premium versions (Ultimate, Business, Multimedia, Gaming) which are available upon donating. There is also a free version that does not come with as much software preinstalled.

5. Peppermint OS 3

Best Linux OS in 2012

Peppermint OS a very light distro that comes with LXDE desktop envioronment. LXDE is very simple to use and many will find it to be a straightforward DE. The OS boots up quite fast which makes it ideal for older computers or netbooks. Peppermint OS 3 is based on Lubuntu 12.04. It includes an elegant theme by default and includes media-codecs out of the box.

6. Fedora

Best Linux OS in 2012

You simply cant go wrong with Fedora ( or Red Hat Enterprise Linux for a more server oriented usage ). The quality of Red Hat Linux distributions, and a great looking desktop. Perhaps a little less user-friendly than the two previous Debian based Linux distributions mentioned above. 


Windows XP no longer most popular desktop system

windows xp vs windows 7


Windows 7 is now the world's most popular desktop operating system, according to the August report from Net Applications.In August, Windows 7 had a 42.76% market share, a fraction of a point more than Windows XP's 42.52%. Windows XP was released in 2001.The much-maligned Windows Vista sits at third place with a 6.15% market share, followed by Mac OS X 10.7 and Mac OS X 10.6 with 2.45% and 2.38%, respectively.

All in all, older versions included, Microsoft controls some 92% of the market.
It took three years for Windows 7 to become the world's most popular OS. Microsoft's desktop operating system, which was launched in October 2009, will soon be replaced by a newer version — Windows 8.
Windows 8, which is scheduled to go on sale on October 26, will be Microsoft's first operating system designed to work just as well on tablets as it does on desktop computers.
Users running Windows XP, Vista or Windows 7 will be able to upgrade to Windows 8 Professional for $39.99 via an online download.

Upgrading to Windows 8 - FAQ


Upgrading to Windows 8(Credit: CNET)
Even if you're excited for Microsoft's new OS, you might not be planning to buy a new computer. If you have an existing Windows PC, Microsoft has made the upgrade process more or less simple, but there are still some things you might want to think about before making the switch. Here are a few key points to consider. 
Q: From which older versions of Windows can I upgrade to Windows 8?
A: According to this official Microsoft blog post, if you own a Windows XP, Windows Vista, or aWindows 7 PC, you are eligible for a downloadable upgrade to Windows 8 Pro.
Q: How much will the upgrade cost?
For PCs with the above operating systems purchased prior to June 2, 2012, you can download the upgrade from Microsoft for $39.99. For new, non-Windows 8 PCs purchased between June 2 and January 31, 2013, Microsoft will offer the Windows 8 Pro upgrade download for $14.99 (presumably to help prevent a pre-Windows 8 drop-off in new PC purchases).
Upgrading to Windows 8
The Windows 8 Upgrade Assistant walks you through the relatively simple upgrade process.
(Credit: Microsoft)
Q: Is there an option to purchase the upgrade on a DVD or other physical media?
A: You can buy the boxed version of the Windows 8 Pro upgrade for $69.99. If you purchase the downloadable upgrade, Microsoft will offer you the option to purchase a DVD version for an additional $15. The upgrade installation process will also offer you the ability to burn a DVD or make a bootable USB key using your own media, for no charge.
Q: What about other versions of Windows 8?
A: Microsoft has announced four versions of Windows 8. You can only upgrade to two of them as a consumer, Windows 8 and Windows 8 Pro. Windows RT will only come with tablets, and an Enterprise version will be sold with large-volume corporate PC purchases. Windows 8, Windows Pro, and Windows 8 Enterprise will be available in both 32-bit and 64-bit editions, with 64-bit being most common. Microsoft has not yet announced pricing for the vanilla Windows 8 upgrade.
Q: What are the differences between Windows 8 and Windows 8 Pro?
A: Microsoft says, "For many consumers, Windows 8 will be the right choice," while it designed Windows 8 Pro "to help tech enthusiasts and business/technical professionals obtain a broader set of Windows 8 technologies."
Basically what that means is that Windows 8 Pro comes with features Microsoft believes most consumers won't care about. For the most part this is probably true. Most people won't miss Pro's extras like the Client Hyper-V virtualization software and BitLocker disk encryption tool.
Upgrading to Windows 8
Windows Media Center and its DVD player software are no longer standard features in Windows 8.
(Credit: Rich Brown/CNET)
The one feature you might miss in Windows 8 is Microsoft's Windows Media Center home theater software, and its accompanying DVD movie player codecs. Windows 8 Pro users won't get it either to start with, but they can download it for free via a post-upgrade download. If you have basic Windows 8, you have to download what Microsoft is calling its Windows 8 Pro Pack, which will upgrade you to Windows 8 Pro, and also bring Media Center along with it. Pricing for the Pro Pack upgrade has not been announced.
Q: What are the hardware requirements for Windows 8?
A: Here are the basics as outlined by Microsoft in a blog post:
  • 1GHz or faster processor
  • 1GB RAM (32-bit) or 2GB RAM (64-bit)
  • 16GB available hard-disk space (32-bit) or 20GB (64-bit)
  • DirectX 9 graphics device with WDDM 1.0 or higher driver
Microsoft also says, "Metro style applications have a minimum of 1,024x768 screen resolution, and 1,366x768 for the snap feature." "Snap" refers to Windows 8's feature of automatically resizing and positioning application Windows when you drag them to the side of the screen. And "Metro" is the now-abandoned nomenclature for Windows 8's distinct touch-oriented software interface design.
Microsoft has suggested both "Modern UI," and "Windows 8-style UI" as alternatives, and may further refine the name before Windows 8's October 26 launch date.
Microsoft's Windows 8 Compatibility Center helps verify which hardware and software will work in the new OS.
(Credit: Rich Brown/CNET)
Q: What happens to my old files and system settings when I upgrade?
A: It depends on which version of Windows you started with. Per Microsoft: "You will be able to upgrade from any consumer edition of Windows 7 to Windows 8 Pro and bring everything along which includes your Windows settings, personal files, and apps. If you are upgrading from Windows Vista, you will be able to bring along your Windows settings and personal files, and if you are upgrading from Windows XP you will only be able to bring along your personal files."
Q: Will I have any problems with older hardware or software when I upgrade?
A: If you're upgrading from Windows XP or Windows Vista, you can expect to have to reinstall any applications you might have used prior to the upgrade. Most programs that worked in Windows 7 should work in Windows 8, though. Microsoft has a Compatibility Center Web sitewhere you can check for specific applications and hardware devices that have been certified to work in Windows 8. When you launch the upgrade installation, you will also receive a compatibility report.