Set up and use Google Docs offline


Google has now made its Drive service more than an online storage product and productivity suite. You can now edit documents you have stored on Google Drive (or Docs, if you haven't moved over to the new interface) during those moments -- while sitting on an airplane or in a cabin in the woods or in a Wi-Fi-free coffee shop -- when you are not connected to the Internet. And when you open that same document when you are back online, the changes you made while offline are there. (For some reason, Google is putting this offline access under the old Docs banner.) Here's how to start using Google Docs offline.
set up and use Google Docs offline(Credit: Screenshot by Matt Elliott/CNET)
To begin, Google Docs offline is available only in Google's own Chrome browser. To enable offline access, go to your Google Drive page and click the gear icon in the upper-right corner and select Set up Google Docs offline. A window will pop up with a two-step setup process. Click the Enable offline Docs button and then for Step 2, you will need to install the Drive Web app for Chrome. Click the second blue button in the window and you will be taken to the Chrome Web store to install the Drive Web app.
After installing the Web app, return to your Drive home page and you'll see a notification pointing to the gear icon that informs you that some of your recent files are being synced and how to view them. To see which docs are available offline, click the gear icon and choose "view offline Docs." It opens a new Google Docs offline tab in Chrome. Bookmark this page so you can access it in Chrome when you are without the Internet.
set up and use Google Docs offline(Credit: Screenshot by Matt Elliott/CNET)
Google Docs offline shows you only Documents and Spreadsheets; Presentations, Drawings, and Forms don't make the jump. And you can edit Documents but can only view Spreadsheets. And despite there being a grayed-out red (pinked out?) New Document button, you cannot create new documents in offline mode. Given the presence of such a button, I'd wager that this feature is coming soon.

Creating Awesome Excel Tables


Excel Tables offer a range of features for working with list-style data

Creating Awesome Excel Tables

Much of the data that you use Excel to analyze comes in a list form. You might need to sort the data, filter it, sum it, and perhaps even chart it. Excel tables provide superior tools for working with data in list form.
If you want to sum columns of data automatically so that the totals show only the sum of visible cells (for example), Excel's Tables features can do it. And if you want to format any Excel data in just a couple of quick steps, Excel's Tables features can handle that task, too. And as for using a form instead of punching numbers into ordinary spreadsheet cells, Tables once again can do the job.
Here are my top 10 secrets for managing lists of data using Excel Tables.


1.Create a Table in Any of Several Ways

The first step in learning how to work with Excel's Tables features is to use the program to create a table. You'll need a list with column headings and (if you wish) row headings. Select the data, including the heading rows and columns, and click Insert > Table. Visually confirm that the range you've selected is correct, click the My table has headers checkbox, and click OK. Excel will then create a formatted table for you. If you would prefer to choose a particular table format, select the same data area and click Home (instead of Insert); then choose a table style from the Table Styles gallery.
Create a Table in Any of Several Ways
You can create a table from the Insert tab or (as here) from the Home tab, where you can choose a style at the same time.

2. Remove the Filter Arrows

When you want to use some features of an Excel table, but you don't plan to filter or sort your data, you can hide the filter arrows. To do this, click somewhere inside the table and then click Data > Sort & Filter > Filter. Now you can toggle between hiding the arrows with one click and revealing them with the next. The shortcut keystroke combination Shift-Ctrl-L accomplishes the same thing.
Remove the Filter Arrows
Click the Filter option to toggle the display of the filter arrows on or off.


3. Take the Format but Ditch the Table

Formatting data as an Excel table is the quickest way to achieve a neatly formatted range of cells in Excel. The only potential problem is that it may seem that you can't get the formatting without getting all the unwanted table features as well. But while this limitation is technically true, you don't have to keep the table features if you don't want them. To borrow a table style for any worksheet, first create the data as a table, making sure to choose your preferred table style for formatting it.
Next, click inside the table and then click Table Tools > Design > Convert to Range. Click Yeswhen Excel prompts you with 'Do you want to convert the table to a normal range?' and the table will revert to being a regular range--but with its attractive formatting intact.

4. Fix Ugly Column Headings

The filter arrows in an Excel table's column headings look downright ugly when those headings are right-justified. The arrows cover the rightmost characters in the headings, and there is no obvious way to fix the problem. The workaround is to indent the content from the right side of the cell. To do this, select the cells containing the headings that are partly hidden and click Home > Increase Indent. If the cell contents respond by jumping to the left edge of the cell, click Home > Align Rightto return them to right justification. Click Increase Indent more than once as necessary to position the heading text well clear of the filter arrows.
Fix Ugly Column Headings
Use the Increase Indent option with right-aligned column headings to push them to the left of the filter arrows.


5. Add New Rows to a Table

Rows in a table behave a little differently from rows in a regular worksheet. If you need to add a new row to a table, and if the Totals row is not visible, click in the bottom right cell in the table and press the Tab key. This simple procedure adds a new row to the table, just as it would if you were working with a Word table.
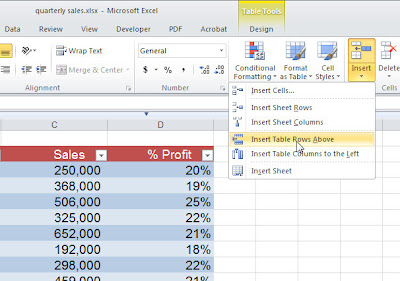
To add rows to the end of a table, drag the small indicator in the bottom right corner of the table to add more rows and more adjacent columns, if desired. To add a row inside a table, click in a cell either above or below where the row should be inserted and click eitherHome > Insert > Insert Table Row Above or Home > Insert > Insert Table Row Below, depending on where you want the new row to appear. The table's formatting will automatically adjust so that the new row is correctly formatted.
Add New Rows to a Table
To add a new row inside a table, use the special insert options that appear only when you've selected a cell inside a table.

6. Calculate Accurate Totals

Anyone who has ever tried to use the SUM function to total a column of data in which some of the rows are hidden has received a nasty surprise: The SUM function calculates the total of all of the cells in a range, whether they're visible or not. This characteristic of the function means that the result won't be the total of the numbers in the visible rows--and that discrepancy can be a huge problem. The way tyo avoid this difficulty is to use the SUBTOTAL function instead. Excel will do this automatically when you use its Total row feature for your table.
When you want to add a total row to the table, click inside the table, right-click, and choose Table > Totals Row; or click inside the table and click Table Tools > Design > Total Row. In either case, a total row will appear at the foot of the table. If the last column contains numerical values, Excel will automatically use a SUBTOTAL function to sum them.
To add a total to any other column, click in the appropriate cell in the Total row, and in the drop-down menu click SUM. This operation will add a SUBTOTAL formula to the cell that will total only visible values when the table is filtered. You may choose other calculation options from this drop-down list, including Min, Max, Count, and Average.
When you choose to total a column in a table, Excel will add a SUBTOTAL function that totals only the values in visible cells.


7. Create a Chart From Table Data

One significant benefit of formatting a list as a table is that charts created from table data change dynamically when you add data to or remove data from the table. So a column chart that charts the values in a range will expand to incorporate new values when you add them to the table. This is the case whether you add data to the bottom of the table or introduce a new column to the right of it. Creating a chart based on the table is the same as creating any chart in Excel--only the behavior of the chart is different. Tables of this type are extremely useful when you work with data that expands or contracts over time.

Charts created from Excel tables automatically expand and contract as you add data to or remove data from the table.

8. Enter Data Using a Simple Form

Typing lots of data across a wide table can be quite cumbersome; often, entering data into a form is easier. Earlier versions of Excel included a handy Form tool; that tool is still available, but you won't find it on the Ribbon. To make it easier to find, you can add it to Excel's Quick Access Toolbar: ClickFile > Options > Quick Access Toolbar. In the Choose Commands From list, click All Commands and then scroll down and click Form.... Click Add to add the tool to the Quick Access Toolbar, and then click OK.
To use the form, click somewhere inside your table and then click theForm button to display a form dialog area. The form heading is the sheet name, and the form contains boxes where you can preview the current form data and add new data. To add new data, click New and type the data into the relevant text boxes. To view the form data, click Find Prev or Find Next to move through the data one row (record) at a time. To exit the form, click Close.
Excel's hidden Form feature creates a data entry form for your table automatically.


9. Sort and Filter Table Data

One key feature of Excel's tables is their ability to sort and filter the data in the table. To perform either of these actions, click the down arrow to the right of any table column and then choose a Sort or Filter option. The two Sort options available are 'ascending' and 'descending'. The Filter options vary depending on whether you're working with a column of numbers, text, or dates.
You can then select from among a number of predefined options, or click Custom Filter and build your own. Alternatively you can create complex filters such as AND and OR filters. For example, locating values in a column that are less than $200,000 or more than $400,000 involves using an OR filter. To create it, click Custom Filterand then build both parts of the search in the dialog area, making sure to click the OR option. Similarly you can create AND filters that work across two columns, thereby enabling you to display information such as "All entries for Canada, where sales are greater than $300,000." In this case you would select to view only 'Canada' in the Location column. In the Sales column, click Numbers Filters > Custom Filter > is greater than, type 300000and click OK.
Any column that has a filter in place will show a filter icon instead of the downward-pointing triangle, so you can see at a glance where the filters are. To clear a filter, click the Filter icon and click Clear filter from; or click Home > Sort & Filter > Clear to clear all filters from all columns in the table.
Excel's built-in AutoFilters feature gives you a select range of prebuilt filters for filtering table data.


10. Create Complex OR Searches Across Multiple Columns

One type of search that you can't build using the menu options is an OR search of the type "All entries for Canada or where sales are greater than $200,000." Consequently you must write a search instruction of this type in a different way. To do so, first copy the table heading row and paste it a few rows immediately below your table. Beneath these headings, in the Location column, type="=Canada"and in the second row, in the Sales column, type >200000. Click inside the table, clickData > Advanced > Filter the list, in-place. Confirm that the List range is the table range, and set the Criteria Range to an area covering the second set of headings and the two data rows below it. Then click OK to filter the list.
OR searches across multiple columns are relatively complex and can't be generated by using the AutoFilter options.


Network Magic - A great tool for Networks

Network Magic - A great tool for Networks
Network Magic

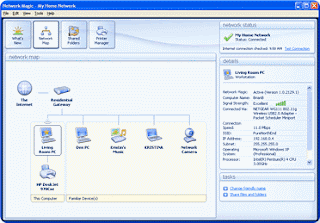
If you're looking for a simple, free, all-in-one network management tool for a small peer-to-peer network, this is the one to get. It handles all the basic network chores, including adding new devices to the network, fixing broken network connections, setting up wireless encryption and protection, sharing printers and folders, reporting on the state of the security of each PC, and much more.
For example, the network map, pictured nearby, displays every device connected to your network, shows whether it's online or offline, and displays details about each, including the computer name, IP address, MAC address, operating system being used, shared folders, and system information such as its processor and RAM. It also lets you change the machine name, and it displays alerts about each device, such as if it isn't protected properly. Overall, it's far superior to Windows Vista's Network Map. 
The software's Status Center is also useful. It displays overall information about your network, such as whether there are any problems with overall security or with an individual PC. It also lets you troubleshoot connections, shows whether there are any intruders on the network, and displays information about wireless protection. 
Parents will appreciate some of Network Magic's features. For example, the software can monitor the use of any individual PC on the network for the Web sites it visits, the times the computer is online and which programs are being used, and then mail a daily report about it to an e-mail address. So it's ideal for parents who want to keep track of their kids' computer use. There's much more as well, including a bandwidth tester to show you your current Internet broadband speed.
Note that there are both paid and free versions of the software. The free version includes most basic features, such as repairing broken connections, issuing security alerts, monitoring network activity and the Network Map. The paid version, which costs from $24 to $40 (depending on how many PCs are on your network), delivers daily reports of Internet activity, supports remote access to your network's files and includes other advanced features.
When you install this program, you may need to tell your firewall to let this application access your network and the Internet.


10 unknown Google tricks


10 unknown Google tricks


Below is a list of  Ten unknown Google tricks. many people who use Google don't know about this.

Definitions
Pull up the definition of the word by typing define followed by the word you want the definition for. For example, typing: define bravura would display the definition of that word.
Local search
Visit Google Local enter the area you want to search and the keyword of the place you want to find. For example, typing:restaurant at the above link would display local restaurants.
Find weather and movies
Type "weather" or "movies" followed by a zip code or city and state to display current weather conditions or movie theaters in your area. For example, typing weather 84101 gives you the current weather conditions for Salt Lake City, UT and the next four days. Typing movies 84101 would give you a link for showtimes for movies in that area.
Track airline flight and packages
Enter the airline and flight number to display the status of an airline flight and it's arrival time. For example, type: delta 123 to display this flight information if available.
Google can also give a direct link to package tracking information if you enter a UPS, FedEx or USPS tracking number.
Translate
Translate text, a full web page, or search by using the Google Language Tools.
Pages linked to you
See what other web pages are linking to your website or blog by typing link: followed by your URL. For example, typing link: http://www.blogforadmins.blogspot.in displays all pages linking to blogforadmins.com
Find PDF results only
Add filetype: to your search to display results that only match a certain file type. For example, if you wanted to display PDF results regarding linux only type: "linux" filetype:pdf -- this is a great way to find online manuals.
Calculator
Use the Google Search engine as a calculator by typing a math problem in the search. For example, typing: 100 + 200 would display results as 300.

Best Linux desktop of 2012: Linux Mint 13

Best Linux desktop of 2012: Linux Mint 13

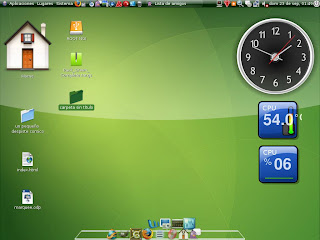
The very popular Linux distribution, Mint, has a new version Linux Mint 13, Maya, and a new take on the GNOME 3.x desktop interface: Cinnamon 1.4. The result is, in my opinion, the best Linux desktop for experienced users to date.
Not everyone will agree this. They'll find Mint's other default desktop MATE to be much more their speed. MATE is a fork of that old Linux desktop favorite, GNOME 2.x. While I haven't looked at the MATE edition of GNOME closely, other Linux reviewers, like Jim Lynch, have and Lynch likes what he's seen of Mint 13 paired with MATE.
Even with the little work I've done with MATE though I can see what GNOME 2.x fans will like it. It's a very clean desktop and it feels and works like a natural extension of GNOME 2. GNOME fans who abandoned GNOME after the annoying changes in GNOME 3.x for Lightweight X11 Desktop Environment (LXDE) will want to give Mint with MATE a try. With MATE, GNOME 2.x is back.
That said, I prefer Cinnamon myself. Cinnamon, which is remindful of GNOME 2.x, is built on Clutter and Gnome 3. I find it more attractive and I like its features. For example, the menu includes drag and drop support. With that, besides just being move icons from the menu to the desktop, I can add them to panel launchers, favorites, and reorder my favorites. I can also right-click the menu to use the menu editor to change edit the main menu itself. It's pretty, gives me great control over how my desktop, and now
Another great feature is Cinnamon's new Expo mode is. Expo gives you great control over your workspaces. You can choose how many workspaces to use and drag and drop applications to each workspace. It's a powerful tool but as easy to use as Mac OS X Lion's Mission Control and Spaces.
Much as I'd like to recommend Cinnamon for everyone though, I can't. As Mint's own developers admit that while, "Cinnamon is among the sleekest and most modern looking environments [and] features innovative features and emphasis on productivity with traditional desktop metaphors, it also has several problems. These are:
Cons:
  • Cinnamon requires 3D acceleration and might not work well for you, depending on your graphics card and/or drivers.
  • Cinnamon is brand new and unfortunately not yet as stable as more matures and established desktops such as MATE, KDE or Xfce.
  • Cinnamon relies on Gnome 3 and Clutter, which are also both brand new and going through rapid transformations.
Of course, you can just switch between MATE and Cinnamon. One of Mint's new features is an improved version of the old Gnome Display Manager: MDM. With MDM, you can pick which GUI to boot into, configure them, set up themes for them, and set up remote, automatic, and timed logins. There may be display/login manager with more features out there, but I honestly don't know what it could be though.
For me, however, Cinnamon works just fine. I tested Mint 13 with Cinnamon on two systems. The first was one of my workhorse Dell Inspiron 530S. This system is powered by a 2.2-GHz Intel Pentium E2200 dual-core processor with an 800-MHz front-side bus. This PC has 4GBs of RAM, a 500GB SATA (Serial ATA) drive, and an Integrated Intel 3100 GMA (Graphics Media Accelerator) chip set. I also put it to work on my new Lenovo ThinkPad T520 laptop. This, much more up-to-date computer boasts a 2.5GHz Intel Core i5 Processor, 4GBs of RAM, a 500GB hard drive and an integrated Intel HD Graphics 3000 processor. On both systems, the old and new, Linux Mint and Cinnamon ran flawlessly.
Installing Mint, as always, is a snap. All you need do is download the Mint ISO, burn it to a CD, DVD, or USB stick and then re-boot your computer with it and follow the instructions. On my PCs, the entire process took less than half-an-hour. Mint will run on pretty much any PC. It requires only 512MBs of RAM, but runs better with at least 1GB of memory.
The only annoying thing about the process is you can't do an in-place update of Mint 13 from Mint 12 or any other Linux distribution. That's by design. Mint's developers feel that you'll avoid out of date software incompatibilities by forcing you to do a fresh install. That's true, but it also means you may need to back up and restore your home directories and files. I did this by backing them up to an attached USB drive.
Moving on to the operating system itself, Mint 13 is based onUbuntu 12.04. I like this version of Ubuntu with its Unity interface as well. In particular I think Ubuntu 12.04 is great for users who aren't computer savvy. But, I'm a Linux pro. I like operating systems that enable me do decide exactly what I want it to do and how it's going to do it. If you're a power user too, then you'll like the taste of Mint.
Beneath the desktop, you'll find a Linux 3.2 kernel. Mint, like most Linux distributions, is still using ext4 for its file system.
Above that foundation, in applications, you'll find the usual Linux distribution goodness: LibreOffice 3.5.2 for office work, Firefox 12 for the Web browser; GIMP 2.6.12 for graphics; Thunderbird 12.01 for e-mail; and Pidgin 2.10.3 for IM. I'm not crazy about the choices of Thunderbird, I much prefer Evolution for e-mail or Firefox over Chrome.
The default software choice is no big deal though since Mint's Software Manager makes adding new programs a snap. The one quirk here is that after you install the program from the Software Manager the screen doesn't show it as being installed. You need to leave the program installation screen and come back to it before you'll see that your software was indeed installed. It's not a big bug, but it's a bit of a nuisance and I can see someone thinking they really hadn't installed a program when they've actually done so.
As has long been the case with Mint, and it's first claim to fame, this is one Linux distribution that comes ready to deal with proprietary video and audio codexes such as Flash, MP3 and DVDs. Ironically, thanks to including VLC Media Player 2.01, Linux Mint plays DVDs better than Windows 8 will. You see, Mint comes ready to play DVDs. In Windows 8, DVD playback is an extra-cost item.
It's not any of these components by themselves that really impress me. I mean they're all really good. But, what really makes Mint special is how all of them are brought together into one, complete whole. As far as I'm concerned, Mint 13 really is the best Linux distribution so far of 2012. Give it a try yourself. 

Download Linux Mint 13 here...


Linux Mint


Linux Mint is a computer operating system based on the Linux distribution Ubuntu. Linux Mint is intended to be a modern, elegant and comfortable operating system which is both powerful and easy to use.  Linux Mint provides a more complete out of the box experience by including proprietary and patented software.
Linux Mint introduced its first release, named "Ada", in 2006. Its latest and 13th release is "Maya".

Linux Mint uses primarily free and open source software, making exceptions for some proprietary software, such as plug-ins and codecs that provide Adobe Flash, Java, MP3, and DVD playback. Linux Mint's inclusion of proprietary software is uncommon; most Linux distributions do not include proprietary software by default, as a common goal for Linux distributions is to adhere to the model of free and open source software.
Linux Mint comes installed with a wide range of software that includes Libre Office, Firefox, Thunderbird, XChat, Pidgin, Transmissionand GIMP. Additional software that is not installed by default can be downloaded using the package manager. Linux Mint allows networking ports to be closed using its firewall, with customized port selection available. The default Linux Mint desktop environments,MATE and Cinnamon, support many languages. Linux Mint can also run many programs designed for Microsoft Windows (such as Microsoft Office), using the Wine software or using virtualization software (such as VMware Workstation or VirtualBox).
Linux Mint is available with a number of desktop environments to choose from, including Cinnamon, MATE, KDE, and Xfce. Other desktop environments can be installed via APT.
Linux Mint actively develops software for its operating system. Most of the development is done in Python and the source code is available on GitHub.
Minimum Size (megabytes): 
783
Maximum Size (megabytes): 
898
Last Stable Version: 
13
Last Release: 
May 23, 2012


HP announces Envy X2 tablet-laptop hybrid with Windows 8

HP announces Envy X2 tablet-laptop hybrid with Windows 8


Hewlett-Packard on Thursday announced an Envy X2 tablet-laptop hybrid device with the Windows 8 OS, signaling the company's re-entry into the tablet market, which it abandoned after the highly publicized failure of its TouchPad product.
At first glance, the HP Envy X2 resembles a netbook, with a keyboard base and an 11.6-inch touch display. But the device turns into a tablet once the screen is detached from the base.

The benefit of a hybrid device is it offers the best of both worlds for Windows 8, which doubles as a tablet and PC operating system. The tablet is 8.5 millimeters thick and 680 grams, and the display shows images at a 1,366-by-768-pixel resolution.
The Envy X2 runs on Intel's low-power Atom processor code-named Clover Trail. The device will be sold with the keyboard base and 64GB of solid-state drive storage, and the configuration cannot be customized. The device will become available during the latter part of the holiday season this year and will compete with hybrid devices that have been announced by PC makers like Asus, Acer, Lenovo and Samsung. Windows 8 will start shipping commercially on Oct. 26.
Though the device can operate independently as a tablet, HP views it as a laptop first and people have to buy the keyboard base. The dock has an SD card slot, USB ports and a high-definition multimedia interface (HDMI) port. The device has two batteries -- one in the base and the other in the tablet. The device offers more than eight hours of battery life in laptop mode. It has NFC capabilities, a high-definition webcam on the front and an 8.0-megapixel camera on the back. An optional stylus is available.
With this hybrid device, HP re-enters the consumer tablet market after it discontinued sales of webOS devices including the TouchPad. HP has reset its tablet strategy around Windows 8 OS.
HP also announced touchscreen ultrabooks with Windows 8 including the Spectre XT Touchsmart ultrabook, which is the company's first laptop with a Thunderbolt port. Thunderbolt is a high-speed interconnect technology developed by Intel to shuttle data between host PCs and external peripherals.
The ultrabook has a 15.6-inch, high-definition touchscreen and a choice of Intel's third-generation Core processor. It is 17.9 millimeters thick and weighs 2.16 kilograms. The laptop also features USB 3.0, Ethernet and HDMI ports.
The laptop will become available in the U.S. in December starting at $1,399. HP did not immediately provide information on worldwide availability.
HP's Envy Touchsmart Ultrabook 4 has a 14-inch touchscreen and a choice of Intel's latest Core processors. The ultrabook weighs 2.16 kilograms and offers up to eight hours of battery life. An optional Advanced Micro Devices graphics card can be added to the ultrabook to boost graphics capabilities. The company did not immediately provide availability and pricing for the product.