Showing posts with label Blog tricks. Show all posts

Recommended Post Slide out for Blogger


“Keep the visitors glued to your site for long” This is what every blogger out there wants to do. The Recommended Post slide Out Widget does just that. It’s kind of  an invitation to the reader to read a new post once he has read one of your blog entries. You might have seen this kind of a widget on many popular websites like New York Times, Mashable, Times of India etc.

I too loved the idea and found out that some one else had already made a jQuery snippet which does just the same. You can read about this awesome code on Mary Lou’s blog athttp://tympanus.net/codrops/2010/04/13/end-of-page-slide-out-box/ 
This is the modified form of that snippet so that it gets loaded asynchronously without affecting the page load. The Slide out will show random posts from your Blog. The random posts are fetched from your Blog Feed using Ajax. 

Demo of the Slide Out

Scroll down to the bottom of the post and you should see the Recommended Slide Out.
Recommended Post Slide out for Blogger

Add the Recommended Post Slide out Widget

To add the widget to your blog, you can use this one click installer.

Customizing the Recommended Slide out

1. End Of Post marker – The slide comes out when the user scrolls down to a particular point in your Blog.(the bottom of the page by default) To mark this point, you can add an HTML element there. The element should have the id bpslidein_place_holder
e.g.: <div id='bpslidein_place_holder'></div> would do the job. The best place to add this marker would be at the end of the post. If you want to do it easily, you can add this to your Blogger Template.
In your template Find,(You will have to expand the Widget Templates)
<div class='post-footer-line post-footer-line-1'>
or
<p class='post-footer-line post-footer-line-1'>
or
<data:post.body/>
Immediately below any of these, add the following snippet and save our template
<b:if cond='data:blog.pageType == "item"'>
<div style='display:none' id='bpslidein_place_holder'></div>
</b:if>
Now when the reader scrolls down to this div, the slide will open up.
2. Customizing the Look and Feel of the Slide out.
You can obviously style the Recommended Slide out. But before you do that, you have to add this variable definition to your template
<script>var bpslidein_custom_css=true;</script>
This should be added somewhere above the Slide Out Widget. If this variable is not set, a default StyleSheet will be used to spice up the Recommended Slide out.
Once this variable is set to true, you can add your own CSS definitions. You can add your CSS at Template Designer > Advanced Add CSS
This is the default set of Style definitions applied to the Widget. You can modify them and use it.
#bpslidein{z-index:5;width:400px;height:100px;padding:10px;background-color:#fff;border-top:3px solid #1616F5;position:fixed;right:-430px;bottom:0;-moz-box-shadow:-2px 0 5px #aaa;-webkit-box-shadow:-2px 0 5px #aaa;box-shadow:-2px 0 5px #aaa;font-family:Arial, Helvetica, sans-serif;}
#bpslidein p{font-size:11px;text-transform:uppercase;font-family:Arial,Helvetica,sans-serif;letter-spacing:1px;color:#555;}
#bpslidein_title{color:#555;font-weight:700;font-size:16px;margin:10px 20px 10px 0;}
#bpslidein a,#bpslidein a:hover,#bpslidein_title{text-decoration:none;color:#1616F5;}
#bpslidein .close,#bpslidein .expand,#bpslidein .help{border:2px solid #EEE;cursor:pointer;color:#9A9AA1;width:13px;height:15px;padding:2px 0 0 5px;position:absolute;right:10px;font-size:17px;font-weight:700;font-family:Arial, Helvetica, sans-serif;font-size:12px;}
#bpslidein .help{right:35px;}
#bpslidein_title,#bpslidein_image{float:left;width:80px;}
#bpslidein_title{width:290px;}
3. Other Stuff that you can edit
You can edit the Title of the Widget and the Loading text by editing the Widget Content.

Add a Floating facebook Like page in blog

Try this new way to Add a Floating facebok Like page in blog.


Adding Jquery Plugin
1. Sign in to Blogger
2. Go to your Dashboard>Design>Edit HTML
3. Add this code above the closing </head> tag in your HTML file:


<script src="https://ajax.googleapis.com/ajax/libs/jquery/1.6.1/jquery.min.js" type="text/javascript">
</script>


Adding Widget Code
1. Go to Design>Add a Gadget>HTML/JavaScript
2. Add This code to HTML/JavaScript Widget


<script type="text/javascript">
//<!--
$(document).ready(function() {$(".ssslikebox").hover(function() {$(this).stop().animate({right: "0"}, "medium");}, function() {$(this).stop().animate({right: "-250"}, "medium");}, 500);});
//-->
</script>
<style type="text/css">
.ssslikebox{background: url("https://blogger.googleusercontent.com/img/b/R29vZ2xl/AVvXsEhOv-pmFoX-4N_HZ3Dko872-NR_FxFnbFOStDs-dL7Z1ZMS_vETIK-5AFi8qV4TB7gmiaPmaORzDvp1Y4ypT2XB_lMaaKkpq3crPKvsFnVF7oPQIW-9_f_Jq7sMVIXL_VNHhsGJDVjIjQgu/s150/w2b_facebookbadge.pn") no-repeat scroll left center transparent !important;display: block;float: right;height: 270px;padding: 0 5px 0 46px;width: 245px;z-index: 99999;position:fixed;right:-250px;top:20%;}
.ssslikebox div{border:none;position:relative;display:block;}
.ssslikebox span{bottom: 12px;font: 8px "lucida grande",tahoma,verdana,arial,sans-serif;position: absolute;right: 6px;text-align: right;z-index: 99999;}
.ssslikebox span a{color: #808080;text-decoration:none;}
.ssslikebox span a:hover{text-decoration:underline;}
</style><div class="ssslikebox" style=""><div><iframe src="http://www.facebook.com/plugins/likebox.php?href=http%3A%2F%2Ffacebook.com%2FAdminsClub&amp;width=245&amp;colorscheme=light&amp;show_faces=true&amp;connections=9&amp;stream=false&amp;header=false&amp;height=270" scrolling="no" frameborder="0" scrolling="no" style="border: medium none; overflow: hidden; height: 270px; width: 245px;background:#fff;"></iframe><span>By <a href="http://www.strikingsoon.com/">Strikingsoon</a> / <a href="http://blogger.strikingsoon.com/2011/08/sliding-facebook-likebox-widget-for.html">+Get This!</a></span></div></div>

Replace http%3A%2F%2Ffacebook.com%2FAdminsClub, with your Facebook fan page URL.

Remember!
Before replacing URL, replace these symbols:
: with %3A
/ with %2F


how to enable DISQUS COMMENT BOX in blogger

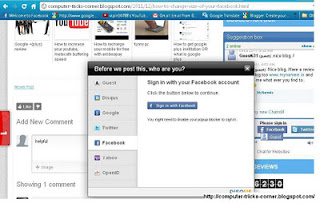
DISQUS is the best COMMENTING PLATFORM which gives total freedom to all of your visitors no matter where they came from ( facebook ,twitter, online search or from where ever). they can give there views with having a identity. DISQUS COMMENT BOX also gives your blog a great look and improve your blogs interface .Disqus lets your visitor to comment as by using any of following ids.
how to enable DISQUS COMMENT BOX in blogger

So all the visitors will have lots of option to choose from and will have there unique identity. 
they can also use OPENID or GUEST id to submit there views if they want to..!

NOW HOW TO ENABLE DISQUS COMMENT BOX IN YOUR BLOG:-
It will only gonna take 4-5mins to setup DISQUS COMMENT BOX in your blog
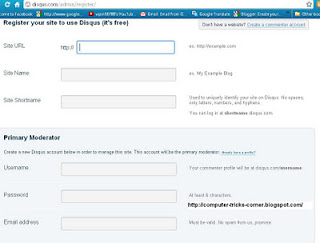
First of all goto disqus and register your blog click here to register your blog.

                                                  THIS WINDOW WILL OPEN
                               Fill all the required  fields and click on ' CONTINUE '
HOW TO ENABLE DISQUS COMMENT BOX IN YOUR BLOG

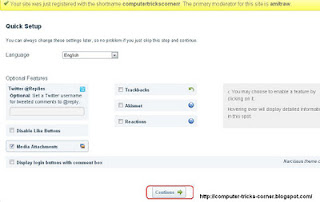
  • After clicking " CONTINUE " the following window will open . in this window simply click on " continue "(at bottom of the window). no need to fill any field. just click on "CONTINUE"
IN THIS WIDOW NO NEED TO FILL ANYTHING SIMPLY CLICK ON " CONTINUE
HOW TO ENABLE DISQUS COMMENT BOX IN YOUR BLOG
  • After clicking on " Continue " following window will show up, in this window click on "BLOGGER ".


CLICK ON " BLOGGER "
  • After clicking on " Blogger " following window will show up, in this window simply click on the tab under 3rd option which says " Add site " your_site_name" to blogger.
click on the tab under 3rd option which says " Add site " your_site_name" to blogger.
Now  select a blog in which you want to add DISQUS COMMENT BOX . fill the title and click on " add widget ". 

IN THIS WINDOW CLICK ON " Add Widget "


  • Now you can see DISQUS COMMENT BOX  in your layout and as well as in your blog..!

  • To check it you have to click on a particular post. in you blog...! !! :-)


HOW TO ENABLE DISQUS COMMENT BOX IN BLOGGER

Scroll Bar for Labels in blog

Scroll Bar for Labels in blog
The label is a function provided by blog service providers to classify our writing in several categories, for which we write writing can be more easily found by search engines in the search index on the category of writing that we write, to be more easily known to be our writing categories.


How easy and simple installation, just a few clicks, scroll label will appear. Good for those who can not wait, please follow the tutorial below: 

Adding spy effect to Recently post thumbnail widget


This is a recent post widgets to display a highly dynamic. very suitable for a blog that dynamic highlights display. spy effect recent post blogger widgets, how to install blogger widgets on your blog?
very easy, follow the steps below:
1. login to your blog dashboard
2. design >> Add A Gadget >> Html/Java Script
3. copy the code below in HTML / Java Script box

How to Remove and Hide Blogger NavBar


When browsing Blogger powered weblogs hosted on blogspot.com domain or custom domain, there is always a NavBar (Navigation Bar or Banner) that appears on top of the blog. The Blogger NavBar contains Search Blog textbox, Flag Blog to notify Blogger about objectionable contents on the blog, Next Blog link to visit another blog randomly, plus links to create a blog or sign in to Blogger.

No many visitors nor bloggers themselves may find it useful though. It’s possible to hide and remove the NavBar with a little CSS hack. The trick will not interfere or mess up with the custom layouts that webmaster has designed, and pretty safe and easy to implement. In fact, if you’re publishing the Blogger blog to own custom domain with FTP or SFTP, it’s possible to turn off NavBar.