Showing posts with label Windows 7. Show all posts

How to fix windows 7 not genuine error easily !!!

                                    How to fix " This copy of Windows is not genuine" is very easy. If you install pirated Windows OS, it will run only for some months. After that, you will get error This copy of Windows is not genuine.32 bit and 64-bit versions of Windows 7


Fixing "This copy of Windows is not genuine"

                     You must perform the below mentioned three steps to eliminate error. After the second step, your errorwill be gone. Even then you must follow the third step. Otherwise, you may get this error back again later.


1. Uninstall Update KB971033


The error “This copy of windows is not genuine,”  means your windows has an updated file which can detect your Windows OS. So before going into actual procedure, You must uninstall the update which was detecting your windows. Remember,You have to uninstall this only if you see the mentioned update.If you can't see this update, you may skip this step. Follow the below steps to uninstall Windows update.
  • Open control panel.
  • Go to windows update section.
  • Click on view installed updates.
  • After loading all installed updates, check for update “KB971033” and uninstall.
  • Restart your PC.

2. Use SLMGR -REARM command

Let’s see the actual procedure to fix This copy of Windows is not genuine error.


  • Go to Start Menu.
  • Type cmd in the search field.
  • You will see command prompt option. Right, click Command prompt. Select Run as Administrator. It is must run command prompt with administrator privileges otherwise command will not work
  • Type SLMGR -REARM (SLMGR is a tool which manages Windows software license. REARM is a command which resets license status of the machine.) and press enter.
  •  Click OK next window.
  • Just Restart your PC. Now you will never receive the error message. If this command did not work for you, you need to try SLMGR /REARM.
SLMGR -REARM must work for Windows 32 bit version. It may work for Windows 64 bit version. If it did not work for Windows 64 bit version, then only you have to try SLMGR /REARM.

3. Turn off Updates

You are not using original OS, so you can not get updates. And you must turn off updates. Otherwise, you will get the same error one more time. If you don’t turn off updates, you OS will get updated. Any one of future updates may detect your OS Genuity. So there is a chance that you will get the error. Just follow below procedure.
  • Go to Control Panel.
  • Click Windows Update.
  • Click Install updates automatically(Recommended).
  • You must select Never Check for Updates(Not recommended).
If you get blank screen even after following above steps, just change the background in system properties.
NOTE:
This procedure does not convert non genuine OS to genuine. It makes use of non genuine OS without problems and updates. If you want complete features and updates, you must buy Genuine OS.
I suggest you, Don’t buy Windows OS from any third parties. Because I found lot of messages that so many people are getting a non genuine error, even though they use original OS which was bought from third-parties. So Buy Windows from Microsoft Windows store only. So that, if you get any problem in future, Microsoft will help you.
                                                **************************

10 Windows 7 Registry hacks and tweaks

Windows 7 Registry hacks and tweaks
Windows 7 
Windows 7 needs far less of the sleeves-up shuffling about that its predecessors demanded for smooth operation.
It works, and it works well. But that doesn't mean you can't use the Registry to add nifty features or change the settings to your liking.
Here are ten things you can do with the Windows 7 Registry. Just type regedit in the usual search box and hit [Enter], then follow our tips.

1. Personalise IE8
Bought your PC from an overzealous manufacturer that's gratuitously branded Internet Explorer with its own name? Just want to add your own custom touch in place of the default 'Windows Internet Explorer'? It's easy.
In the registry editor, navigate to 'HKEY_CURRENT_ USER\Software\Microsoft\ Internet Explorer\Main' and create a new string value. Name it 'Window Title', with the space. Then just double-click it and enter your desired window title in the field.
2. Stop Snap
Aero Snap is arguably a very useful feature – we say arguably because, as we're sure you've noticed, it often decides to kick in and glue your windows to screen edges when you don't want it to.
If you're not finding the Snap feature useful, then you might as well turn it off . First, navigate to 'HKEY_CURRENT_ USER\Control Panel\Desktop'. There are a number of settings you could customise here, but the one that you're looking for in this case is called 'WindowArrangementActive'. The value should be 1 – change it to 0 to make this feature inactive.
Alternatively, just make sure you never venture too close to the edge.
3. Change stacking behaviour
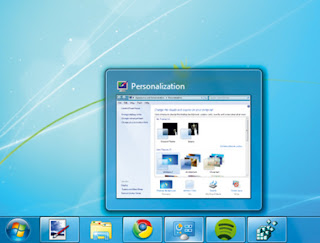
This particular tweak is perhaps of questionable usefulness, but we thought you'd like the option to try it anyway. If you don't like the thumbnail display when clicking on taskbar buttons, then you can change the action and force Windows to open the last opened window of the stack instead.
To do this, open 'HKEY_ CURRENT_USER\Software\ Microsoft\Windows\Current Version\Explorer\Advanced' and create a new DWORD value. Rename it LastActiveClick and set its value to 1 to switch this mode on.
Should you change your mind, you can always go back and delete the key or set it to 0 to revert back later on.
4. Quicker taskbar previews
Are you bored of waiting the couple of seconds it takes for the graphical previews to pop up when you hover over icons on the taskbar? Or would you rather they took longer to appear?

Windows 7 Registry hacks and tweaks
The choice is yours. Go to 'HKEY_CURRENT_USER\ Software\Microsoft\Windows\ CurrentVersion\Explorer\Advanced' and create a DWORD named 'ExtendedUIHoverTime'. Now double-click to open it, click the 'Decimal' radio button, and then change its value to the number of milliseconds you'd like the process to take. The default is 400ms.
5. Change other delays
Stay in the same key (Explorer\Advanced) and you can tweak a couple of other timings.
Add a 32-bit DWORD into the mix named 'DesktopLivePreviewHoverTime'. Switch this to decimal in the same manner as before, then change the value data field to alter the number of milliseconds it takes for the Aero Peek function (minimise all windows) to kick in when you hover over the icon on the right of the taskbar.
Alternatively, do the same with a DWORD called 'ThumbnailLivePreview HoverTime' to alter how long it takes for the windows that are associated with taskbar thumbnails to come to the front.
6. Speed up menus
Make menu items automatically drop down a lot faster with this tweak. Go to 'HKEY_CURRENT_USER\ Control Panel\Desktop', right-click 'MenuShowDelay' and click 'Modify'.
Now change the current string value to something like 100 – hey presto, near-instant menu appearance.
7. Stop space checking
Free up a tiny shred of system resources. Go to 'HKEY_ CURRENT_USER\Software\ Microsoft\Windows\Current Version\Policies\Explorer', create a new DWORD called 'NoLowDisk SpaceChecks' and set its value to 1 to switch off disk space checking.
8. Move the kernel
If the Windows Kernel is in memory, it will run slightly faster than it would if it were on your hard drive. Hunt out 'DisablePagingExecutive' within 'HKEY_LOCAL_MACHINE\SYSTEM\ CurrentControlSet\Control\Session Manager\Memory Management'. Change its value to 1.
9. Change the name
Bought a second-hand machine? Then you might want to alter the name of the registered owner. Go to 'HKEY_LOCAL_MACHINE\ Software\Microsoft\Windows NT\ CurrentVersion\', double-click on the 'RegisteredOwner' key and then change it.
10. Boost speed
There's one tweak that will make every hover action much faster, from tooltips to the Start menu. Navigate to 'HKEY_CURRENT_USER\ Control Panel\Mouse' and tweak the 'MouseHoverTime' value. A word of warning, though: never choose 0 – it's completely unworkable.

Click here for more Registry tweaks...

comments pls...


Create an all-in-one Windows 7 install disk


With the help of the WinAIO Maker Professional tool you can make a master copy of your Windows 7 disk that contains all the available editions.

You are probably tired of carrying around multiple editions of Microsoft Windows 7 when servicing PCs for your clients or users. Instead, make a master copy of your Windows 7 disk that contains all the editions you need. It’s simple, really. All it takes is a quick tool download, a disk rip, a setup modification, and a save to a DVD or thumb drive.
Every Windows 7 install disk includes all the editions of the operating system, the editions not pertinent to the purchased copy are merely hidden from view. For that reason, one disk from any edition (Home Basic, Home Premium, Professional, and Ultimate) will suffice for this procedure. However, if you want to combine x86 and x64 versions of Windows 7 together as well, you must have disks for both x86 and x64 versions of Windows 7 handy.

Remote Server Administration Tools for Windows 7 with Service Pack 1 (SP1)


Remote Server Administration Tools for Windows 7 with Service Pack 1 (SP1)

Remote Server Administration Tools for Windows® 7 with SP1 enables IT administrators to manage roles and features that are installed on computers that are running Windows Server® 2008 R2, Windows Server® 2008, or Windows Server® 2003, from a remote computer that is running Windows 7 or Windows 7 with SP1.


Repair & Fix Windows 7 & Vista problems with FixWin Utility

We are pleased to release a first-of-its-kind  application for Windows 7 & Vista: FixWin. FixWin is a 529 KB freeware portable application to repair & fix common Windows annoyances & issues. FixWin detects whether you have Windows 7 or Windows Vista installed and accordingly offers you the relevant fixes only.


While there were several tutorials and how-to’s already available on the Internet to deal with such annoyances, FixWin  as a single utility was conceptualized, to fix some of the common annoyances which may be faced by a Windows user.

Removing Windows 7 partition - For XP users

This process is essentially the same as before but using the third-party tool GParted instead of the integrated Disk Management utility in Vista. Be sure to have your XP CD on-hand to repair potential boot loader complications.

Before proceeding realize that by removing your Windows 7 installation and partition you will be deleting any documents
, pictures, videos etc. which you've accumulated on the Windows 7 partition if you haven't backed them up previously, so consider doing that before continuing.

Download the latest copy of GParted here, and then burn it to a disc as an image file.

After you've downloaded and burned your image of GParted, pop it in your optical drive and reboot. Shortly after booting off the disk you'll have to choose your preferred language, keymap and screen resolution.

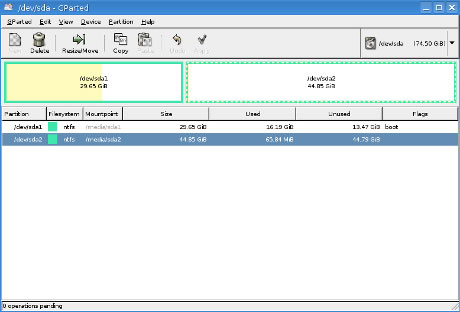
Once the partition software has loaded, right click the partition where Windows 7 resides (it's probably the second partition on “dev/hda1” if you followed our dual boot guide) and choose “Delete”.

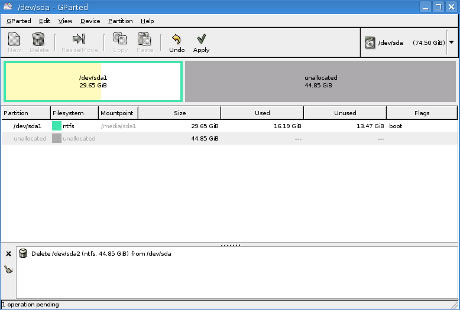
You should now see unallocated space on your hard drive where Windows 7 once laid.


Right click your original (and probably only remaining) partition, choose “Resize/Move” and fill in 0 for both the free space preceding and following to occupy the entire unallocated space.

Windows 7 in Windows XP Mode

Microsoft’s new Windows XP Mode requires hardware virtualization, which is probably one of the more confusing parts to knowing if your computer can support XPM. If you’re not sure what XPM is, check out our screenshot tour here.

Hardware Requirements:

The hardware requirements are essentially the same as Windows 7′s minimum requirements, with two exceptions:
CPU: Your CPU must support Hardware Virtualization.
RAM: Instead of a 1GB minimum, Microsoft recommends 2GBs of RAM

How to check if your CPU supports Hardware Virtualization:

You can use tools issued by the hardware manufacturer to check if your processor supports hardware virtualization. You may heard from elsewhere that Securable can be used to check for Hardware-VT, but this post from Neowin shows that Securable is not always correct.
Intel:
1) Download and install the Intel Processor Identification Utility. Run the Utility, click on the CPU Technologies tab and check to see if it says yes beside Intel(R) Virtualization Technology.
Windows 7 and Windows XP Mode: Can you run it?