HP announces Envy X2 tablet-laptop hybrid with Windows 8

HP announces Envy X2 tablet-laptop hybrid with Windows 8


Hewlett-Packard on Thursday announced an Envy X2 tablet-laptop hybrid device with the Windows 8 OS, signaling the company's re-entry into the tablet market, which it abandoned after the highly publicized failure of its TouchPad product.
At first glance, the HP Envy X2 resembles a netbook, with a keyboard base and an 11.6-inch touch display. But the device turns into a tablet once the screen is detached from the base.

The benefit of a hybrid device is it offers the best of both worlds for Windows 8, which doubles as a tablet and PC operating system. The tablet is 8.5 millimeters thick and 680 grams, and the display shows images at a 1,366-by-768-pixel resolution.
The Envy X2 runs on Intel's low-power Atom processor code-named Clover Trail. The device will be sold with the keyboard base and 64GB of solid-state drive storage, and the configuration cannot be customized. The device will become available during the latter part of the holiday season this year and will compete with hybrid devices that have been announced by PC makers like Asus, Acer, Lenovo and Samsung. Windows 8 will start shipping commercially on Oct. 26.
Though the device can operate independently as a tablet, HP views it as a laptop first and people have to buy the keyboard base. The dock has an SD card slot, USB ports and a high-definition multimedia interface (HDMI) port. The device has two batteries -- one in the base and the other in the tablet. The device offers more than eight hours of battery life in laptop mode. It has NFC capabilities, a high-definition webcam on the front and an 8.0-megapixel camera on the back. An optional stylus is available.
With this hybrid device, HP re-enters the consumer tablet market after it discontinued sales of webOS devices including the TouchPad. HP has reset its tablet strategy around Windows 8 OS.
HP also announced touchscreen ultrabooks with Windows 8 including the Spectre XT Touchsmart ultrabook, which is the company's first laptop with a Thunderbolt port. Thunderbolt is a high-speed interconnect technology developed by Intel to shuttle data between host PCs and external peripherals.
The ultrabook has a 15.6-inch, high-definition touchscreen and a choice of Intel's third-generation Core processor. It is 17.9 millimeters thick and weighs 2.16 kilograms. The laptop also features USB 3.0, Ethernet and HDMI ports.
The laptop will become available in the U.S. in December starting at $1,399. HP did not immediately provide information on worldwide availability.
HP's Envy Touchsmart Ultrabook 4 has a 14-inch touchscreen and a choice of Intel's latest Core processors. The ultrabook weighs 2.16 kilograms and offers up to eight hours of battery life. An optional Advanced Micro Devices graphics card can be added to the ultrabook to boost graphics capabilities. The company did not immediately provide availability and pricing for the product.


LAMP Quickstart for Red Hat Enterprise Linux 4


Introduction
A very common way to build web applications with a database backend is called
a “LAMP Stack”, where “LAMP” stands for the Linux® operating system, the Apache web server, the MySQL database, and the PHP (or Perl or Python) web
application language. This Quickstart will take you through configuring and starting up the LAMP components, and then downloading, installing and testing a
complete LAMP application, an online DVD Store. The DVD Store application, including four PHP pages and the code needed to build and load the MySQL database, can be used as a model for your own LAMP web application.

This Quickstart assumes you have successfully installed Red Hat® Enterprise
Linux 4 on your server (RHEL4 ES edition was used for the test but the
instructions should be similar for the other RHEL4 editions) and are moderately
familiar with Linux commands (you will need to be able to edit files). Total time to
work through the Quickstart should be 30 – 60 minutes.

Getting Started
For ease of use, log into the system as root.

Verify that the required packages have been installed. To do this, click on Applications => Systems Settings => Add/Remove Packages. This will bring up
a window showing all of the packages available, and what has already been installed, sorted by groups. Scroll down to the Servers section and verify the Web Server and MySQL Database have been checked. Under details of MySQL Database, verify that both php-mysql and mysql-server have also been checked. If any of these items have not been previously checked, simply click the update button at the bottom of the window and provide the appropriate installation media as requested.

For purposes of this document, the hostname is “rhel4es” and the root password
is “password” (you should use something more creative, of course!). You will need to ensure that all of the appropriate host name information has been
set in your network environment (updating DNS, or /etc/hosts, etc.) You will
need to create a non-root user to own the PHP and MySQL code. We used user
“web” with password “web”.

To create the web user, open a terminal shell (right click anywhere on the
desktop, select “Open Terminal”). Type the following (ideally you can cut and
paste right from this Quickstart to your Linux command shell). In this document
commands that you type or that are printed by the computer are indicated in
monospace font.

useradd web
passwd web

At this point, it will prompt you for the new password. Use “web” as the password
(ignore the warnings for BAD PASSWORD – you can always change this later).

For the rest of this document you will enter some commands as root and some
as web. [Hint: use two Linux command shells, one for root, one for web. If you
are logged in as root you can use the command su – web to login as web in that
command shell].

Start and Test Apache
To run the Apache web server you first need to make a small modification to the
Apache configuration file, then start the Apache service (known as “httpd”), and
finally configure it so it will always start when the machine is booted:

cd /etc/httpd/conf
cp httpd.conf httpd.conf.orig
gedit httpd.conf

Find the line with #ServerName new.host.name:80 and add below it:
ServerName rhel4es

Save your changes; close the window. Next, you will start the web server, and
configure it so that it will automatically start on the next reboot. Type the
following into the shell window:

service httpd start
chkconfig httpd on

To test Apache, bring up a web browser with URL http://localhost. You should
see the Red Hat Enterprise Linux Test Page:
LAMP Quickstart for Red Hat Enterprise Linux 4
Start and Test Apache


Start and Test MySQL
Before starting MySQL, you’ll need to create a MySQL configuration file from one
of the standard ones offered. As root, copy the standard small configuration file
to /etc/my.cnf and add 4 lines to the end of it. Type the following into the terminal
window:

cd /etc
cp /usr/share/doc/mysql-server-4.1.7/my-small.cnf my.cnf
cat >> my.cnf <hit Enter, then paste in next 4 lines>
# For DVD Store full text search
ft_min_word_len = 3
ft_stopword_file =
log=/var/lib/mysql/mysql_query.log
<Enter Ctrl-C>

Next you need to start the MySQL service (called “mysqld”), and set it to always
start when the machine starts. Type the following into the terminal shell:

service mysqld start
chkconfig mysqld on

Now configure user access to the MySQL database. To change root’s password
(replace the final “password” with your root password), give privileges to the webuser, and remove the default anonymous user, type the following into the
terminal shell:

mysqladmin -u root password password
mysql –p

This will prompt you for the password you just entered above, and start the
MySQL monitor. You will need to ensure that you also add access based on
your specific host name as well (i.e. web@localhost.localdomain). Type the
following at the mysql> prompt:

grant all privileges on *.* to web@localhost identified by 'web';
grant all privileges on *.* to web@rhel4es identified by 'web';
delete from mysql.user where User='';
exit

Login as web and test out MySQL:

su – web
mysql –u web –-password=web

This will start the MySQL monitor as the user “web”. Type the following at the mysql> prompt to test it:

show databases;

You should get output that looks something like:

+----------+
| Database |
+----------+
| mysql    |
| test     |
+----------+
2 rows in set (0.00 sec)

Type “exit” to leave the MySQL monitor. Type “exit” again to log out as “web”.
This shows that MySQL has been installed with the initial two databases.

 Start and Test PHP

As root, edit the PHP configuration file to point to the correct host and allow
access to the web user, then restart Apache to read changes. In the terminal
window, type the following:

cd /etc
cp php.ini php.ini.orig
gedit php.ini

Change three lines to read as follows:

mysql.default_host = rhel4es   
mysql.default_user = web
mysql.default_pw = web

Save the document, close the window, then continue typing the following into the
terminal shell window to restart the web server and put the changes you just
made into effect:

service httpd restart

To test PHP, create a test PHP page. Type the following into the terminal
window:

cd /var/www/html
gedit default.php

Add the following to the file:
<html>
 <head>
   <title>PHP Test Page</title>
 </head>
 <body>
   <?php
     echo “<hr />”;
     echo “<p align=center>This is a test of PHP!</p>”;
     echo “<hr />”;
     echo “<p align=center>Copyright &copy; 2005 Dell</p>”;
   ?>
 </body>
</html>

To test, use your browser to access http://localhost/default.php. It should look like
LAMP Quickstart for Red Hat Enterprise Linux 4
Start and Test PHP

Install and Test the DVD Store LAMP Application

Now you are ready to install a full LAMP application, the Dell DVD Store
application. This application has been released by Dell to the open source
community under the GPL license and is available for all to use.
First, download in binary the DVD Store files ds2.tar.gz and ds2_mysql.tar.gz
from http://linux.dell.com/dvdstore to web’s home directory, /home/web. To
accomplish this, type the following from the terminal window:

su – web
wget http://linux.dell.com/dvdstore/ds2.tar.gz

Then expand these “tarballs” with:

tar –xvzf ds2.tar.gz
tar –xvzf ds2_mysql.tar.gz

This will create several directories under /home/web/ds2 with the DVD Store data
files and driver programs, as well as the MySQL build and load scripts. Now, as
root, you will need to create a directory to put the PHP pages:

cd /var/www/html
mkdir ds2
Now, the PHP files need to be copied to the new directory:

cd ds2
cp ~/ds2/mysqlds2/web/php4/* .

Now you are ready to create and test the MySQL DVD Store database. As web:

cd ~/ds2/mysqlds2
sh mysqlds2_create_all_nosp.sh
mysql –u web --password=web

mysql> use DS2;
mysql> show tables;
+---------------+
| Tables_in_DS2 |
+---------------+
| CATEGORIES    |
| CUSTOMERS     |
| CUST_HIST     |
| INVENTORY     |
| ORDERLINES    |
| ORDERS        |
| PRODUCTS      |
| REORDER       |
+---------------+
8 rows in set (0.00 sec)

mysql> select count(*) from CUSTOMERS;
+----------+
| count(*) |
+----------+
| 20000    |
+----------+
1 row in set (0.01 sec)

mysql> exit

This shows that the DVD Store has been installed correctly with 8 tables and
20,000 initial customers.

The DVD Store LAMP stack is ready for testing. With your browser, access
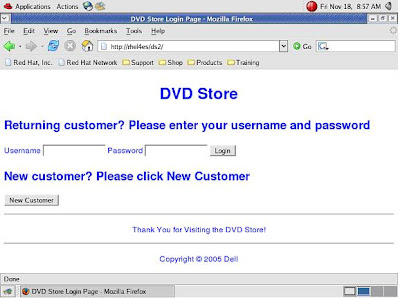
http://rhel4es/ds2. You should see the DVD Store Login page:
LAMP Quickstart for Red Hat Enterprise Linux 4


Login with Username “user2” and password “password”. You should see the
following Welcome screen:
LAMP Quickstart for Red Hat Enterprise Linux 4


Click on “Start Shopping”, search for some DVDs by Title, Actor or Category, add
DVDs to your shopping cart, and finally purchase them using your stored credit
card number.

You now have a working LAMP stack. By basing your application on the MySQL
and PHP code included here, you can jumpstart your own LAMP stack!

Recommended Post Slide out for Blogger


“Keep the visitors glued to your site for long” This is what every blogger out there wants to do. The Recommended Post slide Out Widget does just that. It’s kind of  an invitation to the reader to read a new post once he has read one of your blog entries. You might have seen this kind of a widget on many popular websites like New York Times, Mashable, Times of India etc.

I too loved the idea and found out that some one else had already made a jQuery snippet which does just the same. You can read about this awesome code on Mary Lou’s blog athttp://tympanus.net/codrops/2010/04/13/end-of-page-slide-out-box/ 
This is the modified form of that snippet so that it gets loaded asynchronously without affecting the page load. The Slide out will show random posts from your Blog. The random posts are fetched from your Blog Feed using Ajax. 

Demo of the Slide Out

Scroll down to the bottom of the post and you should see the Recommended Slide Out.
Recommended Post Slide out for Blogger

Add the Recommended Post Slide out Widget

To add the widget to your blog, you can use this one click installer.

Customizing the Recommended Slide out

1. End Of Post marker – The slide comes out when the user scrolls down to a particular point in your Blog.(the bottom of the page by default) To mark this point, you can add an HTML element there. The element should have the id bpslidein_place_holder
e.g.: <div id='bpslidein_place_holder'></div> would do the job. The best place to add this marker would be at the end of the post. If you want to do it easily, you can add this to your Blogger Template.
In your template Find,(You will have to expand the Widget Templates)
<div class='post-footer-line post-footer-line-1'>
or
<p class='post-footer-line post-footer-line-1'>
or
<data:post.body/>
Immediately below any of these, add the following snippet and save our template
<b:if cond='data:blog.pageType == "item"'>
<div style='display:none' id='bpslidein_place_holder'></div>
</b:if>
Now when the reader scrolls down to this div, the slide will open up.
2. Customizing the Look and Feel of the Slide out.
You can obviously style the Recommended Slide out. But before you do that, you have to add this variable definition to your template
<script>var bpslidein_custom_css=true;</script>
This should be added somewhere above the Slide Out Widget. If this variable is not set, a default StyleSheet will be used to spice up the Recommended Slide out.
Once this variable is set to true, you can add your own CSS definitions. You can add your CSS at Template Designer > Advanced Add CSS
This is the default set of Style definitions applied to the Widget. You can modify them and use it.
#bpslidein{z-index:5;width:400px;height:100px;padding:10px;background-color:#fff;border-top:3px solid #1616F5;position:fixed;right:-430px;bottom:0;-moz-box-shadow:-2px 0 5px #aaa;-webkit-box-shadow:-2px 0 5px #aaa;box-shadow:-2px 0 5px #aaa;font-family:Arial, Helvetica, sans-serif;}
#bpslidein p{font-size:11px;text-transform:uppercase;font-family:Arial,Helvetica,sans-serif;letter-spacing:1px;color:#555;}
#bpslidein_title{color:#555;font-weight:700;font-size:16px;margin:10px 20px 10px 0;}
#bpslidein a,#bpslidein a:hover,#bpslidein_title{text-decoration:none;color:#1616F5;}
#bpslidein .close,#bpslidein .expand,#bpslidein .help{border:2px solid #EEE;cursor:pointer;color:#9A9AA1;width:13px;height:15px;padding:2px 0 0 5px;position:absolute;right:10px;font-size:17px;font-weight:700;font-family:Arial, Helvetica, sans-serif;font-size:12px;}
#bpslidein .help{right:35px;}
#bpslidein_title,#bpslidein_image{float:left;width:80px;}
#bpslidein_title{width:290px;}
3. Other Stuff that you can edit
You can edit the Title of the Widget and the Loading text by editing the Widget Content.

What Is a Parity Drive

What Is a Parity Drive

A parity drive is a storage device used as part of a computer system that contains parity data for redundancy and backup purposes. This is commonly part of a Redundant Array of Independent Disks (RAID), in which one or more disk drives are connected together to act as a single system. When data is stored on these devices, parity information can be created for use later in case one of the disks fails. A parity drive is not necessarily part of all RAID setups, but it allows for simple and effective data recovery.
The basic function of a parity drive is to provide additional storage of "parity bits," which are pieces of data used to backup the main drives in a disk array. An array is a computer setup in which multiple disks, such as two or more hard drives, are connected together and used as a single storage system. Although a number of different methods are used for this, a RAID is among the most common forms. There are various types of RAIDS, and more complex "levels" often include the use of a parity drive to provide effective backup and redundancy of information.
A parity drive functions through the use of parity bits that are stored on it. The simplest example of how parity bits function is in a RAID or other system that uses three drives in total. Two of the drives would be used as the actual data storage disks, while the third would function as a parity drive. Whenever data is saved to the RAID, each piece of information is split in half, with one part going onto one drive and the other part onto the second.
Computer data consists of bits, which are binary pieces of data represented by either a one or a zero. Whenever information is stored on a system with a parity drive, one bit from each storage drive is added to the other. If the result is an even number, then a parity bit with a value of zero is saved to the parity device, while an odd result creates a value of one. This can then be used if one of the storage drives fails, to recreate the data that is missing in order to restore what was lost.
For example, a "1" on one device, and a "0" on the other, would generate a "1" to be stored on the parity drive, since this is an odd value when added together. If the storage drive with the "0" data on it becomes corrupted, it can be replaced with a new, blank disk. The system can then look at the existing data, find the remaining "1" in data storage, compare that to the "1" in the parity device, and recognize that a "0" needs to be recreated to restore the lost data. This is redundancy and allows an array to effectively recover data even if part of the original system is lost.

What are Disk Arrays


What are Disk Arrays

Disk arrays are storage systems that link multiple physical hard drives into one large drive for advanced data control and security. Disk arrays have several advantages over traditional single-disk systems.
A hard disk, while being the vital center of any computer system, is also its weakest link. It is the only critical device of a computer system that is not electronic, but relies on intricate moving mechanical parts that often fail. When this happens, data is irretrievable and unless a backup system has been employed, the user is out of luck. This is where disk arrays make a difference.
Disk arrays incorporate controls and a structure that pre-empts disaster. The most common disk array technology is RAID (Redundant Array of Independent Disks). RAID utilizes disk arrays in a number of optional configurations that benefit the user.
One advantage of RAID disk arrays is redundancy of data writes so that if a file is damaged or stored in a bad cluster or disk, it can be instantly and transparently replaced from another disk in the array. RAID also allows hot-swapping of bad disks and increased flexibility in scalable storage. Performance is also enhanced through a process called "striping."
There are many varieties of RAID, and though designed primarily for servers, disk arrays have become increasingly popular among individuals because of their many benefits. RAID is particularly suited for gamers and multimedia applications.
What are Disk Arrays


RAID controllers, built into motherboards, must set parameters for interacting with disk arrays. The controller sets the performance parameter to match the slowest disk. If it were to use the fastest disk as the benchmark, data would be lost when written to disks that cannot support that speed. For this reason, all disks in the array should be the same brand, speed, size and model for optimal performance. A mix of capacities, speeds and types of disks will negatively impact performance. The best drives for disk arrays are SATA (Serial ATA) RAID drives. These drives are optimized for RAID use and, being SATA, are hot-swappable.
Using disk arrays can provide peace of mind while improving data security and performance. Motherboards with built-in RAID controllers support certain types of RAID. For example, an older or inexpensive motherboard might only support RAID 0 and RAID 1, while a newer or more expensive board might support RAID 1 through RAID 5. Be sure to get a motherboard or third party RAID controller that supports the RAID configuration you require for your disk array.

Registry Hacks to Make Your PC Faster


Windows Registry is a database that holds your operating system's configurations and settings. This includes everything from how long your mouse must hover over a taskbar icon before the preview pops up (in Windows Vista and Windows 7) to performance settings.
Registry Hacks to Make Your PC FasterWindows 7 (and Vista) have more eye-candy features built into the operating system, but a number of Registry hacks and tweaks can speed up--or, at least, appear to speed up--the performance of your computer. Before we start mucking around with your PC's guts, however, we're going to make sure that you have a reliable backup of your Registry in case something goes sour.
Though editing the Windows Registry is not nearly as scary as it sounds, making an incorrect change can cripple your system. To ensure that this doesn't happen, it's important to take the precaution of backing up part, or all, of the Registry before you proceed.

Back Up the Entire Registry

To back up your Registry, you can use the free Registry-specific backup tool ERUNT (Emergency Recovery Utility NT). ERUNT is simple to use, more reliable than System Restore, and works with Windows XP, Vista, and 7 (even 64-bit versions). ERUNT also saves each restore point independently of the other points, unlike System Restore (in System Restore, all restore points are dependent on other points).

Back Up Part of the Registry

If you're changing just one part of the Windows Registry, and you know which part that is, you don't have to back up the entire Registry. Instead, you can back up the part you plan on changing using the Registry's export feature.
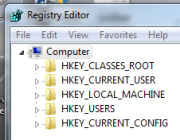
First, go to Start, Run, type regedit, and press Yes. This will open the Registry Editor.
Next, find the part of the Registry you're going to change. Right-click on the Registry key you plan on changing, and click "Export." The Registry Editor will prompt you to save a .reg file to your hard drive.
To undo Registry changes, just find your .reg file and double-click it. The .reg file will reset your Registry values to their existing values (but will not remove values that you've added).


Hack Your Registry

Using the built-in Registry EditorNow that you've backed up your Registry--perhaps more than once--it's time to start hacking away. To get to the Windows Registry, go to Start > Run (in Windows Vista/7 you will have to type run into the Start menu search bar and press Enter). Type regedit, click Yes, and the Registry Editor will open.

Hack 1: Speed Up Aero Peek

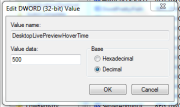
A quick tweak to speed up Aero Peek.A quick tweak to speed up Aero Peek. (Click for larger image.)Windows 7's Aero Peek lets you see the desktop when you move your mouse cursor over to the "show desktop" button at the end of the taskbar. The standard delay time for the Aero Peek preview is 500 milliseconds, or half a second. Here's how to speed it up:
1. Open the Registry Editor and go to HKEY_CURRENT_USER > Software > Microsoft > Windows > CurrentVersion > Explorer > Advanced.
2. Right-click on the right pane and click New > DWORD (32-bit) Value. Name the new DWORD "DesktopLivePreviewHoverTime."
3. Double-click on DesktopLivePreviewHoverTime to open it. Under "Base," click Decimal and then enter the delay time (in milliseconds) in the "Value data" field. Click OK, and your Aero Peek time will be set. You can set the value to higher (a longer delay time) if you're activating it too often by accident, or to lower (a shorter delay time) if half a second is just too long.
4. Log off and log back on for the change to take effect.

Hack 2: Speed Up Taskbar Previews

speed up (or slow down) taskbar previews
You can speed up (or slow down) taskbar previews here. (Click for larger image.)When you roll over taskbar icons in Windows Vista and in Windows 7, little previews appear. The standard delay time for these previews is 400 milliseconds, or just under half a second. If this is too slow (or too fast) for you, you can adjust the delay time with an easy Registry hack.
1. Open the Registry Editor and go to HKEY_CURRENT_USER > Software > Microsoft > Windows > CurrentVersion > Explorer > Advanced.
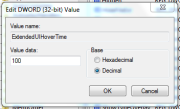
2. Right-click on the right pane and click New > DWORD (32-bit) Value. Name the new DWORD "ExtendedUIHoverTime."
3. Double-click on ExtendedUIHoverTime to open it. Under "Base," click Decimal and then enter in the delay time (in milliseconds) in the "Value data" field. Click OK to set the time (default is 400 milliseconds).
4. Log off and then log back in for the change to take effect.

Hack 3: Speed Up Menus

Ditch the menu display delay.Ditch the menu display delay. (Click for larger image.)If you'd like to speed up the menus in Windows Vista or Windows 7, try this easy Registry tweak:
1. Open the Registry Editor and go to HKEY_CURRENT_USER > Control Panel > Desktop.
2. Find MenuShowDelay and double-click to open. Adjust the value in milliseconds (the default is 400 milliseconds, or just under half a second).
3. Log off and then log back on for the change to take effect.

Hack 4: Prevent Reboots

Tired of losing work to Windows Update reboots? Fix that here.Tired of losing work to Windows Update reboots? Fix that here. (Click for larger image.)If you have a habit of leaving your computer on all the time (as do I), you'll occasionally run into the problem of automatic system reboots. These usually happen after Windows downloads some sort of important update, and will usually be preceded by a notification (that gives you about 10 to 15 minutes warning, unless you click it away). If you're not around to see said notification, and you have a lot of windows or important documents open on your computer, these reboots can be a hassle.
So here's how to keep your computer from automatically rebooting with an easy Registry hack. This hack works for Windows XP, Windows Vista, and Windows 7.
1. Open the Registry Editor and go to HKEY_LOCAL_MACHINE > SOFTWARE > Policies > Microsoft > Windows.
2. Right-click in the right pane and select New > Key. This will create a new folder. Name the new folder "WindowsUpdate."
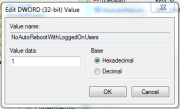
3. Open WindowsUpdate and right-click in the right pane (there will be a value already in the pane called "Default"). Select New > DWORD (32-bit) Value. Name this DWORD "NoAutoRebootWithLoggedOnUsers."
4. Open NoAutoRebootWithLoggedOnUsers and change the Value data to 1. Do not change the Base button to "Decimal"; instead, keep it at "Hexadecimal." Click OK.
5. Exit the Registry Editor and log off and log back in for the settings to take effect. Your system will now never force a reboot without your explicit permission.

Hack 5: Disable Notification Balloons

Your Notification Area is constantly flashing with balloon pop-ups. Your notification area is constantly flashing with balloon pop-ups. Cut them out here. (Click for larger image.)If you hate pop-up notification balloons on your Windows Vista or Windows 7 taskbar, you can disable them using a simple Registry hack:
1. Open the Registry Editor and go to HKEY_CURRENT_USER > Software > Microsoft > Windows > CurrentVersion > Explorer > Advanced.
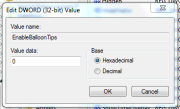
2. Right-click on the right pane and select New > DWORD (32-bit) Value. Name your new DWORD "EnableBalloonTips."
3. Double-click on EnableBalloonTips and set the Value data to 0. It doesn't matter if you have Decimal or Hexadecimal clicked under "Base," because 0 is 0 in both decimal and hexadecimal.
4. Log off and log back on for the change to take effect. You'll no longer see any annoying notification balloons from the taskbar.

Hack 6: Boot XP Faster

Is Windows XP booting too slowly? Here's how to speed up your boot-time with a quick Registry tweak.
1. Open the Registry Editor and go to HKEY_LOCAL_MACHINE > SYSTEM > CurrentControlSet > Control > ContentIndex.
2. In the right pane will be a value called "StartupDelay." Double-click on StartupDelay to open it. Change the "Base" from Hexadecimal to Decimal, and enter 40,000 (the default setting is 480,000).
3. Exit the Registry Editor and restart your computer. Your computer should boot up considerably faster--while this worked for me on my Windows XP laptop, values lower than 40,000 didn't produce a noticeable difference.


How To Backup Your Chrome Bookmarks Without Chromesync

How To Backup Your Chrome Bookmarks Without Chromesync
How To Backup Your Chrome Bookmarks
Chromesync is the most attractive feature on Chrome and we all love it. But what if you do not want to use it but still need to backup your bookmarks? Well, you can copy the “bookmarks” file from Chrome’s App data and backup it on Dropbox or a similar cloud service to get sync it elsewhere. Let me show you how.

The only thing involved here is navigating to the correct folder to find the “bookmarks” file to copy it. So, here is the location of this file on different operating systems.


Windows 7

C:\Users\<USER>\AppData\Local\Google\Chrome\User Data\Default ( Replace the <USER> with your username. Here is the easiest way. Open up explorer and paste this on the addressbar after altering the username to show yours.
This directly takes you to the folder for the default user. Navigate to other folders if you need to copy bookmarks from other profiles.
Open the following

Windows XP

C:\Documents and Settings\<USER>\Local Settings\Application Data\Google\Chrome\User Data\Default\

Windows 8

C:\Users\<USER>\AppData\Local\Google\Chrome\User Data\Default  (same as Windows 7)

Ubuntu

.config/google-chrome/Default/Bookmarks

Apple Mac OSX -

~/Library/Application Support/Google/Chrome/Default