Showing posts with label Linux Tricks. Show all posts

How to get 'Nth' line of a text file in linux

How to get 'nth' line of a text file in linux

 Below are the two better ways to print nth line of text files in linux.

1. Use the combination of head and tail command

one of the easiest way of printing nth line of a text file is by using the combination of head and tail command.Below is an exapmle of how to use it for displaying the 9th line of a file named sample.txt

Moving all the txt files from all the subfolders to another single folder in Linux


 Some times we need to move all the files with same extension to a single desired folder. It can be easy if there is only two or three folders...Just think there is hundreds of folders and its sub folders are there and need to move the files from all these folder.

Searching all the folder manually and move these files to the outside folder is a big task.In such case we can use the below command in order to move all the files to our desired external folder. 

Syntax

find <Parent_folder> -type f -iname "*.txt" -exec mv --backup=numbered -t <destination folder> {} +

Windows 10 partition mounted in Linux mint as read only [SOLVED]


        Linux mint is an easy to use and comfortable GNU/Linux which is a desktop distribution.People worked in windows background has no difficulty in working with Linux mint.But some times users configure there system with dual operating system as windows and Linux for there ease of use.Most of the time it will work smoothly ...

But some times issues can happen....


One of the scenario is described below.

Linux Tricks & Hacks

1. Runnig top command in batch mode

Top is a very useful command we are using while working with linux for monitoring the utilization of our system.It is invoked from the command line and it works by displaying lots of useful information, including CPU and memory usage, the number of running processes, load, the top resource hitters, and other useful bits. By default, top refreshes its report every 3 seconds.
Most of us use top in this fashion; we run it inside the terminal, look on the statistics for a few seconds and then graciously quit and continue our work.
But what if you wanted to monitor the usage of your system resources unattended? In other words, let some system administration utility run and collect system information and write it to a log file every once in a while. Better yet, what if you wanted to run such a utility only for a given period of time, again without any user interaction?
There are many possible answers:
  • You could schedule a job via cron.
  • You could run a shell script that runs ps every X seconds or so in a loop, incrementing a counter until the desired number of interactions elapsed. But you would also need uptime to check the load and several other commands to monitor disk utilization and what not.
Instead of going wild about trying to patch a script, there's a much, much simpler solution: top in batch mode. 
top can be run non-interactively, in batch mode. Time delay and the number of iterations can be configured, giving you the ability to dictate the data collection as you see fit. Here's an example:

top -b -d 10 -n 3 >> top-file

We have top running in batch mode (-b). It's going to refresh every 10 seconds, as specified by the delay (-d) flag, for a total count of 3 iterations (-n). The output will be sent to a file. A few screenshots:
And that does the trick. Speaking of writing to files ...

2. Write to more than one file at once with tee

In general, with static data, this is not a problem. You simply repeat the write operation. With dynamic data, again, this is not that much of a problem. You capture the output into a temporary variable and then write it to a number of files. But there's an easier and faster way of doing it, without redirection and repetitive write operations. The answer: tee.

tee is a very useful utility that duplicates pipe content. Now, what makes tee really useful is that it can append data to existing files, making it ideal for writing periodic log information to multiple files at once.

Here's a great example:
ps | tee file1 file2 file3
That's it! We're sending the output of the ps command to three different files! Or as many as we want. As you can see in the screenshots below, all three files were created at the same time and they all contain the same data. This is extremely useful for constantly changing output, which you must preserve in multiple instances without typing the same commands over and over like a keyboard-loving monkey.

Now, if you wanted to append data to files, that is periodically update them, you would use the -a flag, like this:
ps | tee -a file1 file2 file3 file4

3. Unleash the accounting power with pacct

Did you know that you can log the completion of every single process running on your machine? You may even want to do this, for security, statistical purposes, load optimization, or any other administrative reason you may think of. By default, process accounting (pacct) may not be activated on your machine. You might have to start it:
/usr/sbin/accton /var/account/pacct
Once this is done, every single process will be logged. You can find the logs under/var/account. The log itself is in binary form, so you will have to use a dumping utility to convert it to human-readable form. To this end, you use the dump-acct utility.
dump-acct pacct
The output may be very long, depending on the activity on your machine and whether you rotate the logs, which you should, since the accounting logs can inflate very quickly.
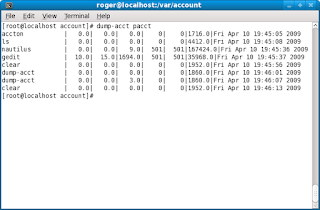
And there you go, the list of all processes ran on our host since the moment we activated the accounting. The output is printed in nice columns and includes the following, from left to right: process name, user time, system time, effective time, UID, GID, memory, and date. Other ways of starting accounting may be in the following forms:
/etc/init.d/psacct start
Or:
/etc/init.d/acct start
In fact, starting accounting using the init script is the preferred way of doing things. However, you should note that accounting is not a service in the typical form. The init script does not look for a running process - it merely checks for the lock file under /var. Therefore, if you turn the accounting on/off using the accton command, the init scripts won't be aware of this and may report false results.
BTW, turning accounting off with accton is done just like that:
/usr/sbin/accton
When no file is specified, the accounting is turned off. When the command is run against a file, as we've demonstrated earlier, the accounting process is started. You should be careful when activating/deactivating the accounting and stick to one method of management, either via the accton command or using the init scripts.

4. Dump utmp and wtmp logs

Like pacct, you can also dump the contents of the utmp and wtmp files. Both these files provide login records for the host. This information may be critical, especially if applications rely on the proper output of these files to function.
Being able to analyze the records gives you the power to examine your systems in and out. Furthermore, it may help you diagnose problems with logins, for example, via VNC or ssh, non-console and console login attempts, and more.
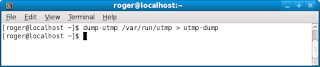
You can dump the logs using the dump-utmp utility. There is no dump-wtmp utility; the former works for both.

You can also do the following:
dump-utmp /var/log/wtmp
Here's what the sample file looks like:

5. Monitor CPU and disk usage with iostat

Would you like to know how your hard disks behave? Or how well does your CPU churn?iostat is a utility that reports statistics for CPU and I/O devices on your system. It can help you identify bottlenecks and mis-tuned kernel parameters, allowing you to boost the performance of your machine.
On some systems, the utility will be installed by default. Ubuntu 9.04, for example, requires that you install sysstat package, which, by the way, contains several more goodies that we will soon review:
Then, we can start monitoring the performance. I will not go into details what each little bit of displayed information means, but I will focus on one item: the first output reported by the utility is the average statistics since the last reboot.
Here's a sample run of iostat:
iostat -x 10 10
The utility runs 10 times, every 10 seconds, reporting extended (-x) statistics. Here's what the sample output to terminal looks like:

6. Monitor memory usage with vmstat

vmstat does the similar job, except it works with the virtual memory statistics. For Windows users, please note the term virtual does not refer to the pagefile, i.e. swap. It refers to the logical abstraction of memory in kernel, which is then translated into physical addresses.
vmstat reports information about processes, memory, paging, block IO, traps, and CPU activity. Again, it is very handy for detecting problems with system performance. Here's a sample run of vmstat:
vmstat -x 10 10
The utility runs 10 times, reporting every 1 second. For example, we can see that out system has taken some swap, but it's not doing anything much with it, there's approx. 35MB free memory and there's very little I/O activity, as there are no blocked processes. The CPU utilization spikes from just a few percents to almost 90% before calming down.
Nothing specially exciting, but in critical situations, this kind of information can be critical.

7. Combine the power of iostat and vmstat with dstat

dstat aims to replace vmstat, iostat and ifstat combined. It also offers exporting data into .csv files that can then be analyzed using spreadsheet software. dstat uses a pleasant color output in the terminal:
Plus you can make really nice graphs. The spike in the graph comes from opening the Firefox browser, for instance.

8. Collect, report or save system activity information with sar

sar is another powerful, versatile system. It is a sort of a jack o' all trades when it comes to monitoring and logging system activity. sar can be very useful for trying to analyze strange system problems where normal logs like boot.msg, messages or secure under /var/log do not yield too much information. sar writes the daily statistics into log files under /var/log/sa. Like we did before, we can monitor CPU utilization, every 2 seconds, 10 times:
sar -u 2 10
Or you may want to monitor disk activity (10 iterations, every 5 seconds):
sar -d 5 10
Now for some really cool stuff ...

9. Create UDP server-client - version 1

Here's something radical: create a small UDP server that listens on a port. Then configure a client to send information to the server. All this without root access!

Configure server with netcat

netcat is an incredibly powerful utility that can do just about anything with TCP or UDP connections. It can open connections, listen on ports, scan ports, and much more, all this with both IPv4 and IPv6.
In our example, we will use it to create a small UDP server on one of the non-service ports. This means we won't need root access to get it going.
netcat -l -u -p 42000
Here's what we did:
-l tells netcat to listen, -u tells it to use UDP, -p specifies the port (42000).
We can indeed verify with netstat:
netstat -tulpen | grep 42000
And we have an open port:

Configure client

Now we need to configure the client. The big question is how to tell our process to send data to a remote machine, to a UDP port? The answer is quite simple: open a file descriptor that points to the remote server. Here's the actual BASH script that we will use to test our connection:
The most interesting bit is the line that starts with exec.
exec 104<> /dev/udp/192.168.1.143/$1
We created a file descriptor 104 that points to our server. Now, it is possible that the file descriptor number 104 might already be in use, so you may want to check first with lsof or randomize the choice of the descriptor. Furthermore, if you have a name resolution mechanism in place, you can use a hostname instead of an IP. If you wanted to use a TCP connection, you would use /dev/tcp.
The choice of the port is defined by the $1 variable, passed as a command-line argument. You can hard code it - or make everything configurable by the user at runtime. The rest of the code is unimportant; we do something and then send information to our file descriptor, without really caring what it is. Again, we need no root access to do this.

Test connection

Now, we can see the server-client connection in action. Our server is a Ubuntu 8.10machine, while our client is a Fedora 11. We ran the script on the client:
And watch the command-line on the server:
To make it even more exciting, I've created a small Flash demo with Wink. You are welcome to play the file, if you're interested:

Cool, eh?

10. Configure UDP server-client - version 2

The limitation with the exercise above is that we do not control over some of the finer aspects of our connection. Furthermore, the connection is limited to a single end-point. If one client connects, others will be refused. To make things more exciting, we can improve our server. Instead of using netcat, we will write one of our own - in Perl.
Perl is a powerful programming language, very flexible, very neat. I must admin I have only recently began dabbling in it, so do not expect any miracles, but here's one way of creating a UDP server in Perl - there are tons of other implementations available, better, smarter, faster, and more elegant.
The code is very simple. First, let's take a look at the entire file and then examine sections of code. Here it is:
#!/usr/bin/perl

use IO::Socket;

$server = IO::Socket::INET->new(LocalPort => '50060',
                                Proto => "udp")
or die "Could not create UDP server on port
$server_port : $@n";

my $datagram;
my $MAXSIZE = 16384; #buffer size

while (my $data=$server->recv($datagram,$MAXSIZE))
{
    print $datagram;

    my $logdate=`date +"%m-%d-%H:%M:%S"`;
    chomp($logdate);

    my $filename="file.$logdate";
    open(FD,">","$filename");
    print FD $datagram;
    close(FD);
}

close($server);
The code begins with the standard Perl declaration. If you want extra debugging, you can add the -w flag. If you want to use strict code, then you may also want to add use strict;declaration. I warmly recommend this.
The next important bit is this one:
use IO::Socket;
This one tells Perl to use the IO::Socket object interface. You can also use IO:Socket::INET specifically for domain sockets. For more information, please check the official Perl documentation.
The next bit is the creation of the socket, i.e. server:
$server = IO::Socket::INET->new(LocalPort => '50060',
                                Proto => "udp")
or die "Could not create UDP server on port
$server_port : $@n";
We are trying to open the local UDP port 50060. If this cannot be done, the script will die with a rather descriptive message.
Next, we define a variable that will take incoming data (datagram) and the buffer size. The buffer size might be limited by the network implementation or network restrictions on your router/switch or the kernel itself, so some values might not work for you.
And then, we have the server doing some hard work. It prints the data to the screen. But it also creates a log file with a time stamp and prints the data to the file as well.
The beauty of this implementation is that the server permits multiple incoming connections. Of course, you will have to decide how you want to differentiate the data sent by different clients, whether by a message header or using additional IO:Socket:INET objects like PeerAddr.
On the client side, nothing changes.

Conclusion

That's it for now. This crazy collection should help you impress friends evoke a smile with your peers or even your boss and help you be more detailed and productive when it comes to system administration tasks. Some of the utilities and tricks presented here are tremendously useful.
If you're wondering what distribution you may need to be running to get these things done, don't worry. You can get them working on all distros. Throughout this document, I demonstrated using Ubuntu 8.10, Ubuntu 9.04 and Fedora 11. Debian-based or RedHat-based, there's something for everyone.

TV on Linux


A number of cards exist allowing you to watch and record TV on your PC. Most come with software for Windows only, like so many things, but it is possible to do the same thing on Linux. Linux comes with several drivers which make up the Video4Linux drivers. Several cards are supported by these drivers, and a list of them is available at http://roadrunner.swansea.linux.org.uk/v4l.shtml. This is the driver side. You also need software to use the devices.
Several programs are available to watch TV, capture images and even Web applications. A list of some of the
programs is available at http://www.thp.uni-koeln.de/~rjkm/linux/bttv.html including datasheets.

Find hardware information in Linux


When the Linux system boots, it will try to detect the hardware installed in the computer. It will then make a fake file system called procfs and will store important information about your system in it. You can get information about your system simply by browsing the directory /proc. The files in there will contain information such as the processor you have, the amount of memory and the file systems the kernel currently supports. A usefull application exists to browse the /proc file system. It is called Xproc and is available from http://devplanet.fastethernet.net/files.html


Detecting 2 ethernet cards in Linux


To configure an ethernet card in Linux, you need to enable it in the kernel. Then the kernel will detect your ethernet card if it is at a common IO port. But it will stop there, and will never check if you have 2 ethernet cards. The trick is to tell the ethernet driver that there are 2 cards in the system. The following line will tell the kernel that there is an ethernet card at IRQ 10 and IO 0x300, and another one at IRQ 9 and IO 0x340: ether=10,0x300,eth0 ether=9,0x340,eth1 .You can add that line on bootup at the "boot:" prompt, or in the /etc/lilo.conf file. Don't forget to run: lilo
That will reload the lilo.conf file and enable changes.

Auto mounting a partition


It’s been a while. A while since I’ve had to actually had to manually edit the /etc/fstab to automount a partition. So long, that I searched my blog trying to find out how to do it. To my surprise, I’d never actually written one. If I had, I couldn’t find it. Here’s to you, memory:
According to /etc/fstab this is how it’s done
# <file system> <mount point> <type> <options> <dump> <pass>
For those of us that are human, that can mean very little. What you can do, in hopefully slightly more understandable terms is add a line that looks like this:

Setup SSH Key Authentication (Password-Less Authentication)


Setup ssh key authentication for password-less login between servers.  For use by ssh/sftp users or scripts.
Source Server (or local system)
Generate RSA key for user on this system, you can also use DSA.  This asks for key pass-phrase but you can leave it blank.
ssh-keygen -t rsa
This asks for location to place the generated key, by default it will be your home directory (ex: /home/your_username/.ssh/).  This generates two files:  id_rsaand id_rsa.pub.  Content of id_rsa.pub is what we need to copy to destination server.

Restrict network access by time or IP address with Squid


There are a number of reasons why you would want to restrict network access. You run a cafe with web access or you have young or teenage children and you want them to only be able to use the network at certain times. Their are certainly tools out there to do this on a PC-by-PC basis, but why not employ a proxy server instead? One of the best (and most robust) proxy servers available for the Linux operating system is theSquid Proxy server. But don’t let the name fool you, you do not have to install Squid on a server. You can just as easily install squid on a Linux desktop machine and control network access from your LAN.
Of course when you open up your /etc/squid/squid.conf file you might be a bit overwhelmed. So in this article I am going to show you two ways to limit access with Squid (instead of tossing the whole configuration file at you at once). I will also show you the quick and dirty method of installing Squid on a Fedora 13 machine. Once done with this article, you will at least be able to control network access by time or by IP address. In later articles we will discuss other ways to control network access with Squid.

See what images are being viewed on your network with driftnet


I want to preface this article by saying I am not, in any way advocating spying on your users. With that said, there are times (and reasons) why you might need to see what images are being viewed on your network. Whether it be an end user who is viewing content that goes against specific company policies or, worse, against the law. When this happens, you might have need or cause to see just what is being viewed from your LAN. When this is the case there is a handy tool for that called Driftnet.
Driftnet was inspired by the old Apple program EtherPEG and works by watching TCP streams for images and MPEG audio streams. As it listens I dumps the images into a user configured directory and/or it can display the images within a window as they are captured. In this article I will show you how to install and use Driftnet.
Installation

Connect to a Windows Terminal Server from Linux


There are a number of reasons to have to connect to a Windows Terminal Server machine. Either you telecommute, you administer remotely, you work on the go, or you use Linux and have to use a Windows app for company business. No matter the reason, you have to be able to connect. From the Windows operating system there is a built-in application for making this connection. But what aboutLinux? How do you make this connection from within the open source operating system? Simple.
There are a number of good Linux terminal server clients available. In this article I will demonstrate how you connect to your server with the help of two of them: tsclient and krdc.
tsclient
What most people like about tsclient is that is very closely resembles the Microsoft tool that handles the same task. So there is already a level of familiarity to the application. But before you can use it, you have to install it. This is simple, just follow these steps:

Migrate users from one Linux machine to another


Have you ever had a need to migrate current running Linux users from installation to another? That would be a simple task if the user count was low. But  what happens when the user count is in the hundreds? What do you do then? If you’re not using LDAP, you know you will have to migrate the users’ data, passwords, etc from the old machine to the new. Believe it or not, this is just a matter of a few commands – not necessarily simple commands, but it’s not as complex as you would think.
In this article I am going to show you how to make this migration so your Linux users do not loose their data and their passwords are all retained.
What we migrating
The list is fairly simple:
  • /etc/passwd - Contains information about the user.
  • /etc/shadow - Contains the encrypted passwords.
  • /etc/group - Contains group information.
  • /etc/gshadow - Contains group encrypted passwords.
  • /var/spool/mail - Contains users email (the location will depend upon the mail server you use).
  • /home/ - Contains users data.
Unfortunately these files can not simply be copied from one machine to another – that would be too easy.  Just make sure you enter the following commands correctly.