Showing posts with label Tricks. Show all posts

Set up and use Google Docs offline


Google has now made its Drive service more than an online storage product and productivity suite. You can now edit documents you have stored on Google Drive (or Docs, if you haven't moved over to the new interface) during those moments -- while sitting on an airplane or in a cabin in the woods or in a Wi-Fi-free coffee shop -- when you are not connected to the Internet. And when you open that same document when you are back online, the changes you made while offline are there. (For some reason, Google is putting this offline access under the old Docs banner.) Here's how to start using Google Docs offline.
set up and use Google Docs offline(Credit: Screenshot by Matt Elliott/CNET)
To begin, Google Docs offline is available only in Google's own Chrome browser. To enable offline access, go to your Google Drive page and click the gear icon in the upper-right corner and select Set up Google Docs offline. A window will pop up with a two-step setup process. Click the Enable offline Docs button and then for Step 2, you will need to install the Drive Web app for Chrome. Click the second blue button in the window and you will be taken to the Chrome Web store to install the Drive Web app.
After installing the Web app, return to your Drive home page and you'll see a notification pointing to the gear icon that informs you that some of your recent files are being synced and how to view them. To see which docs are available offline, click the gear icon and choose "view offline Docs." It opens a new Google Docs offline tab in Chrome. Bookmark this page so you can access it in Chrome when you are without the Internet.
set up and use Google Docs offline(Credit: Screenshot by Matt Elliott/CNET)
Google Docs offline shows you only Documents and Spreadsheets; Presentations, Drawings, and Forms don't make the jump. And you can edit Documents but can only view Spreadsheets. And despite there being a grayed-out red (pinked out?) New Document button, you cannot create new documents in offline mode. Given the presence of such a button, I'd wager that this feature is coming soon.

10 unknown Google tricks


10 unknown Google tricks


Below is a list of  Ten unknown Google tricks. many people who use Google don't know about this.

Definitions
Pull up the definition of the word by typing define followed by the word you want the definition for. For example, typing: define bravura would display the definition of that word.
Local search
Visit Google Local enter the area you want to search and the keyword of the place you want to find. For example, typing:restaurant at the above link would display local restaurants.
Find weather and movies
Type "weather" or "movies" followed by a zip code or city and state to display current weather conditions or movie theaters in your area. For example, typing weather 84101 gives you the current weather conditions for Salt Lake City, UT and the next four days. Typing movies 84101 would give you a link for showtimes for movies in that area.
Track airline flight and packages
Enter the airline and flight number to display the status of an airline flight and it's arrival time. For example, type: delta 123 to display this flight information if available.
Google can also give a direct link to package tracking information if you enter a UPS, FedEx or USPS tracking number.
Translate
Translate text, a full web page, or search by using the Google Language Tools.
Pages linked to you
See what other web pages are linking to your website or blog by typing link: followed by your URL. For example, typing link: http://www.blogforadmins.blogspot.in displays all pages linking to blogforadmins.com
Find PDF results only
Add filetype: to your search to display results that only match a certain file type. For example, if you wanted to display PDF results regarding linux only type: "linux" filetype:pdf -- this is a great way to find online manuals.
Calculator
Use the Google Search engine as a calculator by typing a math problem in the search. For example, typing: 100 + 200 would display results as 300.

How To Backup Your Chrome Bookmarks Without Chromesync

How To Backup Your Chrome Bookmarks Without Chromesync
How To Backup Your Chrome Bookmarks
Chromesync is the most attractive feature on Chrome and we all love it. But what if you do not want to use it but still need to backup your bookmarks? Well, you can copy the “bookmarks” file from Chrome’s App data and backup it on Dropbox or a similar cloud service to get sync it elsewhere. Let me show you how.

The only thing involved here is navigating to the correct folder to find the “bookmarks” file to copy it. So, here is the location of this file on different operating systems.


Windows 7

C:\Users\<USER>\AppData\Local\Google\Chrome\User Data\Default ( Replace the <USER> with your username. Here is the easiest way. Open up explorer and paste this on the addressbar after altering the username to show yours.
This directly takes you to the folder for the default user. Navigate to other folders if you need to copy bookmarks from other profiles.
Open the following

Windows XP

C:\Documents and Settings\<USER>\Local Settings\Application Data\Google\Chrome\User Data\Default\

Windows 8

C:\Users\<USER>\AppData\Local\Google\Chrome\User Data\Default  (same as Windows 7)

Ubuntu

.config/google-chrome/Default/Bookmarks

Apple Mac OSX -

~/Library/Application Support/Google/Chrome/Default

10 Windows 7 Registry hacks and tweaks

Windows 7 Registry hacks and tweaks
Windows 7 
Windows 7 needs far less of the sleeves-up shuffling about that its predecessors demanded for smooth operation.
It works, and it works well. But that doesn't mean you can't use the Registry to add nifty features or change the settings to your liking.
Here are ten things you can do with the Windows 7 Registry. Just type regedit in the usual search box and hit [Enter], then follow our tips.

1. Personalise IE8
Bought your PC from an overzealous manufacturer that's gratuitously branded Internet Explorer with its own name? Just want to add your own custom touch in place of the default 'Windows Internet Explorer'? It's easy.
In the registry editor, navigate to 'HKEY_CURRENT_ USER\Software\Microsoft\ Internet Explorer\Main' and create a new string value. Name it 'Window Title', with the space. Then just double-click it and enter your desired window title in the field.
2. Stop Snap
Aero Snap is arguably a very useful feature – we say arguably because, as we're sure you've noticed, it often decides to kick in and glue your windows to screen edges when you don't want it to.
If you're not finding the Snap feature useful, then you might as well turn it off . First, navigate to 'HKEY_CURRENT_ USER\Control Panel\Desktop'. There are a number of settings you could customise here, but the one that you're looking for in this case is called 'WindowArrangementActive'. The value should be 1 – change it to 0 to make this feature inactive.
Alternatively, just make sure you never venture too close to the edge.
3. Change stacking behaviour
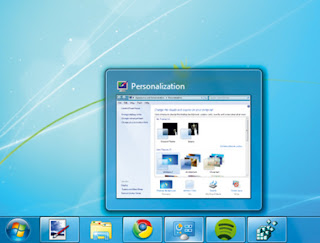
This particular tweak is perhaps of questionable usefulness, but we thought you'd like the option to try it anyway. If you don't like the thumbnail display when clicking on taskbar buttons, then you can change the action and force Windows to open the last opened window of the stack instead.
To do this, open 'HKEY_ CURRENT_USER\Software\ Microsoft\Windows\Current Version\Explorer\Advanced' and create a new DWORD value. Rename it LastActiveClick and set its value to 1 to switch this mode on.
Should you change your mind, you can always go back and delete the key or set it to 0 to revert back later on.
4. Quicker taskbar previews
Are you bored of waiting the couple of seconds it takes for the graphical previews to pop up when you hover over icons on the taskbar? Or would you rather they took longer to appear?

Windows 7 Registry hacks and tweaks
The choice is yours. Go to 'HKEY_CURRENT_USER\ Software\Microsoft\Windows\ CurrentVersion\Explorer\Advanced' and create a DWORD named 'ExtendedUIHoverTime'. Now double-click to open it, click the 'Decimal' radio button, and then change its value to the number of milliseconds you'd like the process to take. The default is 400ms.
5. Change other delays
Stay in the same key (Explorer\Advanced) and you can tweak a couple of other timings.
Add a 32-bit DWORD into the mix named 'DesktopLivePreviewHoverTime'. Switch this to decimal in the same manner as before, then change the value data field to alter the number of milliseconds it takes for the Aero Peek function (minimise all windows) to kick in when you hover over the icon on the right of the taskbar.
Alternatively, do the same with a DWORD called 'ThumbnailLivePreview HoverTime' to alter how long it takes for the windows that are associated with taskbar thumbnails to come to the front.
6. Speed up menus
Make menu items automatically drop down a lot faster with this tweak. Go to 'HKEY_CURRENT_USER\ Control Panel\Desktop', right-click 'MenuShowDelay' and click 'Modify'.
Now change the current string value to something like 100 – hey presto, near-instant menu appearance.
7. Stop space checking
Free up a tiny shred of system resources. Go to 'HKEY_ CURRENT_USER\Software\ Microsoft\Windows\Current Version\Policies\Explorer', create a new DWORD called 'NoLowDisk SpaceChecks' and set its value to 1 to switch off disk space checking.
8. Move the kernel
If the Windows Kernel is in memory, it will run slightly faster than it would if it were on your hard drive. Hunt out 'DisablePagingExecutive' within 'HKEY_LOCAL_MACHINE\SYSTEM\ CurrentControlSet\Control\Session Manager\Memory Management'. Change its value to 1.
9. Change the name
Bought a second-hand machine? Then you might want to alter the name of the registered owner. Go to 'HKEY_LOCAL_MACHINE\ Software\Microsoft\Windows NT\ CurrentVersion\', double-click on the 'RegisteredOwner' key and then change it.
10. Boost speed
There's one tweak that will make every hover action much faster, from tooltips to the Start menu. Navigate to 'HKEY_CURRENT_USER\ Control Panel\Mouse' and tweak the 'MouseHoverTime' value. A word of warning, though: never choose 0 – it's completely unworkable.

Click here for more Registry tweaks...

comments pls...


What to do when Oracle XE is not starting after a reboot


What to do when Oracle XE is not starting after a reboot
When you install Oracle Xe on a windows machine (mainly server OS’s like Windows 2003) you may notice that the database is not always starting after a reboot. This ussualy happenes when the Oracle XE was installed under a different user than the one you are currently logged in as.
It is easy to start the database by going to Start-> All Programs -> Oracle Database 10g Express Edition – Run SQL Command Line and simply type “STARTUP”.

However, if you want to automate this process you can use the StartDB.bat.
1) Navigate to your Oracle XE directory (typically under C:\oraclexe\app\oracle\product\10.2.0\server\BIN)
2) Edit the StartDB.bat file – If the Oracle Service andthe listener is started you can delete the first two lines (net start OracleXETNSListener and net start OracleServiceXE) and save the file.
3) Go to Start > All Programs > Accessories > System Tools > Scheduled Tasksand Use the Windows Scheduler to execute the batch file “When my computer Starts”.
Oradim messages are not displayed in the command prompt (you can still find the results in oradim.log under C:\oraclexe\app\oracle\product\10.2.0\server\database) so it might be wise to try the command first using the command prompt.
If you get ORA-01031: insufficient privileges when you trying to start the db (you probably will if you are logged on as different user than the user who installed Oracle XE) all you need to do is add the user to the ORA_DBA windows group.
1) Right click on My Computer and click Manage.
2) Navigate to Local Users and Groups and click on Groups.
3) Double click on the ORA_DB group and add the user you are currently logged in as.
4) Re run the oradim -startup -sid XE -starttype inst > nul 2>&1 to verify that it works.

How To Extract Audio From FLV Files Using VLC


This method allows you to extract the audio of FLV files (e.g. YouTube videos) using VLC and save it in MP3 format. I tested the instructions below with VLC on Mac OS X.
  1. Open the FLV file with VLC and stop it as soon as it starts playing.
  2. Open the VLC Wizard by clicking on File > Streaming/Exporting Wizard…
  3. Select Transcode/Save to file. Next
  4. Select your file from the Playlist. Next

PROCESS TO REMOVE WINDOW GENUINENES FROM WINDOW XP MACHINE

1.Lauch Windows Task Manager.
2.End wgatray.exe process in Task Manager.
3.Restart Windows XP in Safe Mode.
4.Delete WgaTray.exe from c:\Windows\System32.
5.Delete WgaTray.exe from c:\Windows\System32\dllcache.
6.Lauch RegEdit.
7.Browse to the following location:
HKEY_LOCAL_MACHINE\SOFTWARE\Microsoft\
Windows NT\CurrentVersion\Winlogon\Notify
8.Delete the folder ‘WgaLogon’ and all its contents
9.Reboot Windows XP.

Setup SSH Key Authentication (Password-Less Authentication)


Setup ssh key authentication for password-less login between servers.  For use by ssh/sftp users or scripts.
Source Server (or local system)
Generate RSA key for user on this system, you can also use DSA.  This asks for key pass-phrase but you can leave it blank.
ssh-keygen -t rsa
This asks for location to place the generated key, by default it will be your home directory (ex: /home/your_username/.ssh/).  This generates two files:  id_rsaand id_rsa.pub.  Content of id_rsa.pub is what we need to copy to destination server.

Download Registry Edits for Windows XP "Tweaks and Tips"


To use the VBS Files: Download .vbs file and save it to your hard drive (you may want to right click and use Save Target As).  Double
click  the vbs file. You will be prompted when the script is done.
NOTE: If your anti-virus software warns you of  a "malicious" script, this is normal if you have "Script Safe" or similar technology enabled.  These scripts are not malicious, but they do make changes to the System Registry.Disclaimer:  These registry edits and script files are presented "as is".  Every effort has been made to ensure the files work as stated.  I assume no responsibility for your use of these files.
click on read more.....


Removing Windows 7 partition - For XP users

This process is essentially the same as before but using the third-party tool GParted instead of the integrated Disk Management utility in Vista. Be sure to have your XP CD on-hand to repair potential boot loader complications.

Before proceeding realize that by removing your Windows 7 installation and partition you will be deleting any documents
, pictures, videos etc. which you've accumulated on the Windows 7 partition if you haven't backed them up previously, so consider doing that before continuing.

Download the latest copy of GParted here, and then burn it to a disc as an image file.

After you've downloaded and burned your image of GParted, pop it in your optical drive and reboot. Shortly after booting off the disk you'll have to choose your preferred language, keymap and screen resolution.

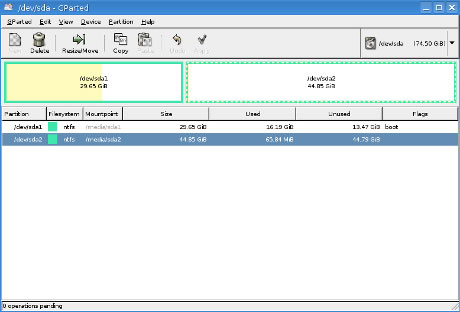
Once the partition software has loaded, right click the partition where Windows 7 resides (it's probably the second partition on “dev/hda1” if you followed our dual boot guide) and choose “Delete”.

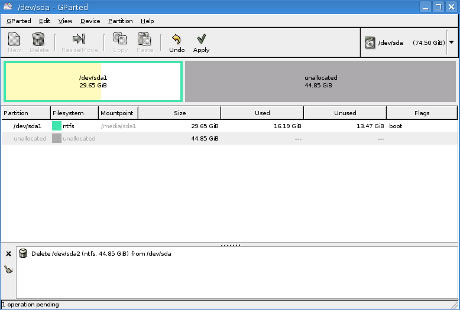
You should now see unallocated space on your hard drive where Windows 7 once laid.


Right click your original (and probably only remaining) partition, choose “Resize/Move” and fill in 0 for both the free space preceding and following to occupy the entire unallocated space.

Windows 7 in Windows XP Mode

Microsoft’s new Windows XP Mode requires hardware virtualization, which is probably one of the more confusing parts to knowing if your computer can support XPM. If you’re not sure what XPM is, check out our screenshot tour here.

Hardware Requirements:

The hardware requirements are essentially the same as Windows 7′s minimum requirements, with two exceptions:
CPU: Your CPU must support Hardware Virtualization.
RAM: Instead of a 1GB minimum, Microsoft recommends 2GBs of RAM

How to check if your CPU supports Hardware Virtualization:

You can use tools issued by the hardware manufacturer to check if your processor supports hardware virtualization. You may heard from elsewhere that Securable can be used to check for Hardware-VT, but this post from Neowin shows that Securable is not always correct.
Intel:
1) Download and install the Intel Processor Identification Utility. Run the Utility, click on the CPU Technologies tab and check to see if it says yes beside Intel(R) Virtualization Technology.
Windows 7 and Windows XP Mode: Can you run it?

Configure Windows XP to Automatically Login

After downloading fixes from Windows Updates page or via Automatic Updates, you may notice that Windows XP no longer logs into your account automatically. This is usually caused after the installation of .NET Framework from Microsoft. It creates an additional user account called ASP.NET, which you can see in the Control Panel User Accounts applet. But, you neither need to remove this update nor delete this account. You can still configure Windows XP to automatically login using these methods:

Method 1


Click Start, Run and type CONTROL USERPASSWORDS2, and click Ok. Select the user account from the list (the account to which you want to automatically logon). Uncheck Users must enter a user name and password to use this computer option, and click Ok. Type the user account password and complete the process.
For Windows XP Home, don't try to auto-login as the built-in Administrator, as you'll receive an error message.