Showing posts with label Tutorials. Show all posts

Set a default view for Google Calendar


set a default view for Google Calendar(Credit: Google)
Google offers lots of useful, and free, Web tools that you can use from anywhere -- with Internet access being required at only some points to save data to the cloud. The best part about these services is that you can customize many of them to your preferences, like Google Calendar.
Suppose you don't want to load your calendar to the monthly view every time you open it. What if you want to only look at the next two to three days at a time, and not the whole week? If you find yourself resetting your calendar view every time you log in, you can save yourself a little time by adjusting a quick setting to make your preference stick. Here's how:
set a default view for Google Calendar(Credit: Screenshot by Nicole Cozma/CNET)
Step 1: Log in to your Google Calendar.
set a default view for Google Calendar(Credit: Screenshot by Nicole Cozma/CNET)
Step 2: Click on the cog in the top right-hand corner and select Settings from the menu. Make sure you're on the General tab of the Settings area.
(Credit: Screenshot by Nicole Cozma/CNET)
Step 3: Next to Default view, select Week, Month, Custom View, or Agenda. If you chose Custom View, you'll be able to set a range of days in the next drop-down menu below this one.
set a default view for Google Calendar(Credit: Screenshot by Nicole Cozma/CNET)
Before you leave the page, make sure you click Save or your changes will be lost.

You will be intreaseted in reading  10 Unknown Google tricks

Set up and use Google Docs offline


Google has now made its Drive service more than an online storage product and productivity suite. You can now edit documents you have stored on Google Drive (or Docs, if you haven't moved over to the new interface) during those moments -- while sitting on an airplane or in a cabin in the woods or in a Wi-Fi-free coffee shop -- when you are not connected to the Internet. And when you open that same document when you are back online, the changes you made while offline are there. (For some reason, Google is putting this offline access under the old Docs banner.) Here's how to start using Google Docs offline.
set up and use Google Docs offline(Credit: Screenshot by Matt Elliott/CNET)
To begin, Google Docs offline is available only in Google's own Chrome browser. To enable offline access, go to your Google Drive page and click the gear icon in the upper-right corner and select Set up Google Docs offline. A window will pop up with a two-step setup process. Click the Enable offline Docs button and then for Step 2, you will need to install the Drive Web app for Chrome. Click the second blue button in the window and you will be taken to the Chrome Web store to install the Drive Web app.
After installing the Web app, return to your Drive home page and you'll see a notification pointing to the gear icon that informs you that some of your recent files are being synced and how to view them. To see which docs are available offline, click the gear icon and choose "view offline Docs." It opens a new Google Docs offline tab in Chrome. Bookmark this page so you can access it in Chrome when you are without the Internet.
set up and use Google Docs offline(Credit: Screenshot by Matt Elliott/CNET)
Google Docs offline shows you only Documents and Spreadsheets; Presentations, Drawings, and Forms don't make the jump. And you can edit Documents but can only view Spreadsheets. And despite there being a grayed-out red (pinked out?) New Document button, you cannot create new documents in offline mode. Given the presence of such a button, I'd wager that this feature is coming soon.

Creating Awesome Excel Tables


Excel Tables offer a range of features for working with list-style data

Creating Awesome Excel Tables

Much of the data that you use Excel to analyze comes in a list form. You might need to sort the data, filter it, sum it, and perhaps even chart it. Excel tables provide superior tools for working with data in list form.
If you want to sum columns of data automatically so that the totals show only the sum of visible cells (for example), Excel's Tables features can do it. And if you want to format any Excel data in just a couple of quick steps, Excel's Tables features can handle that task, too. And as for using a form instead of punching numbers into ordinary spreadsheet cells, Tables once again can do the job.
Here are my top 10 secrets for managing lists of data using Excel Tables.


1.Create a Table in Any of Several Ways

The first step in learning how to work with Excel's Tables features is to use the program to create a table. You'll need a list with column headings and (if you wish) row headings. Select the data, including the heading rows and columns, and click Insert > Table. Visually confirm that the range you've selected is correct, click the My table has headers checkbox, and click OK. Excel will then create a formatted table for you. If you would prefer to choose a particular table format, select the same data area and click Home (instead of Insert); then choose a table style from the Table Styles gallery.
Create a Table in Any of Several Ways
You can create a table from the Insert tab or (as here) from the Home tab, where you can choose a style at the same time.

2. Remove the Filter Arrows

When you want to use some features of an Excel table, but you don't plan to filter or sort your data, you can hide the filter arrows. To do this, click somewhere inside the table and then click Data > Sort & Filter > Filter. Now you can toggle between hiding the arrows with one click and revealing them with the next. The shortcut keystroke combination Shift-Ctrl-L accomplishes the same thing.
Remove the Filter Arrows
Click the Filter option to toggle the display of the filter arrows on or off.


3. Take the Format but Ditch the Table

Formatting data as an Excel table is the quickest way to achieve a neatly formatted range of cells in Excel. The only potential problem is that it may seem that you can't get the formatting without getting all the unwanted table features as well. But while this limitation is technically true, you don't have to keep the table features if you don't want them. To borrow a table style for any worksheet, first create the data as a table, making sure to choose your preferred table style for formatting it.
Next, click inside the table and then click Table Tools > Design > Convert to Range. Click Yeswhen Excel prompts you with 'Do you want to convert the table to a normal range?' and the table will revert to being a regular range--but with its attractive formatting intact.

4. Fix Ugly Column Headings

The filter arrows in an Excel table's column headings look downright ugly when those headings are right-justified. The arrows cover the rightmost characters in the headings, and there is no obvious way to fix the problem. The workaround is to indent the content from the right side of the cell. To do this, select the cells containing the headings that are partly hidden and click Home > Increase Indent. If the cell contents respond by jumping to the left edge of the cell, click Home > Align Rightto return them to right justification. Click Increase Indent more than once as necessary to position the heading text well clear of the filter arrows.
Fix Ugly Column Headings
Use the Increase Indent option with right-aligned column headings to push them to the left of the filter arrows.


5. Add New Rows to a Table

Rows in a table behave a little differently from rows in a regular worksheet. If you need to add a new row to a table, and if the Totals row is not visible, click in the bottom right cell in the table and press the Tab key. This simple procedure adds a new row to the table, just as it would if you were working with a Word table.
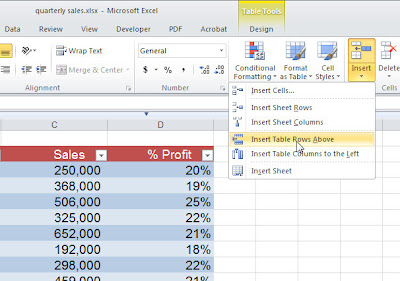
To add rows to the end of a table, drag the small indicator in the bottom right corner of the table to add more rows and more adjacent columns, if desired. To add a row inside a table, click in a cell either above or below where the row should be inserted and click eitherHome > Insert > Insert Table Row Above or Home > Insert > Insert Table Row Below, depending on where you want the new row to appear. The table's formatting will automatically adjust so that the new row is correctly formatted.
Add New Rows to a Table
To add a new row inside a table, use the special insert options that appear only when you've selected a cell inside a table.

6. Calculate Accurate Totals

Anyone who has ever tried to use the SUM function to total a column of data in which some of the rows are hidden has received a nasty surprise: The SUM function calculates the total of all of the cells in a range, whether they're visible or not. This characteristic of the function means that the result won't be the total of the numbers in the visible rows--and that discrepancy can be a huge problem. The way tyo avoid this difficulty is to use the SUBTOTAL function instead. Excel will do this automatically when you use its Total row feature for your table.
When you want to add a total row to the table, click inside the table, right-click, and choose Table > Totals Row; or click inside the table and click Table Tools > Design > Total Row. In either case, a total row will appear at the foot of the table. If the last column contains numerical values, Excel will automatically use a SUBTOTAL function to sum them.
To add a total to any other column, click in the appropriate cell in the Total row, and in the drop-down menu click SUM. This operation will add a SUBTOTAL formula to the cell that will total only visible values when the table is filtered. You may choose other calculation options from this drop-down list, including Min, Max, Count, and Average.
When you choose to total a column in a table, Excel will add a SUBTOTAL function that totals only the values in visible cells.


7. Create a Chart From Table Data

One significant benefit of formatting a list as a table is that charts created from table data change dynamically when you add data to or remove data from the table. So a column chart that charts the values in a range will expand to incorporate new values when you add them to the table. This is the case whether you add data to the bottom of the table or introduce a new column to the right of it. Creating a chart based on the table is the same as creating any chart in Excel--only the behavior of the chart is different. Tables of this type are extremely useful when you work with data that expands or contracts over time.

Charts created from Excel tables automatically expand and contract as you add data to or remove data from the table.

8. Enter Data Using a Simple Form

Typing lots of data across a wide table can be quite cumbersome; often, entering data into a form is easier. Earlier versions of Excel included a handy Form tool; that tool is still available, but you won't find it on the Ribbon. To make it easier to find, you can add it to Excel's Quick Access Toolbar: ClickFile > Options > Quick Access Toolbar. In the Choose Commands From list, click All Commands and then scroll down and click Form.... Click Add to add the tool to the Quick Access Toolbar, and then click OK.
To use the form, click somewhere inside your table and then click theForm button to display a form dialog area. The form heading is the sheet name, and the form contains boxes where you can preview the current form data and add new data. To add new data, click New and type the data into the relevant text boxes. To view the form data, click Find Prev or Find Next to move through the data one row (record) at a time. To exit the form, click Close.
Excel's hidden Form feature creates a data entry form for your table automatically.


9. Sort and Filter Table Data

One key feature of Excel's tables is their ability to sort and filter the data in the table. To perform either of these actions, click the down arrow to the right of any table column and then choose a Sort or Filter option. The two Sort options available are 'ascending' and 'descending'. The Filter options vary depending on whether you're working with a column of numbers, text, or dates.
You can then select from among a number of predefined options, or click Custom Filter and build your own. Alternatively you can create complex filters such as AND and OR filters. For example, locating values in a column that are less than $200,000 or more than $400,000 involves using an OR filter. To create it, click Custom Filterand then build both parts of the search in the dialog area, making sure to click the OR option. Similarly you can create AND filters that work across two columns, thereby enabling you to display information such as "All entries for Canada, where sales are greater than $300,000." In this case you would select to view only 'Canada' in the Location column. In the Sales column, click Numbers Filters > Custom Filter > is greater than, type 300000and click OK.
Any column that has a filter in place will show a filter icon instead of the downward-pointing triangle, so you can see at a glance where the filters are. To clear a filter, click the Filter icon and click Clear filter from; or click Home > Sort & Filter > Clear to clear all filters from all columns in the table.
Excel's built-in AutoFilters feature gives you a select range of prebuilt filters for filtering table data.


10. Create Complex OR Searches Across Multiple Columns

One type of search that you can't build using the menu options is an OR search of the type "All entries for Canada or where sales are greater than $200,000." Consequently you must write a search instruction of this type in a different way. To do so, first copy the table heading row and paste it a few rows immediately below your table. Beneath these headings, in the Location column, type="=Canada"and in the second row, in the Sales column, type >200000. Click inside the table, clickData > Advanced > Filter the list, in-place. Confirm that the List range is the table range, and set the Criteria Range to an area covering the second set of headings and the two data rows below it. Then click OK to filter the list.
OR searches across multiple columns are relatively complex and can't be generated by using the AutoFilter options.


LAMP Quickstart for Red Hat Enterprise Linux 4


Introduction
A very common way to build web applications with a database backend is called
a “LAMP Stack”, where “LAMP” stands for the Linux® operating system, the Apache web server, the MySQL database, and the PHP (or Perl or Python) web
application language. This Quickstart will take you through configuring and starting up the LAMP components, and then downloading, installing and testing a
complete LAMP application, an online DVD Store. The DVD Store application, including four PHP pages and the code needed to build and load the MySQL database, can be used as a model for your own LAMP web application.

This Quickstart assumes you have successfully installed Red Hat® Enterprise
Linux 4 on your server (RHEL4 ES edition was used for the test but the
instructions should be similar for the other RHEL4 editions) and are moderately
familiar with Linux commands (you will need to be able to edit files). Total time to
work through the Quickstart should be 30 – 60 minutes.

Getting Started
For ease of use, log into the system as root.

Verify that the required packages have been installed. To do this, click on Applications => Systems Settings => Add/Remove Packages. This will bring up
a window showing all of the packages available, and what has already been installed, sorted by groups. Scroll down to the Servers section and verify the Web Server and MySQL Database have been checked. Under details of MySQL Database, verify that both php-mysql and mysql-server have also been checked. If any of these items have not been previously checked, simply click the update button at the bottom of the window and provide the appropriate installation media as requested.

For purposes of this document, the hostname is “rhel4es” and the root password
is “password” (you should use something more creative, of course!). You will need to ensure that all of the appropriate host name information has been
set in your network environment (updating DNS, or /etc/hosts, etc.) You will
need to create a non-root user to own the PHP and MySQL code. We used user
“web” with password “web”.

To create the web user, open a terminal shell (right click anywhere on the
desktop, select “Open Terminal”). Type the following (ideally you can cut and
paste right from this Quickstart to your Linux command shell). In this document
commands that you type or that are printed by the computer are indicated in
monospace font.

useradd web
passwd web

At this point, it will prompt you for the new password. Use “web” as the password
(ignore the warnings for BAD PASSWORD – you can always change this later).

For the rest of this document you will enter some commands as root and some
as web. [Hint: use two Linux command shells, one for root, one for web. If you
are logged in as root you can use the command su – web to login as web in that
command shell].

Start and Test Apache
To run the Apache web server you first need to make a small modification to the
Apache configuration file, then start the Apache service (known as “httpd”), and
finally configure it so it will always start when the machine is booted:

cd /etc/httpd/conf
cp httpd.conf httpd.conf.orig
gedit httpd.conf

Find the line with #ServerName new.host.name:80 and add below it:
ServerName rhel4es

Save your changes; close the window. Next, you will start the web server, and
configure it so that it will automatically start on the next reboot. Type the
following into the shell window:

service httpd start
chkconfig httpd on

To test Apache, bring up a web browser with URL http://localhost. You should
see the Red Hat Enterprise Linux Test Page:
LAMP Quickstart for Red Hat Enterprise Linux 4
Start and Test Apache


Start and Test MySQL
Before starting MySQL, you’ll need to create a MySQL configuration file from one
of the standard ones offered. As root, copy the standard small configuration file
to /etc/my.cnf and add 4 lines to the end of it. Type the following into the terminal
window:

cd /etc
cp /usr/share/doc/mysql-server-4.1.7/my-small.cnf my.cnf
cat >> my.cnf <hit Enter, then paste in next 4 lines>
# For DVD Store full text search
ft_min_word_len = 3
ft_stopword_file =
log=/var/lib/mysql/mysql_query.log
<Enter Ctrl-C>

Next you need to start the MySQL service (called “mysqld”), and set it to always
start when the machine starts. Type the following into the terminal shell:

service mysqld start
chkconfig mysqld on

Now configure user access to the MySQL database. To change root’s password
(replace the final “password” with your root password), give privileges to the webuser, and remove the default anonymous user, type the following into the
terminal shell:

mysqladmin -u root password password
mysql –p

This will prompt you for the password you just entered above, and start the
MySQL monitor. You will need to ensure that you also add access based on
your specific host name as well (i.e. web@localhost.localdomain). Type the
following at the mysql> prompt:

grant all privileges on *.* to web@localhost identified by 'web';
grant all privileges on *.* to web@rhel4es identified by 'web';
delete from mysql.user where User='';
exit

Login as web and test out MySQL:

su – web
mysql –u web –-password=web

This will start the MySQL monitor as the user “web”. Type the following at the mysql> prompt to test it:

show databases;

You should get output that looks something like:

+----------+
| Database |
+----------+
| mysql    |
| test     |
+----------+
2 rows in set (0.00 sec)

Type “exit” to leave the MySQL monitor. Type “exit” again to log out as “web”.
This shows that MySQL has been installed with the initial two databases.

 Start and Test PHP

As root, edit the PHP configuration file to point to the correct host and allow
access to the web user, then restart Apache to read changes. In the terminal
window, type the following:

cd /etc
cp php.ini php.ini.orig
gedit php.ini

Change three lines to read as follows:

mysql.default_host = rhel4es   
mysql.default_user = web
mysql.default_pw = web

Save the document, close the window, then continue typing the following into the
terminal shell window to restart the web server and put the changes you just
made into effect:

service httpd restart

To test PHP, create a test PHP page. Type the following into the terminal
window:

cd /var/www/html
gedit default.php

Add the following to the file:
<html>
 <head>
   <title>PHP Test Page</title>
 </head>
 <body>
   <?php
     echo “<hr />”;
     echo “<p align=center>This is a test of PHP!</p>”;
     echo “<hr />”;
     echo “<p align=center>Copyright &copy; 2005 Dell</p>”;
   ?>
 </body>
</html>

To test, use your browser to access http://localhost/default.php. It should look like
LAMP Quickstart for Red Hat Enterprise Linux 4
Start and Test PHP

Install and Test the DVD Store LAMP Application

Now you are ready to install a full LAMP application, the Dell DVD Store
application. This application has been released by Dell to the open source
community under the GPL license and is available for all to use.
First, download in binary the DVD Store files ds2.tar.gz and ds2_mysql.tar.gz
from http://linux.dell.com/dvdstore to web’s home directory, /home/web. To
accomplish this, type the following from the terminal window:

su – web
wget http://linux.dell.com/dvdstore/ds2.tar.gz

Then expand these “tarballs” with:

tar –xvzf ds2.tar.gz
tar –xvzf ds2_mysql.tar.gz

This will create several directories under /home/web/ds2 with the DVD Store data
files and driver programs, as well as the MySQL build and load scripts. Now, as
root, you will need to create a directory to put the PHP pages:

cd /var/www/html
mkdir ds2
Now, the PHP files need to be copied to the new directory:

cd ds2
cp ~/ds2/mysqlds2/web/php4/* .

Now you are ready to create and test the MySQL DVD Store database. As web:

cd ~/ds2/mysqlds2
sh mysqlds2_create_all_nosp.sh
mysql –u web --password=web

mysql> use DS2;
mysql> show tables;
+---------------+
| Tables_in_DS2 |
+---------------+
| CATEGORIES    |
| CUSTOMERS     |
| CUST_HIST     |
| INVENTORY     |
| ORDERLINES    |
| ORDERS        |
| PRODUCTS      |
| REORDER       |
+---------------+
8 rows in set (0.00 sec)

mysql> select count(*) from CUSTOMERS;
+----------+
| count(*) |
+----------+
| 20000    |
+----------+
1 row in set (0.01 sec)

mysql> exit

This shows that the DVD Store has been installed correctly with 8 tables and
20,000 initial customers.

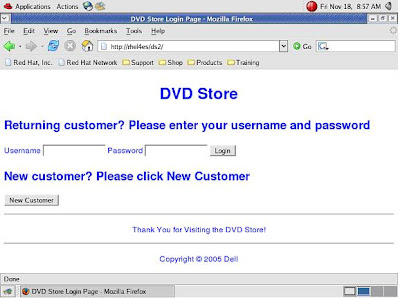
The DVD Store LAMP stack is ready for testing. With your browser, access
http://rhel4es/ds2. You should see the DVD Store Login page:
LAMP Quickstart for Red Hat Enterprise Linux 4


Login with Username “user2” and password “password”. You should see the
following Welcome screen:
LAMP Quickstart for Red Hat Enterprise Linux 4


Click on “Start Shopping”, search for some DVDs by Title, Actor or Category, add
DVDs to your shopping cart, and finally purchase them using your stored credit
card number.

You now have a working LAMP stack. By basing your application on the MySQL
and PHP code included here, you can jumpstart your own LAMP stack!

Recommended Post Slide out for Blogger


“Keep the visitors glued to your site for long” This is what every blogger out there wants to do. The Recommended Post slide Out Widget does just that. It’s kind of  an invitation to the reader to read a new post once he has read one of your blog entries. You might have seen this kind of a widget on many popular websites like New York Times, Mashable, Times of India etc.

I too loved the idea and found out that some one else had already made a jQuery snippet which does just the same. You can read about this awesome code on Mary Lou’s blog athttp://tympanus.net/codrops/2010/04/13/end-of-page-slide-out-box/ 
This is the modified form of that snippet so that it gets loaded asynchronously without affecting the page load. The Slide out will show random posts from your Blog. The random posts are fetched from your Blog Feed using Ajax. 

Demo of the Slide Out

Scroll down to the bottom of the post and you should see the Recommended Slide Out.
Recommended Post Slide out for Blogger

Add the Recommended Post Slide out Widget

To add the widget to your blog, you can use this one click installer.

Customizing the Recommended Slide out

1. End Of Post marker – The slide comes out when the user scrolls down to a particular point in your Blog.(the bottom of the page by default) To mark this point, you can add an HTML element there. The element should have the id bpslidein_place_holder
e.g.: <div id='bpslidein_place_holder'></div> would do the job. The best place to add this marker would be at the end of the post. If you want to do it easily, you can add this to your Blogger Template.
In your template Find,(You will have to expand the Widget Templates)
<div class='post-footer-line post-footer-line-1'>
or
<p class='post-footer-line post-footer-line-1'>
or
<data:post.body/>
Immediately below any of these, add the following snippet and save our template
<b:if cond='data:blog.pageType == "item"'>
<div style='display:none' id='bpslidein_place_holder'></div>
</b:if>
Now when the reader scrolls down to this div, the slide will open up.
2. Customizing the Look and Feel of the Slide out.
You can obviously style the Recommended Slide out. But before you do that, you have to add this variable definition to your template
<script>var bpslidein_custom_css=true;</script>
This should be added somewhere above the Slide Out Widget. If this variable is not set, a default StyleSheet will be used to spice up the Recommended Slide out.
Once this variable is set to true, you can add your own CSS definitions. You can add your CSS at Template Designer > Advanced Add CSS
This is the default set of Style definitions applied to the Widget. You can modify them and use it.
#bpslidein{z-index:5;width:400px;height:100px;padding:10px;background-color:#fff;border-top:3px solid #1616F5;position:fixed;right:-430px;bottom:0;-moz-box-shadow:-2px 0 5px #aaa;-webkit-box-shadow:-2px 0 5px #aaa;box-shadow:-2px 0 5px #aaa;font-family:Arial, Helvetica, sans-serif;}
#bpslidein p{font-size:11px;text-transform:uppercase;font-family:Arial,Helvetica,sans-serif;letter-spacing:1px;color:#555;}
#bpslidein_title{color:#555;font-weight:700;font-size:16px;margin:10px 20px 10px 0;}
#bpslidein a,#bpslidein a:hover,#bpslidein_title{text-decoration:none;color:#1616F5;}
#bpslidein .close,#bpslidein .expand,#bpslidein .help{border:2px solid #EEE;cursor:pointer;color:#9A9AA1;width:13px;height:15px;padding:2px 0 0 5px;position:absolute;right:10px;font-size:17px;font-weight:700;font-family:Arial, Helvetica, sans-serif;font-size:12px;}
#bpslidein .help{right:35px;}
#bpslidein_title,#bpslidein_image{float:left;width:80px;}
#bpslidein_title{width:290px;}
3. Other Stuff that you can edit
You can edit the Title of the Widget and the Loading text by editing the Widget Content.

What Is a Parity Drive

What Is a Parity Drive

A parity drive is a storage device used as part of a computer system that contains parity data for redundancy and backup purposes. This is commonly part of a Redundant Array of Independent Disks (RAID), in which one or more disk drives are connected together to act as a single system. When data is stored on these devices, parity information can be created for use later in case one of the disks fails. A parity drive is not necessarily part of all RAID setups, but it allows for simple and effective data recovery.
The basic function of a parity drive is to provide additional storage of "parity bits," which are pieces of data used to backup the main drives in a disk array. An array is a computer setup in which multiple disks, such as two or more hard drives, are connected together and used as a single storage system. Although a number of different methods are used for this, a RAID is among the most common forms. There are various types of RAIDS, and more complex "levels" often include the use of a parity drive to provide effective backup and redundancy of information.
A parity drive functions through the use of parity bits that are stored on it. The simplest example of how parity bits function is in a RAID or other system that uses three drives in total. Two of the drives would be used as the actual data storage disks, while the third would function as a parity drive. Whenever data is saved to the RAID, each piece of information is split in half, with one part going onto one drive and the other part onto the second.
Computer data consists of bits, which are binary pieces of data represented by either a one or a zero. Whenever information is stored on a system with a parity drive, one bit from each storage drive is added to the other. If the result is an even number, then a parity bit with a value of zero is saved to the parity device, while an odd result creates a value of one. This can then be used if one of the storage drives fails, to recreate the data that is missing in order to restore what was lost.
For example, a "1" on one device, and a "0" on the other, would generate a "1" to be stored on the parity drive, since this is an odd value when added together. If the storage drive with the "0" data on it becomes corrupted, it can be replaced with a new, blank disk. The system can then look at the existing data, find the remaining "1" in data storage, compare that to the "1" in the parity device, and recognize that a "0" needs to be recreated to restore the lost data. This is redundancy and allows an array to effectively recover data even if part of the original system is lost.