Best Linux OS in 2012


1. Ubuntu 12.04 LTS

Best Linux OS in 2012

Ubuntu is the #1 and the most popular distro out there. Even though Linux Mint appeals more to new users Ubuntu has a rigorous release cycle and tends to have more features implemented in each release. Ubuntu does not come with a load of software and codecs pre installed like Linux Mint. So new users may have trouble playing certain media formats and may require a few command line installations but due to the excellent community support they can be sorted out within minutes.
2. Linux Mint 13
Best Linux OS in 2012

Linux Mint is known as the second most popular linux distribution simply because of its user friendliness. It comes with loads of software carefully picked by the team, media codecs and drivers. The distro works so well out of the box you will not be spending any time trouble shooting. The Distro focuses on what is best for its users and provides what the mainstream linux users demand (most of the time). Linux Mint 13 comes in 2 editions. The Cinnamon edition includes a modern Gnome 3 desktop with a familiar and traditional layout. The MATE edition comes with a Gnome 2 desktop. Compared to the cinnamon edition, the MATE edition is more stable but is quite boring. Cinnamon is a fairly new desktop that is being developed by the mint team.
Linux mint is based on Canonical's Ubuntu.

3. Pinguy OS 12.04 LTS

Best Linux OS in 2012

Pinguy OS is an Ubuntu based distribution that comes with A LOT of software preinstalled. It is great for users who want to explore the extensive software that Linux has to offer. It is also very convenient because it includes almost all the software that a user may require. Pinguy OS is a fairly new distro but it is gaining popularity quickly. Pinguy OS includes two Docks by default and the overall look of the desktop leans toward OS X. Pinguy OS 12.04 includes a customized gnome-shell.
4. Zorin OS
Best Linux OS in 2012

Zorin OS is optimized for users who are transitioning From windows. It looks quite similar to Windows 7 and comes with "zorin look changer" that can make your desktop look similar to older Windows versions and Mac OS X. Zorin OS also offers four premium versions (Ultimate, Business, Multimedia, Gaming) which are available upon donating. There is also a free version that does not come with as much software preinstalled.

5. Peppermint OS 3

Best Linux OS in 2012

Peppermint OS a very light distro that comes with LXDE desktop envioronment. LXDE is very simple to use and many will find it to be a straightforward DE. The OS boots up quite fast which makes it ideal for older computers or netbooks. Peppermint OS 3 is based on Lubuntu 12.04. It includes an elegant theme by default and includes media-codecs out of the box.

6. Fedora

Best Linux OS in 2012

You simply cant go wrong with Fedora ( or Red Hat Enterprise Linux for a more server oriented usage ). The quality of Red Hat Linux distributions, and a great looking desktop. Perhaps a little less user-friendly than the two previous Debian based Linux distributions mentioned above. 


Windows XP no longer most popular desktop system

windows xp vs windows 7


Windows 7 is now the world's most popular desktop operating system, according to the August report from Net Applications.In August, Windows 7 had a 42.76% market share, a fraction of a point more than Windows XP's 42.52%. Windows XP was released in 2001.The much-maligned Windows Vista sits at third place with a 6.15% market share, followed by Mac OS X 10.7 and Mac OS X 10.6 with 2.45% and 2.38%, respectively.

All in all, older versions included, Microsoft controls some 92% of the market.
It took three years for Windows 7 to become the world's most popular OS. Microsoft's desktop operating system, which was launched in October 2009, will soon be replaced by a newer version — Windows 8.
Windows 8, which is scheduled to go on sale on October 26, will be Microsoft's first operating system designed to work just as well on tablets as it does on desktop computers.
Users running Windows XP, Vista or Windows 7 will be able to upgrade to Windows 8 Professional for $39.99 via an online download.

Upgrading to Windows 8 - FAQ


Upgrading to Windows 8(Credit: CNET)
Even if you're excited for Microsoft's new OS, you might not be planning to buy a new computer. If you have an existing Windows PC, Microsoft has made the upgrade process more or less simple, but there are still some things you might want to think about before making the switch. Here are a few key points to consider. 
Q: From which older versions of Windows can I upgrade to Windows 8?
A: According to this official Microsoft blog post, if you own a Windows XP, Windows Vista, or aWindows 7 PC, you are eligible for a downloadable upgrade to Windows 8 Pro.
Q: How much will the upgrade cost?
For PCs with the above operating systems purchased prior to June 2, 2012, you can download the upgrade from Microsoft for $39.99. For new, non-Windows 8 PCs purchased between June 2 and January 31, 2013, Microsoft will offer the Windows 8 Pro upgrade download for $14.99 (presumably to help prevent a pre-Windows 8 drop-off in new PC purchases).
Upgrading to Windows 8
The Windows 8 Upgrade Assistant walks you through the relatively simple upgrade process.
(Credit: Microsoft)
Q: Is there an option to purchase the upgrade on a DVD or other physical media?
A: You can buy the boxed version of the Windows 8 Pro upgrade for $69.99. If you purchase the downloadable upgrade, Microsoft will offer you the option to purchase a DVD version for an additional $15. The upgrade installation process will also offer you the ability to burn a DVD or make a bootable USB key using your own media, for no charge.
Q: What about other versions of Windows 8?
A: Microsoft has announced four versions of Windows 8. You can only upgrade to two of them as a consumer, Windows 8 and Windows 8 Pro. Windows RT will only come with tablets, and an Enterprise version will be sold with large-volume corporate PC purchases. Windows 8, Windows Pro, and Windows 8 Enterprise will be available in both 32-bit and 64-bit editions, with 64-bit being most common. Microsoft has not yet announced pricing for the vanilla Windows 8 upgrade.
Q: What are the differences between Windows 8 and Windows 8 Pro?
A: Microsoft says, "For many consumers, Windows 8 will be the right choice," while it designed Windows 8 Pro "to help tech enthusiasts and business/technical professionals obtain a broader set of Windows 8 technologies."
Basically what that means is that Windows 8 Pro comes with features Microsoft believes most consumers won't care about. For the most part this is probably true. Most people won't miss Pro's extras like the Client Hyper-V virtualization software and BitLocker disk encryption tool.
Upgrading to Windows 8
Windows Media Center and its DVD player software are no longer standard features in Windows 8.
(Credit: Rich Brown/CNET)
The one feature you might miss in Windows 8 is Microsoft's Windows Media Center home theater software, and its accompanying DVD movie player codecs. Windows 8 Pro users won't get it either to start with, but they can download it for free via a post-upgrade download. If you have basic Windows 8, you have to download what Microsoft is calling its Windows 8 Pro Pack, which will upgrade you to Windows 8 Pro, and also bring Media Center along with it. Pricing for the Pro Pack upgrade has not been announced.
Q: What are the hardware requirements for Windows 8?
A: Here are the basics as outlined by Microsoft in a blog post:
  • 1GHz or faster processor
  • 1GB RAM (32-bit) or 2GB RAM (64-bit)
  • 16GB available hard-disk space (32-bit) or 20GB (64-bit)
  • DirectX 9 graphics device with WDDM 1.0 or higher driver
Microsoft also says, "Metro style applications have a minimum of 1,024x768 screen resolution, and 1,366x768 for the snap feature." "Snap" refers to Windows 8's feature of automatically resizing and positioning application Windows when you drag them to the side of the screen. And "Metro" is the now-abandoned nomenclature for Windows 8's distinct touch-oriented software interface design.
Microsoft has suggested both "Modern UI," and "Windows 8-style UI" as alternatives, and may further refine the name before Windows 8's October 26 launch date.
Microsoft's Windows 8 Compatibility Center helps verify which hardware and software will work in the new OS.
(Credit: Rich Brown/CNET)
Q: What happens to my old files and system settings when I upgrade?
A: It depends on which version of Windows you started with. Per Microsoft: "You will be able to upgrade from any consumer edition of Windows 7 to Windows 8 Pro and bring everything along which includes your Windows settings, personal files, and apps. If you are upgrading from Windows Vista, you will be able to bring along your Windows settings and personal files, and if you are upgrading from Windows XP you will only be able to bring along your personal files."
Q: Will I have any problems with older hardware or software when I upgrade?
A: If you're upgrading from Windows XP or Windows Vista, you can expect to have to reinstall any applications you might have used prior to the upgrade. Most programs that worked in Windows 7 should work in Windows 8, though. Microsoft has a Compatibility Center Web sitewhere you can check for specific applications and hardware devices that have been certified to work in Windows 8. When you launch the upgrade installation, you will also receive a compatibility report.

Set a default view for Google Calendar


set a default view for Google Calendar(Credit: Google)
Google offers lots of useful, and free, Web tools that you can use from anywhere -- with Internet access being required at only some points to save data to the cloud. The best part about these services is that you can customize many of them to your preferences, like Google Calendar.
Suppose you don't want to load your calendar to the monthly view every time you open it. What if you want to only look at the next two to three days at a time, and not the whole week? If you find yourself resetting your calendar view every time you log in, you can save yourself a little time by adjusting a quick setting to make your preference stick. Here's how:
set a default view for Google Calendar(Credit: Screenshot by Nicole Cozma/CNET)
Step 1: Log in to your Google Calendar.
set a default view for Google Calendar(Credit: Screenshot by Nicole Cozma/CNET)
Step 2: Click on the cog in the top right-hand corner and select Settings from the menu. Make sure you're on the General tab of the Settings area.
(Credit: Screenshot by Nicole Cozma/CNET)
Step 3: Next to Default view, select Week, Month, Custom View, or Agenda. If you chose Custom View, you'll be able to set a range of days in the next drop-down menu below this one.
set a default view for Google Calendar(Credit: Screenshot by Nicole Cozma/CNET)
Before you leave the page, make sure you click Save or your changes will be lost.

You will be intreaseted in reading  10 Unknown Google tricks

Best Free Registry Cleaner

Best Free Registry Cleaner

The registry is what keeps your computer running; it tells the computer what to do when certain events happen. However, as you use your computer, a lot of unwanted and unnecessary information is written into the registry, and this usually occurs because you've installed and uninstalled programs or updated versions of existing programs. This gradual accumulation of unneeded or incorrect information will, over time, slow the speed of your computer.
A registry cleaner tries to get rid of this unwanted data and restore your PC to full speed. The problem is that the cleaning process is less than perfect. In particular, there is always a small risk that the registry cleaner may incorrectly remove data that is actually needed. In the worst case scenario, your PC may become unusable as a result.
That's why it's absolutely essential that you backup your registry before using a registry cleaner. For most users the easiest way to do this is to create a system checkpoint.  An even better way is to use a drive-imaging program to create a snapshot of Windows, which you can use for system recovery if needed. As an added layer of protection, that may actually be more effective than System Restore, consider using the excellent ERUNT utility.
This ever-present risk of problems is why the "best" registry cleaner is the one that causes the fewest problems, rather than the one that finds the greatest number of registry errors.
Thus it is evident, a registry cleaner is - if at all - a tool reserved for the experienced user. The inexperienced may be assured that since the introduction of Windows XP, registry cleaning is no longer a crucial issuefor the stability, security and performance of your system. Don't mess around with it!

Wise Registry Cleaner Free
Runs as a stand-alone program on a user's computer

Full registry backup and registry defrag included. There is also a portable version

Clean with one click option can cause problems
6.21
2.19 MB
32 bit but 64 bit compatible
Unrestricted freeware
A portable version of this product is available from the developer.
Windows 98 to Windows 7

Other languages avaiable
Eusing Free Registry Cleaner

Runs as a stand-alone program on a user's computer

Good track record. Support for older systems

Could have more features
2.8
955 KB
Unrestricted freeware
There is no portable version of this product available.
Windows 95 to Windows 7

Other languages available


Set up and use Google Docs offline


Google has now made its Drive service more than an online storage product and productivity suite. You can now edit documents you have stored on Google Drive (or Docs, if you haven't moved over to the new interface) during those moments -- while sitting on an airplane or in a cabin in the woods or in a Wi-Fi-free coffee shop -- when you are not connected to the Internet. And when you open that same document when you are back online, the changes you made while offline are there. (For some reason, Google is putting this offline access under the old Docs banner.) Here's how to start using Google Docs offline.
set up and use Google Docs offline(Credit: Screenshot by Matt Elliott/CNET)
To begin, Google Docs offline is available only in Google's own Chrome browser. To enable offline access, go to your Google Drive page and click the gear icon in the upper-right corner and select Set up Google Docs offline. A window will pop up with a two-step setup process. Click the Enable offline Docs button and then for Step 2, you will need to install the Drive Web app for Chrome. Click the second blue button in the window and you will be taken to the Chrome Web store to install the Drive Web app.
After installing the Web app, return to your Drive home page and you'll see a notification pointing to the gear icon that informs you that some of your recent files are being synced and how to view them. To see which docs are available offline, click the gear icon and choose "view offline Docs." It opens a new Google Docs offline tab in Chrome. Bookmark this page so you can access it in Chrome when you are without the Internet.
set up and use Google Docs offline(Credit: Screenshot by Matt Elliott/CNET)
Google Docs offline shows you only Documents and Spreadsheets; Presentations, Drawings, and Forms don't make the jump. And you can edit Documents but can only view Spreadsheets. And despite there being a grayed-out red (pinked out?) New Document button, you cannot create new documents in offline mode. Given the presence of such a button, I'd wager that this feature is coming soon.

Creating Awesome Excel Tables


Excel Tables offer a range of features for working with list-style data

Creating Awesome Excel Tables

Much of the data that you use Excel to analyze comes in a list form. You might need to sort the data, filter it, sum it, and perhaps even chart it. Excel tables provide superior tools for working with data in list form.
If you want to sum columns of data automatically so that the totals show only the sum of visible cells (for example), Excel's Tables features can do it. And if you want to format any Excel data in just a couple of quick steps, Excel's Tables features can handle that task, too. And as for using a form instead of punching numbers into ordinary spreadsheet cells, Tables once again can do the job.
Here are my top 10 secrets for managing lists of data using Excel Tables.


1.Create a Table in Any of Several Ways

The first step in learning how to work with Excel's Tables features is to use the program to create a table. You'll need a list with column headings and (if you wish) row headings. Select the data, including the heading rows and columns, and click Insert > Table. Visually confirm that the range you've selected is correct, click the My table has headers checkbox, and click OK. Excel will then create a formatted table for you. If you would prefer to choose a particular table format, select the same data area and click Home (instead of Insert); then choose a table style from the Table Styles gallery.
Create a Table in Any of Several Ways
You can create a table from the Insert tab or (as here) from the Home tab, where you can choose a style at the same time.

2. Remove the Filter Arrows

When you want to use some features of an Excel table, but you don't plan to filter or sort your data, you can hide the filter arrows. To do this, click somewhere inside the table and then click Data > Sort & Filter > Filter. Now you can toggle between hiding the arrows with one click and revealing them with the next. The shortcut keystroke combination Shift-Ctrl-L accomplishes the same thing.
Remove the Filter Arrows
Click the Filter option to toggle the display of the filter arrows on or off.


3. Take the Format but Ditch the Table

Formatting data as an Excel table is the quickest way to achieve a neatly formatted range of cells in Excel. The only potential problem is that it may seem that you can't get the formatting without getting all the unwanted table features as well. But while this limitation is technically true, you don't have to keep the table features if you don't want them. To borrow a table style for any worksheet, first create the data as a table, making sure to choose your preferred table style for formatting it.
Next, click inside the table and then click Table Tools > Design > Convert to Range. Click Yeswhen Excel prompts you with 'Do you want to convert the table to a normal range?' and the table will revert to being a regular range--but with its attractive formatting intact.

4. Fix Ugly Column Headings

The filter arrows in an Excel table's column headings look downright ugly when those headings are right-justified. The arrows cover the rightmost characters in the headings, and there is no obvious way to fix the problem. The workaround is to indent the content from the right side of the cell. To do this, select the cells containing the headings that are partly hidden and click Home > Increase Indent. If the cell contents respond by jumping to the left edge of the cell, click Home > Align Rightto return them to right justification. Click Increase Indent more than once as necessary to position the heading text well clear of the filter arrows.
Fix Ugly Column Headings
Use the Increase Indent option with right-aligned column headings to push them to the left of the filter arrows.


5. Add New Rows to a Table

Rows in a table behave a little differently from rows in a regular worksheet. If you need to add a new row to a table, and if the Totals row is not visible, click in the bottom right cell in the table and press the Tab key. This simple procedure adds a new row to the table, just as it would if you were working with a Word table.
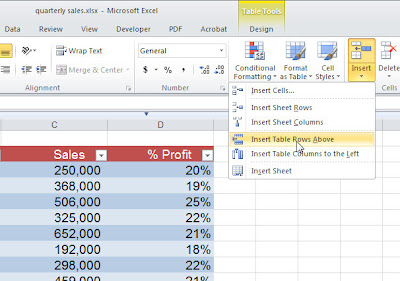
To add rows to the end of a table, drag the small indicator in the bottom right corner of the table to add more rows and more adjacent columns, if desired. To add a row inside a table, click in a cell either above or below where the row should be inserted and click eitherHome > Insert > Insert Table Row Above or Home > Insert > Insert Table Row Below, depending on where you want the new row to appear. The table's formatting will automatically adjust so that the new row is correctly formatted.
Add New Rows to a Table
To add a new row inside a table, use the special insert options that appear only when you've selected a cell inside a table.

6. Calculate Accurate Totals

Anyone who has ever tried to use the SUM function to total a column of data in which some of the rows are hidden has received a nasty surprise: The SUM function calculates the total of all of the cells in a range, whether they're visible or not. This characteristic of the function means that the result won't be the total of the numbers in the visible rows--and that discrepancy can be a huge problem. The way tyo avoid this difficulty is to use the SUBTOTAL function instead. Excel will do this automatically when you use its Total row feature for your table.
When you want to add a total row to the table, click inside the table, right-click, and choose Table > Totals Row; or click inside the table and click Table Tools > Design > Total Row. In either case, a total row will appear at the foot of the table. If the last column contains numerical values, Excel will automatically use a SUBTOTAL function to sum them.
To add a total to any other column, click in the appropriate cell in the Total row, and in the drop-down menu click SUM. This operation will add a SUBTOTAL formula to the cell that will total only visible values when the table is filtered. You may choose other calculation options from this drop-down list, including Min, Max, Count, and Average.
When you choose to total a column in a table, Excel will add a SUBTOTAL function that totals only the values in visible cells.


7. Create a Chart From Table Data

One significant benefit of formatting a list as a table is that charts created from table data change dynamically when you add data to or remove data from the table. So a column chart that charts the values in a range will expand to incorporate new values when you add them to the table. This is the case whether you add data to the bottom of the table or introduce a new column to the right of it. Creating a chart based on the table is the same as creating any chart in Excel--only the behavior of the chart is different. Tables of this type are extremely useful when you work with data that expands or contracts over time.

Charts created from Excel tables automatically expand and contract as you add data to or remove data from the table.

8. Enter Data Using a Simple Form

Typing lots of data across a wide table can be quite cumbersome; often, entering data into a form is easier. Earlier versions of Excel included a handy Form tool; that tool is still available, but you won't find it on the Ribbon. To make it easier to find, you can add it to Excel's Quick Access Toolbar: ClickFile > Options > Quick Access Toolbar. In the Choose Commands From list, click All Commands and then scroll down and click Form.... Click Add to add the tool to the Quick Access Toolbar, and then click OK.
To use the form, click somewhere inside your table and then click theForm button to display a form dialog area. The form heading is the sheet name, and the form contains boxes where you can preview the current form data and add new data. To add new data, click New and type the data into the relevant text boxes. To view the form data, click Find Prev or Find Next to move through the data one row (record) at a time. To exit the form, click Close.
Excel's hidden Form feature creates a data entry form for your table automatically.


9. Sort and Filter Table Data

One key feature of Excel's tables is their ability to sort and filter the data in the table. To perform either of these actions, click the down arrow to the right of any table column and then choose a Sort or Filter option. The two Sort options available are 'ascending' and 'descending'. The Filter options vary depending on whether you're working with a column of numbers, text, or dates.
You can then select from among a number of predefined options, or click Custom Filter and build your own. Alternatively you can create complex filters such as AND and OR filters. For example, locating values in a column that are less than $200,000 or more than $400,000 involves using an OR filter. To create it, click Custom Filterand then build both parts of the search in the dialog area, making sure to click the OR option. Similarly you can create AND filters that work across two columns, thereby enabling you to display information such as "All entries for Canada, where sales are greater than $300,000." In this case you would select to view only 'Canada' in the Location column. In the Sales column, click Numbers Filters > Custom Filter > is greater than, type 300000and click OK.
Any column that has a filter in place will show a filter icon instead of the downward-pointing triangle, so you can see at a glance where the filters are. To clear a filter, click the Filter icon and click Clear filter from; or click Home > Sort & Filter > Clear to clear all filters from all columns in the table.
Excel's built-in AutoFilters feature gives you a select range of prebuilt filters for filtering table data.


10. Create Complex OR Searches Across Multiple Columns

One type of search that you can't build using the menu options is an OR search of the type "All entries for Canada or where sales are greater than $200,000." Consequently you must write a search instruction of this type in a different way. To do so, first copy the table heading row and paste it a few rows immediately below your table. Beneath these headings, in the Location column, type="=Canada"and in the second row, in the Sales column, type >200000. Click inside the table, clickData > Advanced > Filter the list, in-place. Confirm that the List range is the table range, and set the Criteria Range to an area covering the second set of headings and the two data rows below it. Then click OK to filter the list.
OR searches across multiple columns are relatively complex and can't be generated by using the AutoFilter options.