Network Magic - A great tool for Networks

Network Magic - A great tool for Networks
Network Magic

If you're looking for a simple, free, all-in-one network management tool for a small peer-to-peer network, this is the one to get. It handles all the basic network chores, including adding new devices to the network, fixing broken network connections, setting up wireless encryption and protection, sharing printers and folders, reporting on the state of the security of each PC, and much more.
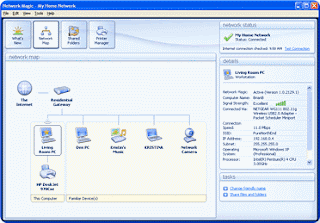
For example, the network map, pictured nearby, displays every device connected to your network, shows whether it's online or offline, and displays details about each, including the computer name, IP address, MAC address, operating system being used, shared folders, and system information such as its processor and RAM. It also lets you change the machine name, and it displays alerts about each device, such as if it isn't protected properly. Overall, it's far superior to Windows Vista's Network Map. 
The software's Status Center is also useful. It displays overall information about your network, such as whether there are any problems with overall security or with an individual PC. It also lets you troubleshoot connections, shows whether there are any intruders on the network, and displays information about wireless protection. 
Parents will appreciate some of Network Magic's features. For example, the software can monitor the use of any individual PC on the network for the Web sites it visits, the times the computer is online and which programs are being used, and then mail a daily report about it to an e-mail address. So it's ideal for parents who want to keep track of their kids' computer use. There's much more as well, including a bandwidth tester to show you your current Internet broadband speed.
Note that there are both paid and free versions of the software. The free version includes most basic features, such as repairing broken connections, issuing security alerts, monitoring network activity and the Network Map. The paid version, which costs from $24 to $40 (depending on how many PCs are on your network), delivers daily reports of Internet activity, supports remote access to your network's files and includes other advanced features.
When you install this program, you may need to tell your firewall to let this application access your network and the Internet.


10 unknown Google tricks


10 unknown Google tricks


Below is a list of  Ten unknown Google tricks. many people who use Google don't know about this.

Definitions
Pull up the definition of the word by typing define followed by the word you want the definition for. For example, typing: define bravura would display the definition of that word.
Local search
Visit Google Local enter the area you want to search and the keyword of the place you want to find. For example, typing:restaurant at the above link would display local restaurants.
Find weather and movies
Type "weather" or "movies" followed by a zip code or city and state to display current weather conditions or movie theaters in your area. For example, typing weather 84101 gives you the current weather conditions for Salt Lake City, UT and the next four days. Typing movies 84101 would give you a link for showtimes for movies in that area.
Track airline flight and packages
Enter the airline and flight number to display the status of an airline flight and it's arrival time. For example, type: delta 123 to display this flight information if available.
Google can also give a direct link to package tracking information if you enter a UPS, FedEx or USPS tracking number.
Translate
Translate text, a full web page, or search by using the Google Language Tools.
Pages linked to you
See what other web pages are linking to your website or blog by typing link: followed by your URL. For example, typing link: http://www.blogforadmins.blogspot.in displays all pages linking to blogforadmins.com
Find PDF results only
Add filetype: to your search to display results that only match a certain file type. For example, if you wanted to display PDF results regarding linux only type: "linux" filetype:pdf -- this is a great way to find online manuals.
Calculator
Use the Google Search engine as a calculator by typing a math problem in the search. For example, typing: 100 + 200 would display results as 300.

Best Linux desktop of 2012: Linux Mint 13

Best Linux desktop of 2012: Linux Mint 13

The very popular Linux distribution, Mint, has a new version Linux Mint 13, Maya, and a new take on the GNOME 3.x desktop interface: Cinnamon 1.4. The result is, in my opinion, the best Linux desktop for experienced users to date.
Not everyone will agree this. They'll find Mint's other default desktop MATE to be much more their speed. MATE is a fork of that old Linux desktop favorite, GNOME 2.x. While I haven't looked at the MATE edition of GNOME closely, other Linux reviewers, like Jim Lynch, have and Lynch likes what he's seen of Mint 13 paired with MATE.
Even with the little work I've done with MATE though I can see what GNOME 2.x fans will like it. It's a very clean desktop and it feels and works like a natural extension of GNOME 2. GNOME fans who abandoned GNOME after the annoying changes in GNOME 3.x for Lightweight X11 Desktop Environment (LXDE) will want to give Mint with MATE a try. With MATE, GNOME 2.x is back.
That said, I prefer Cinnamon myself. Cinnamon, which is remindful of GNOME 2.x, is built on Clutter and Gnome 3. I find it more attractive and I like its features. For example, the menu includes drag and drop support. With that, besides just being move icons from the menu to the desktop, I can add them to panel launchers, favorites, and reorder my favorites. I can also right-click the menu to use the menu editor to change edit the main menu itself. It's pretty, gives me great control over how my desktop, and now
Another great feature is Cinnamon's new Expo mode is. Expo gives you great control over your workspaces. You can choose how many workspaces to use and drag and drop applications to each workspace. It's a powerful tool but as easy to use as Mac OS X Lion's Mission Control and Spaces.
Much as I'd like to recommend Cinnamon for everyone though, I can't. As Mint's own developers admit that while, "Cinnamon is among the sleekest and most modern looking environments [and] features innovative features and emphasis on productivity with traditional desktop metaphors, it also has several problems. These are:
Cons:
  • Cinnamon requires 3D acceleration and might not work well for you, depending on your graphics card and/or drivers.
  • Cinnamon is brand new and unfortunately not yet as stable as more matures and established desktops such as MATE, KDE or Xfce.
  • Cinnamon relies on Gnome 3 and Clutter, which are also both brand new and going through rapid transformations.
Of course, you can just switch between MATE and Cinnamon. One of Mint's new features is an improved version of the old Gnome Display Manager: MDM. With MDM, you can pick which GUI to boot into, configure them, set up themes for them, and set up remote, automatic, and timed logins. There may be display/login manager with more features out there, but I honestly don't know what it could be though.
For me, however, Cinnamon works just fine. I tested Mint 13 with Cinnamon on two systems. The first was one of my workhorse Dell Inspiron 530S. This system is powered by a 2.2-GHz Intel Pentium E2200 dual-core processor with an 800-MHz front-side bus. This PC has 4GBs of RAM, a 500GB SATA (Serial ATA) drive, and an Integrated Intel 3100 GMA (Graphics Media Accelerator) chip set. I also put it to work on my new Lenovo ThinkPad T520 laptop. This, much more up-to-date computer boasts a 2.5GHz Intel Core i5 Processor, 4GBs of RAM, a 500GB hard drive and an integrated Intel HD Graphics 3000 processor. On both systems, the old and new, Linux Mint and Cinnamon ran flawlessly.
Installing Mint, as always, is a snap. All you need do is download the Mint ISO, burn it to a CD, DVD, or USB stick and then re-boot your computer with it and follow the instructions. On my PCs, the entire process took less than half-an-hour. Mint will run on pretty much any PC. It requires only 512MBs of RAM, but runs better with at least 1GB of memory.
The only annoying thing about the process is you can't do an in-place update of Mint 13 from Mint 12 or any other Linux distribution. That's by design. Mint's developers feel that you'll avoid out of date software incompatibilities by forcing you to do a fresh install. That's true, but it also means you may need to back up and restore your home directories and files. I did this by backing them up to an attached USB drive.
Moving on to the operating system itself, Mint 13 is based onUbuntu 12.04. I like this version of Ubuntu with its Unity interface as well. In particular I think Ubuntu 12.04 is great for users who aren't computer savvy. But, I'm a Linux pro. I like operating systems that enable me do decide exactly what I want it to do and how it's going to do it. If you're a power user too, then you'll like the taste of Mint.
Beneath the desktop, you'll find a Linux 3.2 kernel. Mint, like most Linux distributions, is still using ext4 for its file system.
Above that foundation, in applications, you'll find the usual Linux distribution goodness: LibreOffice 3.5.2 for office work, Firefox 12 for the Web browser; GIMP 2.6.12 for graphics; Thunderbird 12.01 for e-mail; and Pidgin 2.10.3 for IM. I'm not crazy about the choices of Thunderbird, I much prefer Evolution for e-mail or Firefox over Chrome.
The default software choice is no big deal though since Mint's Software Manager makes adding new programs a snap. The one quirk here is that after you install the program from the Software Manager the screen doesn't show it as being installed. You need to leave the program installation screen and come back to it before you'll see that your software was indeed installed. It's not a big bug, but it's a bit of a nuisance and I can see someone thinking they really hadn't installed a program when they've actually done so.
As has long been the case with Mint, and it's first claim to fame, this is one Linux distribution that comes ready to deal with proprietary video and audio codexes such as Flash, MP3 and DVDs. Ironically, thanks to including VLC Media Player 2.01, Linux Mint plays DVDs better than Windows 8 will. You see, Mint comes ready to play DVDs. In Windows 8, DVD playback is an extra-cost item.
It's not any of these components by themselves that really impress me. I mean they're all really good. But, what really makes Mint special is how all of them are brought together into one, complete whole. As far as I'm concerned, Mint 13 really is the best Linux distribution so far of 2012. Give it a try yourself. 

Download Linux Mint 13 here...


Linux Mint


Linux Mint is a computer operating system based on the Linux distribution Ubuntu. Linux Mint is intended to be a modern, elegant and comfortable operating system which is both powerful and easy to use.  Linux Mint provides a more complete out of the box experience by including proprietary and patented software.
Linux Mint introduced its first release, named "Ada", in 2006. Its latest and 13th release is "Maya".

Linux Mint uses primarily free and open source software, making exceptions for some proprietary software, such as plug-ins and codecs that provide Adobe Flash, Java, MP3, and DVD playback. Linux Mint's inclusion of proprietary software is uncommon; most Linux distributions do not include proprietary software by default, as a common goal for Linux distributions is to adhere to the model of free and open source software.
Linux Mint comes installed with a wide range of software that includes Libre Office, Firefox, Thunderbird, XChat, Pidgin, Transmissionand GIMP. Additional software that is not installed by default can be downloaded using the package manager. Linux Mint allows networking ports to be closed using its firewall, with customized port selection available. The default Linux Mint desktop environments,MATE and Cinnamon, support many languages. Linux Mint can also run many programs designed for Microsoft Windows (such as Microsoft Office), using the Wine software or using virtualization software (such as VMware Workstation or VirtualBox).
Linux Mint is available with a number of desktop environments to choose from, including Cinnamon, MATE, KDE, and Xfce. Other desktop environments can be installed via APT.
Linux Mint actively develops software for its operating system. Most of the development is done in Python and the source code is available on GitHub.
Minimum Size (megabytes): 
783
Maximum Size (megabytes): 
898
Last Stable Version: 
13
Last Release: 
May 23, 2012


HP announces Envy X2 tablet-laptop hybrid with Windows 8

HP announces Envy X2 tablet-laptop hybrid with Windows 8


Hewlett-Packard on Thursday announced an Envy X2 tablet-laptop hybrid device with the Windows 8 OS, signaling the company's re-entry into the tablet market, which it abandoned after the highly publicized failure of its TouchPad product.
At first glance, the HP Envy X2 resembles a netbook, with a keyboard base and an 11.6-inch touch display. But the device turns into a tablet once the screen is detached from the base.

The benefit of a hybrid device is it offers the best of both worlds for Windows 8, which doubles as a tablet and PC operating system. The tablet is 8.5 millimeters thick and 680 grams, and the display shows images at a 1,366-by-768-pixel resolution.
The Envy X2 runs on Intel's low-power Atom processor code-named Clover Trail. The device will be sold with the keyboard base and 64GB of solid-state drive storage, and the configuration cannot be customized. The device will become available during the latter part of the holiday season this year and will compete with hybrid devices that have been announced by PC makers like Asus, Acer, Lenovo and Samsung. Windows 8 will start shipping commercially on Oct. 26.
Though the device can operate independently as a tablet, HP views it as a laptop first and people have to buy the keyboard base. The dock has an SD card slot, USB ports and a high-definition multimedia interface (HDMI) port. The device has two batteries -- one in the base and the other in the tablet. The device offers more than eight hours of battery life in laptop mode. It has NFC capabilities, a high-definition webcam on the front and an 8.0-megapixel camera on the back. An optional stylus is available.
With this hybrid device, HP re-enters the consumer tablet market after it discontinued sales of webOS devices including the TouchPad. HP has reset its tablet strategy around Windows 8 OS.
HP also announced touchscreen ultrabooks with Windows 8 including the Spectre XT Touchsmart ultrabook, which is the company's first laptop with a Thunderbolt port. Thunderbolt is a high-speed interconnect technology developed by Intel to shuttle data between host PCs and external peripherals.
The ultrabook has a 15.6-inch, high-definition touchscreen and a choice of Intel's third-generation Core processor. It is 17.9 millimeters thick and weighs 2.16 kilograms. The laptop also features USB 3.0, Ethernet and HDMI ports.
The laptop will become available in the U.S. in December starting at $1,399. HP did not immediately provide information on worldwide availability.
HP's Envy Touchsmart Ultrabook 4 has a 14-inch touchscreen and a choice of Intel's latest Core processors. The ultrabook weighs 2.16 kilograms and offers up to eight hours of battery life. An optional Advanced Micro Devices graphics card can be added to the ultrabook to boost graphics capabilities. The company did not immediately provide availability and pricing for the product.


LAMP Quickstart for Red Hat Enterprise Linux 4


Introduction
A very common way to build web applications with a database backend is called
a “LAMP Stack”, where “LAMP” stands for the Linux® operating system, the Apache web server, the MySQL database, and the PHP (or Perl or Python) web
application language. This Quickstart will take you through configuring and starting up the LAMP components, and then downloading, installing and testing a
complete LAMP application, an online DVD Store. The DVD Store application, including four PHP pages and the code needed to build and load the MySQL database, can be used as a model for your own LAMP web application.

This Quickstart assumes you have successfully installed Red Hat® Enterprise
Linux 4 on your server (RHEL4 ES edition was used for the test but the
instructions should be similar for the other RHEL4 editions) and are moderately
familiar with Linux commands (you will need to be able to edit files). Total time to
work through the Quickstart should be 30 – 60 minutes.

Getting Started
For ease of use, log into the system as root.

Verify that the required packages have been installed. To do this, click on Applications => Systems Settings => Add/Remove Packages. This will bring up
a window showing all of the packages available, and what has already been installed, sorted by groups. Scroll down to the Servers section and verify the Web Server and MySQL Database have been checked. Under details of MySQL Database, verify that both php-mysql and mysql-server have also been checked. If any of these items have not been previously checked, simply click the update button at the bottom of the window and provide the appropriate installation media as requested.

For purposes of this document, the hostname is “rhel4es” and the root password
is “password” (you should use something more creative, of course!). You will need to ensure that all of the appropriate host name information has been
set in your network environment (updating DNS, or /etc/hosts, etc.) You will
need to create a non-root user to own the PHP and MySQL code. We used user
“web” with password “web”.

To create the web user, open a terminal shell (right click anywhere on the
desktop, select “Open Terminal”). Type the following (ideally you can cut and
paste right from this Quickstart to your Linux command shell). In this document
commands that you type or that are printed by the computer are indicated in
monospace font.

useradd web
passwd web

At this point, it will prompt you for the new password. Use “web” as the password
(ignore the warnings for BAD PASSWORD – you can always change this later).

For the rest of this document you will enter some commands as root and some
as web. [Hint: use two Linux command shells, one for root, one for web. If you
are logged in as root you can use the command su – web to login as web in that
command shell].

Start and Test Apache
To run the Apache web server you first need to make a small modification to the
Apache configuration file, then start the Apache service (known as “httpd”), and
finally configure it so it will always start when the machine is booted:

cd /etc/httpd/conf
cp httpd.conf httpd.conf.orig
gedit httpd.conf

Find the line with #ServerName new.host.name:80 and add below it:
ServerName rhel4es

Save your changes; close the window. Next, you will start the web server, and
configure it so that it will automatically start on the next reboot. Type the
following into the shell window:

service httpd start
chkconfig httpd on

To test Apache, bring up a web browser with URL http://localhost. You should
see the Red Hat Enterprise Linux Test Page:
LAMP Quickstart for Red Hat Enterprise Linux 4
Start and Test Apache


Start and Test MySQL
Before starting MySQL, you’ll need to create a MySQL configuration file from one
of the standard ones offered. As root, copy the standard small configuration file
to /etc/my.cnf and add 4 lines to the end of it. Type the following into the terminal
window:

cd /etc
cp /usr/share/doc/mysql-server-4.1.7/my-small.cnf my.cnf
cat >> my.cnf <hit Enter, then paste in next 4 lines>
# For DVD Store full text search
ft_min_word_len = 3
ft_stopword_file =
log=/var/lib/mysql/mysql_query.log
<Enter Ctrl-C>

Next you need to start the MySQL service (called “mysqld”), and set it to always
start when the machine starts. Type the following into the terminal shell:

service mysqld start
chkconfig mysqld on

Now configure user access to the MySQL database. To change root’s password
(replace the final “password” with your root password), give privileges to the webuser, and remove the default anonymous user, type the following into the
terminal shell:

mysqladmin -u root password password
mysql –p

This will prompt you for the password you just entered above, and start the
MySQL monitor. You will need to ensure that you also add access based on
your specific host name as well (i.e. web@localhost.localdomain). Type the
following at the mysql> prompt:

grant all privileges on *.* to web@localhost identified by 'web';
grant all privileges on *.* to web@rhel4es identified by 'web';
delete from mysql.user where User='';
exit

Login as web and test out MySQL:

su – web
mysql –u web –-password=web

This will start the MySQL monitor as the user “web”. Type the following at the mysql> prompt to test it:

show databases;

You should get output that looks something like:

+----------+
| Database |
+----------+
| mysql    |
| test     |
+----------+
2 rows in set (0.00 sec)

Type “exit” to leave the MySQL monitor. Type “exit” again to log out as “web”.
This shows that MySQL has been installed with the initial two databases.

 Start and Test PHP

As root, edit the PHP configuration file to point to the correct host and allow
access to the web user, then restart Apache to read changes. In the terminal
window, type the following:

cd /etc
cp php.ini php.ini.orig
gedit php.ini

Change three lines to read as follows:

mysql.default_host = rhel4es   
mysql.default_user = web
mysql.default_pw = web

Save the document, close the window, then continue typing the following into the
terminal shell window to restart the web server and put the changes you just
made into effect:

service httpd restart

To test PHP, create a test PHP page. Type the following into the terminal
window:

cd /var/www/html
gedit default.php

Add the following to the file:
<html>
 <head>
   <title>PHP Test Page</title>
 </head>
 <body>
   <?php
     echo “<hr />”;
     echo “<p align=center>This is a test of PHP!</p>”;
     echo “<hr />”;
     echo “<p align=center>Copyright &copy; 2005 Dell</p>”;
   ?>
 </body>
</html>

To test, use your browser to access http://localhost/default.php. It should look like
LAMP Quickstart for Red Hat Enterprise Linux 4
Start and Test PHP

Install and Test the DVD Store LAMP Application

Now you are ready to install a full LAMP application, the Dell DVD Store
application. This application has been released by Dell to the open source
community under the GPL license and is available for all to use.
First, download in binary the DVD Store files ds2.tar.gz and ds2_mysql.tar.gz
from http://linux.dell.com/dvdstore to web’s home directory, /home/web. To
accomplish this, type the following from the terminal window:

su – web
wget http://linux.dell.com/dvdstore/ds2.tar.gz

Then expand these “tarballs” with:

tar –xvzf ds2.tar.gz
tar –xvzf ds2_mysql.tar.gz

This will create several directories under /home/web/ds2 with the DVD Store data
files and driver programs, as well as the MySQL build and load scripts. Now, as
root, you will need to create a directory to put the PHP pages:

cd /var/www/html
mkdir ds2
Now, the PHP files need to be copied to the new directory:

cd ds2
cp ~/ds2/mysqlds2/web/php4/* .

Now you are ready to create and test the MySQL DVD Store database. As web:

cd ~/ds2/mysqlds2
sh mysqlds2_create_all_nosp.sh
mysql –u web --password=web

mysql> use DS2;
mysql> show tables;
+---------------+
| Tables_in_DS2 |
+---------------+
| CATEGORIES    |
| CUSTOMERS     |
| CUST_HIST     |
| INVENTORY     |
| ORDERLINES    |
| ORDERS        |
| PRODUCTS      |
| REORDER       |
+---------------+
8 rows in set (0.00 sec)

mysql> select count(*) from CUSTOMERS;
+----------+
| count(*) |
+----------+
| 20000    |
+----------+
1 row in set (0.01 sec)

mysql> exit

This shows that the DVD Store has been installed correctly with 8 tables and
20,000 initial customers.

The DVD Store LAMP stack is ready for testing. With your browser, access
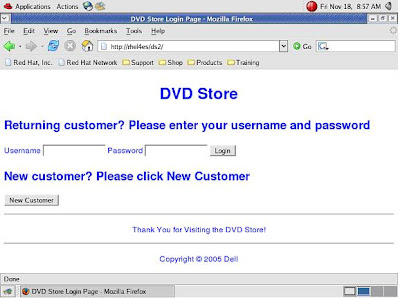
http://rhel4es/ds2. You should see the DVD Store Login page:
LAMP Quickstart for Red Hat Enterprise Linux 4


Login with Username “user2” and password “password”. You should see the
following Welcome screen:
LAMP Quickstart for Red Hat Enterprise Linux 4


Click on “Start Shopping”, search for some DVDs by Title, Actor or Category, add
DVDs to your shopping cart, and finally purchase them using your stored credit
card number.

You now have a working LAMP stack. By basing your application on the MySQL
and PHP code included here, you can jumpstart your own LAMP stack!
Recommended Post Slide out for Blogger


“Keep the visitors glued to your site for long” This is what every blogger out there wants to do. The Recommended Post slide Out Widget does just that. It’s kind of  an invitation to the reader to read a new post once he has read one of your blog entries. You might have seen this kind of a widget on many popular websites like New York Times, Mashable, Times of India etc.

I too loved the idea and found out that some one else had already made a jQuery snippet which does just the same. You can read about this awesome code on Mary Lou’s blog athttp://tympanus.net/codrops/2010/04/13/end-of-page-slide-out-box/ 
This is the modified form of that snippet so that it gets loaded asynchronously without affecting the page load. The Slide out will show random posts from your Blog. The random posts are fetched from your Blog Feed using Ajax. 

Demo of the Slide Out

Scroll down to the bottom of the post and you should see the Recommended Slide Out.
Recommended Post Slide out for Blogger

Add the Recommended Post Slide out Widget

To add the widget to your blog, you can use this one click installer.

Customizing the Recommended Slide out

1. End Of Post marker – The slide comes out when the user scrolls down to a particular point in your Blog.(the bottom of the page by default) To mark this point, you can add an HTML element there. The element should have the id bpslidein_place_holder
e.g.: <div id='bpslidein_place_holder'></div> would do the job. The best place to add this marker would be at the end of the post. If you want to do it easily, you can add this to your Blogger Template.
In your template Find,(You will have to expand the Widget Templates)
<div class='post-footer-line post-footer-line-1'>
or
<p class='post-footer-line post-footer-line-1'>
or
<data:post.body/>
Immediately below any of these, add the following snippet and save our template
<b:if cond='data:blog.pageType == "item"'>
<div style='display:none' id='bpslidein_place_holder'></div>
</b:if>
Now when the reader scrolls down to this div, the slide will open up.
2. Customizing the Look and Feel of the Slide out.
You can obviously style the Recommended Slide out. But before you do that, you have to add this variable definition to your template
<script>var bpslidein_custom_css=true;</script>
This should be added somewhere above the Slide Out Widget. If this variable is not set, a default StyleSheet will be used to spice up the Recommended Slide out.
Once this variable is set to true, you can add your own CSS definitions. You can add your CSS at Template Designer > Advanced Add CSS
This is the default set of Style definitions applied to the Widget. You can modify them and use it.
#bpslidein{z-index:5;width:400px;height:100px;padding:10px;background-color:#fff;border-top:3px solid #1616F5;position:fixed;right:-430px;bottom:0;-moz-box-shadow:-2px 0 5px #aaa;-webkit-box-shadow:-2px 0 5px #aaa;box-shadow:-2px 0 5px #aaa;font-family:Arial, Helvetica, sans-serif;}
#bpslidein p{font-size:11px;text-transform:uppercase;font-family:Arial,Helvetica,sans-serif;letter-spacing:1px;color:#555;}
#bpslidein_title{color:#555;font-weight:700;font-size:16px;margin:10px 20px 10px 0;}
#bpslidein a,#bpslidein a:hover,#bpslidein_title{text-decoration:none;color:#1616F5;}
#bpslidein .close,#bpslidein .expand,#bpslidein .help{border:2px solid #EEE;cursor:pointer;color:#9A9AA1;width:13px;height:15px;padding:2px 0 0 5px;position:absolute;right:10px;font-size:17px;font-weight:700;font-family:Arial, Helvetica, sans-serif;font-size:12px;}
#bpslidein .help{right:35px;}
#bpslidein_title,#bpslidein_image{float:left;width:80px;}
#bpslidein_title{width:290px;}
3. Other Stuff that you can edit
You can edit the Title of the Widget and the Loading text by editing the Widget Content.